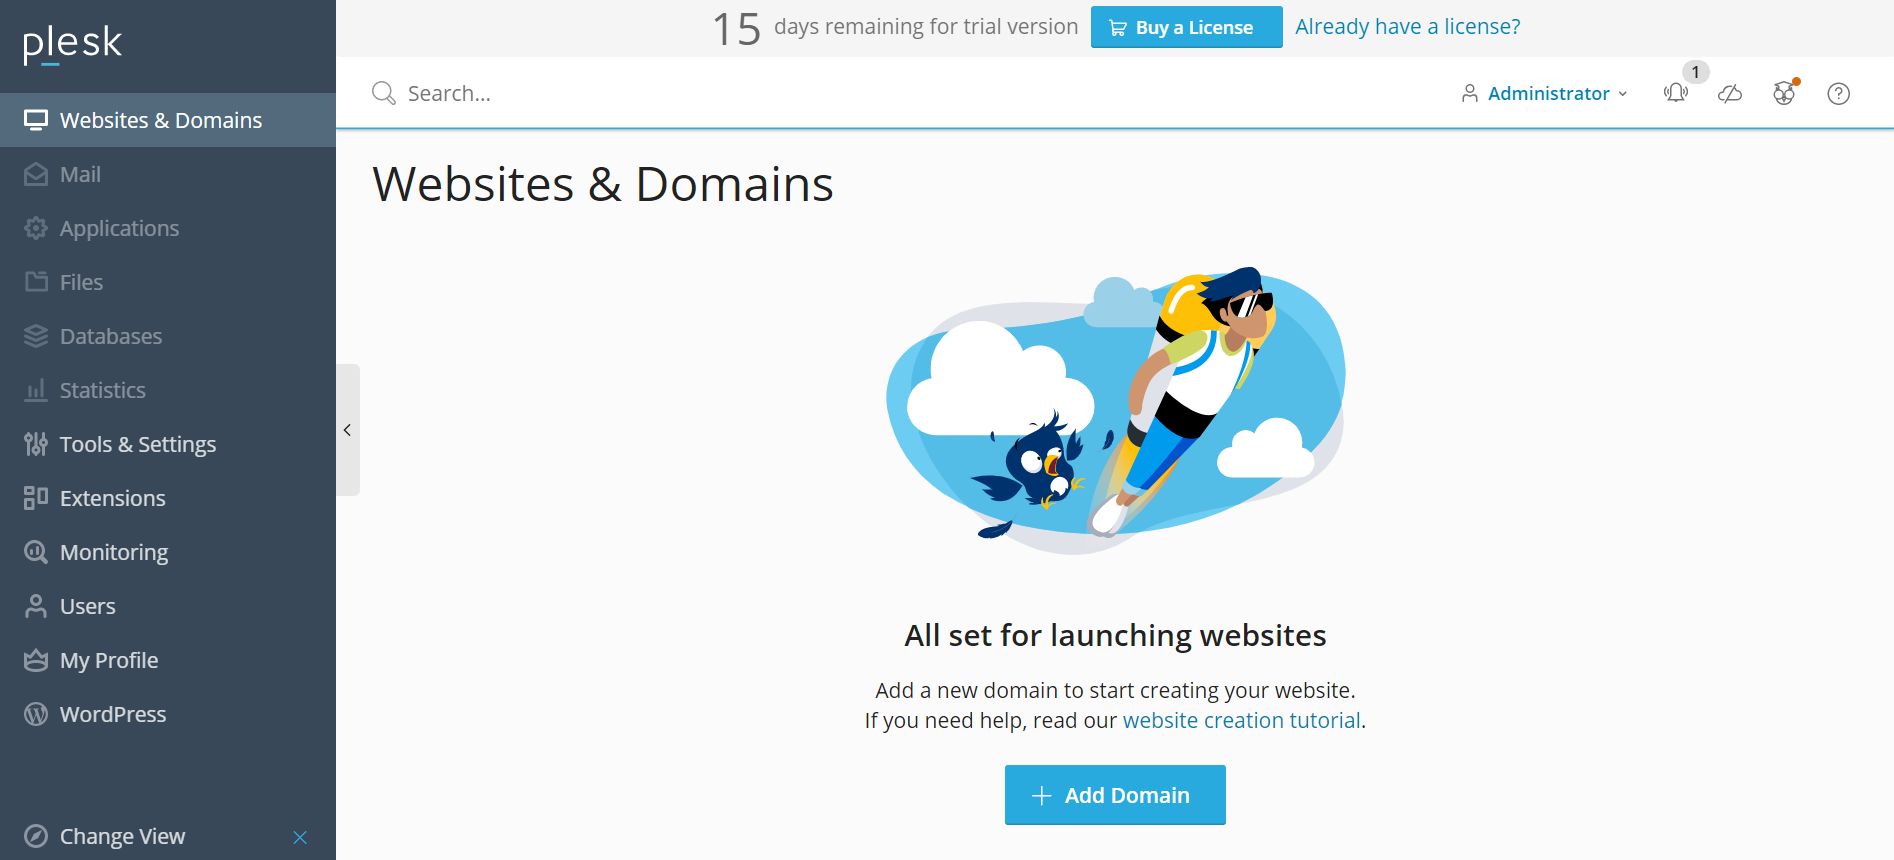
Prerequisites
1. Update Packages
It’s recommended to update system packages first before installing plesk or anything else especially if you have a new OS installed on your server.
apt-get update
2. Allow Firewall Ports
Allow admin port if firewall is on
ufw allow 8880/tcp
ufw allow 8443/tcp


3. Download Plesk Installer
Run this command to download plesk package
wget https://autoinstall.plesk.com/plesk-installer
 In case if you are getting “wget command not found” error. Run this command to install wget
apt-get install wget
4. CHANGE PERMISSION
Change the permission of the installer file before execution by running this command:
chmod 755 plesk-installer
5. Execute Installer
./plesk-installer

Press F, and ENTER

Press F, and ENTER

Press F, and ENTER
After that, it will take some time to install(depending upon your server configuration) usually takes 10-12 minutes.
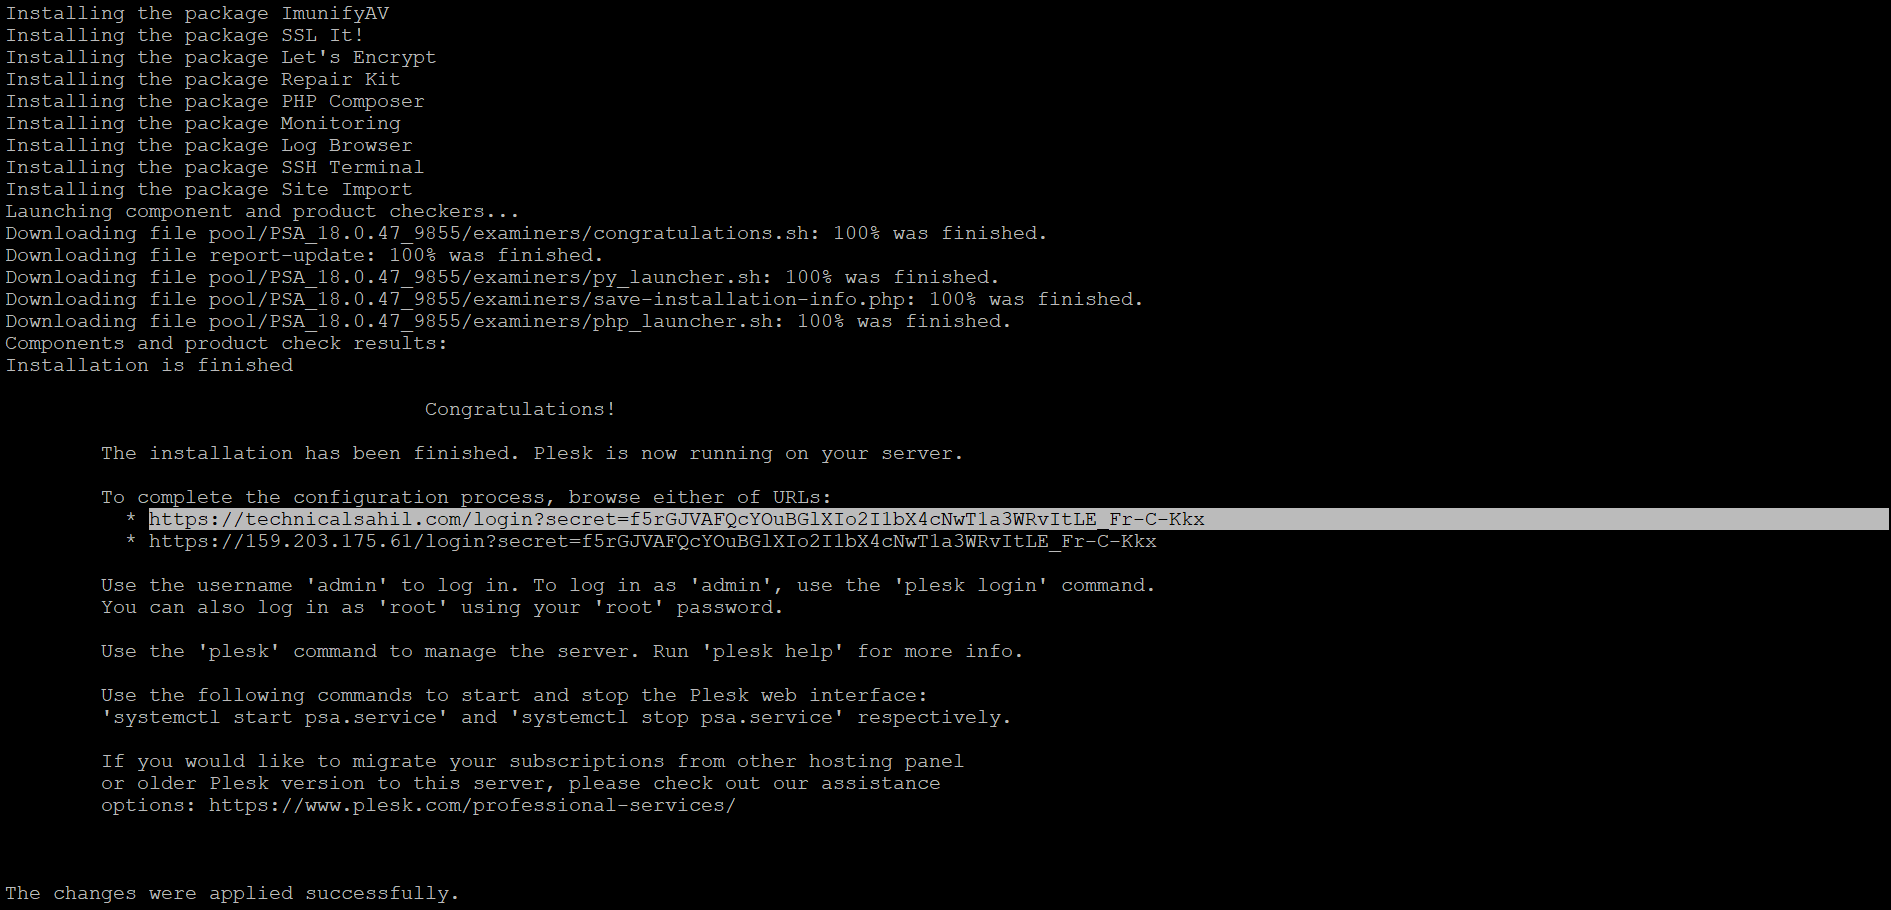
After Installation Completes, Either copy URL from here or type https://Your_Server_IP:8880 or https://Your_Server_IP:8443 in your browser.
Enter Details like Name, Email, Generate Strong Password for admin user.
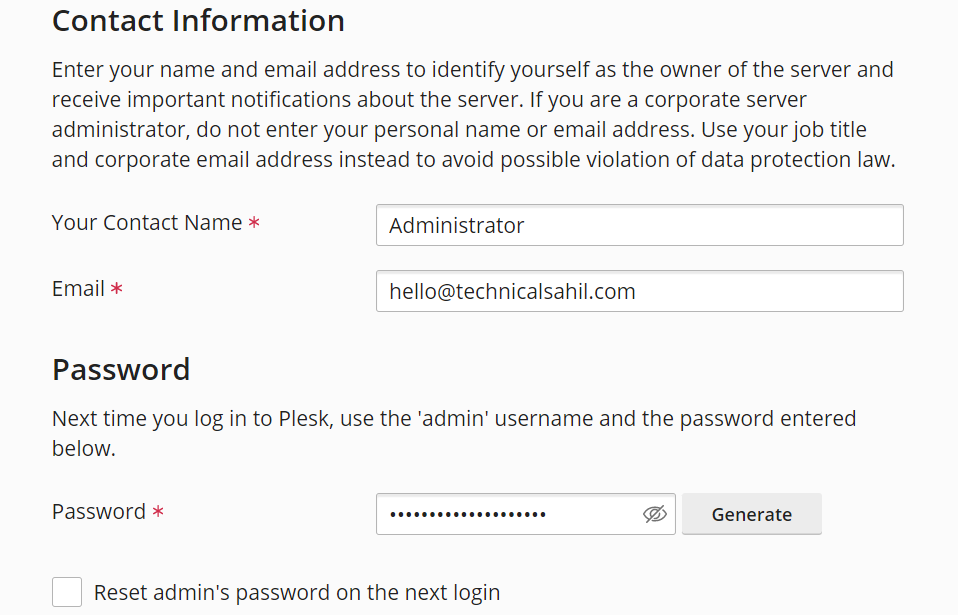
If you already have a license key for Plesk, choose the option ‘Proceed with a paid license’ otherwise Plesk provides 15 days of free trial.


sudo su
add command just in case of this error ERROR: You should have superuser privileges to install
sudo su
The point of view of your article has taught me a lot, and I already know how to improve the paper on gate.oi, thank you. https://www.gate.io/tr/signup/XwNAU
I may need your help. I’ve been doing research on gate io recently, and I’ve tried a lot of different things. Later, I read your article, and I think your way of writing has given me some innovative ideas, thank you very much.
Thank you for your shening. I am worried that I lack creative ideas. It is your enticle that makes me full of hope. Thank you. But, I have a question, can you help me? https://accounts.binance.com/en/register-person?ref=P9L9FQKY
Thank you for your shening. I am worried that I lack creative ideas. It is your enticle that makes me full of hope. Thank you. But, I have a question, can you help me? https://accounts.binance.com/en/register-person?ref=P9L9FQKY
Instagram takipçi satın almak istiyorsanız, kurumsal altyapımızla en güvenli şekilde ucuz beğeni, takipçi hizmetleri ve size özel çözümler üretmekteyiz.
Takipçi Satın Almak artık çok kolay, tek yapmanız gerek profilinizin kullanıcı adını yazmak. Hemen diğer profillerin arasından sıyrılın ve fenomenliğe adımınızı …
Takipçi Satın Almak artık çok kolay, tek yapmanız gerek profilinizin kullanıcı adını yazmak. Hemen diğer profillerin arasından sıyrılın ve fenomenliğe adımınızı …
Instagram takipçi satın al hizmetiyle güvenilir ve faturalı bir şekilde takipçi sayınızı arttırın. Türkiye’nin 1 numaralı servisi.
Instagram takipçi satın almak istiyorsanız, kurumsal altyapımızla en güvenli şekilde ucuz beğeni, takipçi hizmetleri ve size özel çözümler üretmekteyiz.
Takipçi Satın Almak artık çok kolay, tek yapmanız gerek profilinizin kullanıcı adını yazmak. Hemen diğer profillerin arasından sıyrılın ve fenomenliğe adımınızı …
En ucuz Instagram takipçi satın al seçeneği ile hesabınız etkileşimin doruklarına ulaşacaktır. Sosyal medya hesaplarınız için alacağınız paketleri mobil …
Instagram takipçi satın almak istiyorsanız, kurumsal altyapımızla en güvenli şekilde ucuz beğeni, takipçi hizmetleri ve size özel çözümler üretmekteyiz.
SATIN AL. INSTAGRAM PAKETLERİ. 2.500 Düşmeyen Takipçi. 0 Düşme Garantili; Anlık Başlar; Şifreniz İstenmez; 3D Güvenli Ödeme. 189.90₺. SATIN AL.
En ucuz Instagram takipçi satın al seçeneği ile hesabınız etkileşimin doruklarına ulaşacaktır. Sosyal medya hesaplarınız için alacağınız paketleri mobil …
En ucuz Instagram takipçi satın al seçeneği ile hesabınız etkileşimin doruklarına ulaşacaktır. Sosyal medya hesaplarınız için alacağınız paketleri mobil …
En ucuz Instagram takipçi satın al seçeneği ile hesabınız etkileşimin doruklarına ulaşacaktır. Sosyal medya hesaplarınız için alacağınız paketleri mobil …
Instagram takipçi satın al hizmetiyle güvenilir ve faturalı bir şekilde takipçi sayınızı arttırın. Türkiye’nin 1 numaralı servisi.
SATIN AL. INSTAGRAM PAKETLERİ. 2.500 Düşmeyen Takipçi. 0 Düşme Garantili; Anlık Başlar; Şifreniz İstenmez; 3D Güvenli Ödeme. 189.90₺. SATIN AL.
Instagram takipçi satın al hizmetiyle güvenilir ve faturalı bir şekilde takipçi sayınızı arttırın. Türkiye’nin 1 numaralı servisi.
Takipçi Satın Almak artık çok kolay, tek yapmanız gerek profilinizin kullanıcı adını yazmak. Hemen diğer profillerin arasından sıyrılın ve fenomenliğe adımınızı …
Takipçi Satın Almak artık çok kolay, tek yapmanız gerek profilinizin kullanıcı adını yazmak. Hemen diğer profillerin arasından sıyrılın ve fenomenliğe adımınızı …
En ucuz Instagram takipçi satın al seçeneği ile hesabınız etkileşimin doruklarına ulaşacaktır. Sosyal medya hesaplarınız için alacağınız paketleri mobil …
En ucuz Instagram takipçi satın al seçeneği ile hesabınız etkileşimin doruklarına ulaşacaktır. Sosyal medya hesaplarınız için alacağınız paketleri mobil …
Takipçi Satın Almak artık çok kolay, tek yapmanız gerek profilinizin kullanıcı adını yazmak. Hemen diğer profillerin arasından sıyrılın ve fenomenliğe adımınızı …
En ucuz Instagram takipçi satın al seçeneği ile hesabınız etkileşimin doruklarına ulaşacaktır. Sosyal medya hesaplarınız için alacağınız paketleri mobil …
Instagram takipçi satın al hizmetiyle güvenilir ve faturalı bir şekilde takipçi sayınızı arttırın. Türkiye’nin 1 numaralı servisi.
SATIN AL. INSTAGRAM PAKETLERİ. 2.500 Düşmeyen Takipçi. 0 Düşme Garantili; Anlık Başlar; Şifreniz İstenmez; 3D Güvenli Ödeme. 189.90₺. SATIN AL.
Sosyal medyanın gücü artık sizin elinizde! Hemen Siparişinizi Oluşturun ve Yükselişe Geçin. Ömür Boyu Garantili Hizmetler. Anında Teslimat Garantisiyle Popüler Olmaya Adım At!
EFT Havale 3D Ödeme Yöntemleri ile Güvenli Hizmet Profesyonel ve Uygun Fiyatlı Hizmetler. Türkiye Geneli Servis Hizmetlerini Sağlamaktayız. Telafili ve Garantili Hizmetler.
İhtiyacınız olan tek şey, kaç takipçi istediğinizi seçmek, kontrol etmek ve hızlı teslimatı veya anında teslimatı seçmek.
Instagram takipçi satın al hizmetiyle güvenilir ve faturalı bir şekilde takipçi sayınızı arttırın. Türkiye’nin 1 numaralı servisi.
En ucuz Instagram takipçi satın al seçeneği ile hesabınız etkileşimin doruklarına ulaşacaktır. Sosyal medya hesaplarınız için alacağınız paketleri mobil …
Takipci.com.tr: Instagram takipçi satın almak istiyorsanız, kurumsal altyapımızla en güvenli şekilde ucuz beğeni, takipçi hizmetleri ve size özel çözümler üretmekteyiz: gram satın al
Takipci.com.tr: Instagram takipçi satın almak istiyorsanız, kurumsal altyapımızla en güvenli şekilde ucuz beğeni, takipçi hizmetleri ve size özel çözümler üretmekteyiz: takı satın al
Takipci.com.tr: Instagram takipçi satın almak istiyorsanız, kurumsal altyapımızla en güvenli şekilde ucuz beğeni, takipçi hizmetleri ve size özel çözümler üretmekteyiz: takı satın al
Takipci.com.tr: Instagram takipçi satın almak istiyorsanız, kurumsal altyapımızla en güvenli şekilde ucuz beğeni, takipçi hizmetleri ve size özel çözümler üretmekteyiz: gram satın al
Thank you for your shening. I am worried that I lack creative ideas. It is your enticle that makes me full of hope. Thank you. But, I have a question, can you help me? https://accounts.binance.com/en/register?ref=P9L9FQKY
What’s up Dear, are you genuinely visiting this site regularly, if so afterward you will definitely get pleasant experience.
It’s an awesome paragraph in favor of all the online people; they will get advantage from it I am sure.
Hi there! This article couldn’t be written much better!
Looking at this article reminds me of my previous roommate!
He continually kept talking about this. I am going to forward this information to him.
Pretty sure he’ll have a very good read. Thanks for sharing!
Its such as you learn my thoughts! You seem to understand
a lot about this, such as you wrote the ebook in it or something.
I feel that you simply could do with a few % to force the message
house a bit, but instead of that, this is great blog.
An excellent read. I’ll definitely be back.
Howdy! Would you mind if I share your blog with my twitter group? There’s a lot of people that I think would really enjoy your content. Please let me know. Cheers
Your means of describing everything in this paragraph is
genuinely pleasant, all be able to without difficulty be aware of it, Thanks a lot.
Have a look at my blog; calculator with history online
Visit Chit House The Best Restaurant in San Marcos TX 78666
hello there and thank you for your information – I have certainly picked
up anything new from right here. I did however expertise a few
technical issues using this site, as I experienced to reload the web
site many times previous to I could get it
to load properly. I had been wondering if your web hosting
is OK? Not that I’m complaining, but slow loading
instances times will very frequently affect your placement in google and could damage
your quality score if ads and marketing with Adwords. Well I’m adding this RSS to my e-mail
and could look out for much more of your respective
exciting content. Ensure that you update this again very soon.
Aw, this was an exceptionally good post. Taking a few minutes and actual effort to create a great article… but what can I
say… I procrastinate a lot and don’t manage to get
anything done.
It’s truly very difficult in this active life to listen news on Television, therefore I just use the web for that purpose, and obtain the most
recent information.
Wow, amazing weblog structure! How lengthy have you been running a blog for?
you made running a blog glance easy. The total glance
of your website is fantastic, let alone the content material!
It’s an awesome piece of writing for all the internet people;
they will take advantage from it I am sure.
Howdy! This is my first visit to your blog! We are
a collection of volunteers and starting a new initiative in a community
in the same niche. Your blog provided us beneficial information to work
on. You have done a extraordinary job!
Hi, yeah this paragraph is truly good and I have learned lot of things from it regarding blogging.
thanks.
This article will assist the internet users for creating new weblog or even a
blog from start to end.
Excellent article. I certainly love this site.
Keep writing!
Thanks very interesting blog!
Wow, fantastic weblog format! How lengthy have you been running a blog for?
you made blogging look easy. The total glance of your web
site is wonderful, let alone the content material!
Heya i am for the primary time here. I found this board and
I in finding It really helpful & it helped me out a lot.
I am hoping to give one thing again and aid others such as you helped me.
Right here is the right web site for anyone who wants to
understand this topic. You understand a whole lot its almost hard
to argue with you (not that I actually would want to…HaHa).
You definitely put a new spin on a topic that has been discussed for ages.
Wonderful stuff, just wonderful!
I do not even know how I stopped up right here, but I thought this submit
used to be good. I do not know who you might be but definitely you are going to a famous blogger in case you are not already.
Cheers!
Unquestionably believe that that you stated.
Your favourite justification appeared to be at the web the simplest factor to consider of.
I say to you, I certainly get annoyed whilst other people think about concerns that they just don’t understand about.
You managed to hit the nail upon the top and outlined out the whole thing
without having side effect , other people could take
a signal. Will probably be again to get more. Thank you
Thanks for sharing your thoughts about onbet.
Regards
SEO 악성 스팸 백링크 제거 서비스는?
사이트 (블로그) 운영시 급격적인 방문자 수 감소로 인한 잘못된 백링크 (유독한
스팸성 백링크)를 구글의 disavow-links 거부링크 제출을 하실 수 있게 보고서 전달 및 필요시 직접 제출해드릴수 있고,
구글로 부터 받은 패널티를 없애 SEO 순위를 회복시키며
이전에 근접한 사이트 상태로 만들어드리는 복구 서비스입니다.
SEO 악성 스팸 백링크 제거 서비스
Woah! I’m really enjoying the template/theme of this site.
It’s simple, yet effective. A lot of times it’s very difficult to
get that “perfect balance” between superb usability and visual appearance.
I must say you’ve done a superb job with this.
Additionally, the blog loads extremely fast for me
on Safari. Exceptional Blog!
Wonderful learn, I simply handed this onto a colleague who was doing some research on that.
And he truly bought me lunch as a result of I discovered
it for him smile So let me rephrase that: Thanks for
lunch! Anyway, in my language, there arent much good supply
like this.
Very good post. I absolutely love this site. Stick with it!
Hello I am so thrilled I found your weblog, I really found you by accident, while I was
browsing on Bing for something else, Nonetheless I am here now and would just like to say kudos for a fantastic post and a
all round entertaining blog (I also love the theme/design), I don’t have time to go through it all at the moment
but I have saved it and also added in your RSS feeds, so when I have time I
will be back to read a lot more, Please do keep up the great jo.
Pretty portion of content. I just stumbled upon your blog and in accession capital to assert that I get in fact loved account your blog posts.
Anyway I will be subscribing to your feeds and even I fulfillment you access constantly rapidly.
This is a topic which is close to my heart… Many thanks!
Where are your contact details though?
If you want to take a good deal from this post
then you have to apply such methods to your won website.
Hi there friends, its enormous post concerning cultureand fully defined, keep it
up all the time.
I just couldn’t leave your web site before suggesting that I extremely enjoyed the standard information an individual provide for your guests?
Is going to be again incessantly to check up on new posts
Hello! I could have sworn I’ve visited this blog
before but after going through many of the posts I realized it’s new
to me. Nonetheless, I’m definitely delighted I stumbled
upon it and I’ll be book-marking it and checking back
regularly!
I was curious if you ever thought of changing the layout of
your blog? Its very well written; I love what youve got to say.
But maybe you could a little more in the way of content
so people could connect with it better. Youve got an awful
lot of text for only having 1 or two pictures.
Maybe you could space it out better?
Hi, I do think this is an excellent website. I stumbledupon it 😉 I may return yet again since
I bookmarked it. Money and freedom is the best way to
change, may you be rich and continue to guide other people.
I’m not that much of a interneet reader to be honest but your blogs really
nice, keep it up! I’ll go ahead aand bookmark yohr siite
to come back in the future. Many thanks
I am sure this post has touched all the internet visitors, its really really
fastidious piece of writing on building up new weblog.
Wonderful post! We are linking to this great content on our site.
Keep up the good writing.