Mailcow is an open-source mail server suite that provides a user-friendly interface for managing a mail server. It’s built on top of popular mail server components like Postfix, Dovecot, and SOGo, and it includes a web-based administration panel that makes it easier to configure and manage email services.
With Mailcow, you can set up a full-featured mail server that supports SMTP, IMAP, and POP3 protocols, as well as webmail access through SOGo. It also includes features like spam filtering, antivirus scanning, and support for multiple domains and mailboxes.
Mailcow is designed to be easy to install and configure, making it a popular choice for individuals and organizations looking to set up their own mail servers without the need for extensive technical expertise.
>>How to Install PowerMTA on CentOS 7
Benefits of Building Mailcow Mail Server
Building a Mailcow mail server offers several benefits. One of the primary advantages is its ease of use. Mailcow provides a user-friendly web interface that simplifies the management of the mail server. This makes it accessible even to users with limited technical expertise, allowing them to easily configure and manage email services, domains, and mailboxes.
Another significant benefit is the comprehensive feature set that Mailcow offers. It includes all the essential components for a robust mail server, such as SMTP, IMAP, and POP3 protocols, spam filtering, antivirus scanning, and support for multiple domains. Additionally, Mailcow integrates SOGo, a full-featured webmail client, providing users with a seamless email experience.
Security is also a key focus of Mailcow. The suite comes with built-in security features such as SSL/TLS encryption for email transmission, ensuring that your email communication remains private and secure. Furthermore, Mailcow regularly receives updates and patches, helping to protect your mail server against the latest security vulnerabilities.
Scalability is another advantage of using Mailcow. Whether you’re a small business or a large organization, Mailcow can accommodate your needs. It supports the creation of multiple mailboxes and domains, allowing you to expand your email infrastructure as your organization grows.
>>How to Install Postal Mail Server on Ubuntu 20.04
Requirements for Setting up Mailcow Server
To set up a Mailcow server, you need the following prerequisites:
- A domain name to configure DNS records for your mail server and to enable email sending.
- A dedicated server or virtual private server (VPS) with a fresh, minimal installation of Ubuntu or any other Linux distribution that is compatible with Mailcow. The server should have at least 6GB of RAM and sufficient storage capacity based on your anticipated email usage. This includes considering the volume of emails, size of attachments, and the length of time emails will be retained.
- Port 25 must be open, and the server should have an IP address with a good reputation to ensure that emails are delivered directly to the recipient’s primary inbox.
Choosing the right server for your Mailcow installation is crucial for optimal email deliverability and server performance. Here are my recommendations that not only meet the necessary requirements but also come with exciting offers to make your journey more budget-friendly:
- Contabo: Known for their excellent VPS and dedicated server offerings, Contabo is a great choice for hosting your Mailcow server. With their current offer, you can save on the setup fee, making it an economical choice for getting started. Their servers are well-reputed for good IP reputation, which can enhance your email deliverability. Sign up for Contabo and save the setup fee.
- OVH: A global, hyper-scale cloud provider, OVH offers a wide range of robust and secure server options. Their current deal lets you get up to 50% off on selected services, making it a cost-effective choice for small to medium-sized businesses. OVH’s servers are known for their reliability and solid IP reputation. Get started with OVH and enjoy up to 50% off.
- OpenPort25: Specializing in email infrastructure, OpenPort25 provides servers optimized for SMTP with excellent deliverability and support for bulk email sending. Their current promotion offers a discount on their SMTP-optimized servers, making it a great choice for your Mailcow setup. Sign up for OpenPort25 and take advantage of the discount.
Each of these providers offers a solid foundation for your Mailcow server. Remember, a good server provider with a reputable IP is key to ensuring your emails land straight in the primary inbox. So, take advantage of these offers and set up your Mailcow server today!
The above are affiliate links. If you click through and make a purchase, I may receive a commission at no additional cost to you. I only recommend products I trust and would use myself.
>>How to Install iRedMail on Ubuntu 20.04
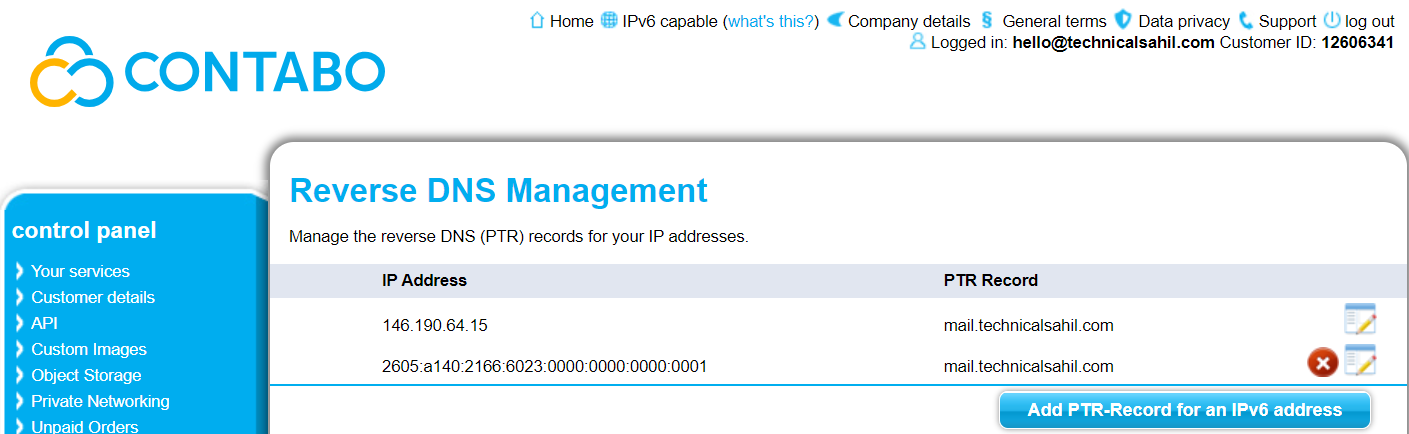
Manage Reverse DNS
To update your Reverse DNS (rDNS), begin by accessing your server provider’s control panel with your login credentials. Locate the server for which you wish to configure the Reverse DNS. Navigate to the section labeled ‘Network’ or ‘DNS’ settings. Here, you should find an option to modify your Reverse DNS. Enter the desired hostname that corresponds to your server’s IP address, making sure that this hostname resolves back to the server’s IP address in your DNS records. After inputting the hostname, save your modifications. Keep in mind that the propagation of these changes across the internet might take some time.
Add DNS Records
To update your DNS records, first, log into your account with your domain registrar. From the sidebar, select ‘Domain List’ and then click on the ‘Manage’ button next to your domain name. Proceed to the ‘Advanced DNS’ tab, where you’ll find options to manage DNS records. To add a new A record, click on the ‘Add New Record’ button. Choose ‘A Record’ from the dropdown menu, and enter your hostname in the ‘Host’ field and your server’s IP address in the ‘Value’ field. After completing these steps, click on the green checkmark to confirm your changes. Keep in mind that it may take some time for DNS changes to propagate globally.

| Type | Host | Value |
|---|---|---|
| A | Your Server’s IP address | |
| CNAME | autodiscover | mail.yourdomain.extension |
| CNAME | autoconfig | mail.yourdomain.extension |
Update MX Record
To update your MX record, start by logging into your domain registrar’s account. Navigate to the ‘Domain List’ from the sidebar and click on the ‘Manage’ button next to your domain name. Then, head over to the ‘Advanced DNS’ tab, where you will see options for managing DNS records. To add a new MX record, click on the ‘Add New Record’ button. Select ‘MX Record’ from the dropdown menu, and enter ‘@’ in the ‘Host’ field and ‘mail.yourdomain.extension’ in the ‘Value’ field. Set the priority to ’10’ in the ‘Priority’ field. Once you’ve completed these steps, click on the green checkmark to save your changes. Remember, DNS changes may take some time to propagate worldwide.
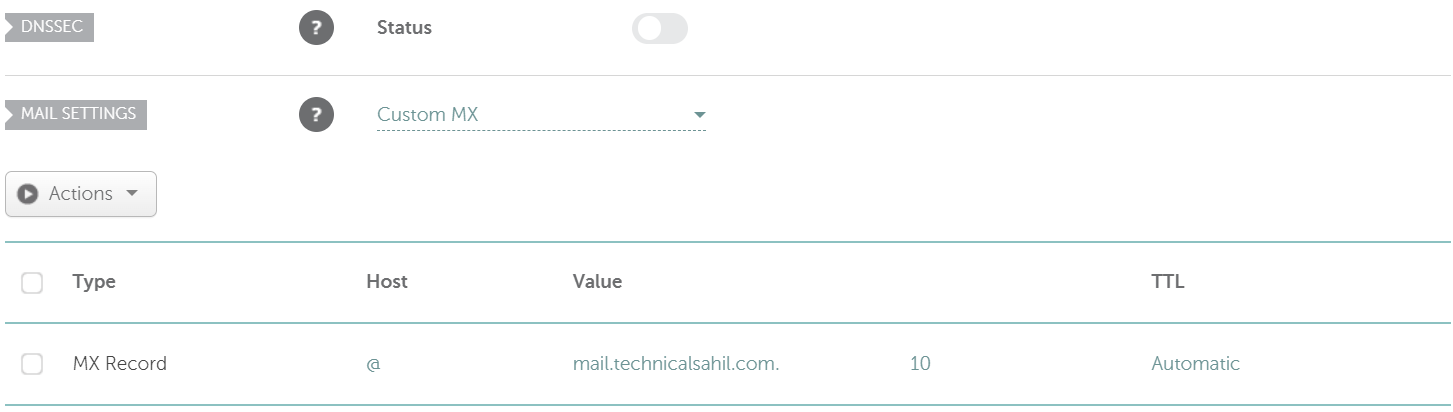
| Type | Host | Value | Priority |
|---|---|---|---|
| MX | @ | mail.yourdomain.extension | 10 |
Change Hostname
To ensure that your server is properly identified on the network, it’s important to set its hostname to a Fully Qualified Domain Name (FQDN) that accurately reflects your domain structure. You can check the current hostname of your server using the following command:
hostname -f
This command displays the current FQDN of your server. If the displayed hostname does not match your desired domain name, you need to update it using the following syntax:
hostnamectl set-hostname yourhostname.yourdomain.extension
Replace ‘yourhostname.yourdomain.extension’ with the desired FQDN for your server. For example, in my setup, I used the following command to set the hostname to mail.technicalsahil.com:
hostnamectl set-hostname mail.technicalsahil.com
Administrative rights (typically root access) are required to modify the hostname. If your server does not have root access by default (e.g., servers from OVHcloud, AWS, etc.), you will need to enable root access before proceeding.
>>How to Enable Root Access on Ubuntu?
After updating the hostname, you can run the ‘hostname -f’ command again to verify that your changes have been successfully applied.
Update System Packages
To keep your system secure and up-to-date, it’s essential to update the package list and upgrade the installed packages. Execute the following command in your terminal to update your system packages:
apt-get update -y
This command refreshes the list of available packages and their versions from the configured repositories. The ‘-y’ option automatically confirms the action, streamlining the update process. This step is crucial for ensuring that your system has the latest information about package updates before proceeding with any installations or upgrades.
Install Dependencies
Before proceeding with the Mailcow Dockerized setup, certain dependencies need to be installed. Run the following command to install the necessary packages:
apt-get install ca-certificates curl gnupg -y
This command installs:
- ca-certificates: A package containing common Certificate Authority (CA) certificates, used by applications to establish secure SSL/TLS connections.
- curl: A command-line tool for transferring data with URLs, supporting various protocols including HTTP, HTTPS, FTP, and more.
- gnupg (GNU Privacy Guard): A tool for secure communication and data storage, commonly used for encrypting and signing data and communications.
Create New Directory
To create a new directory named keyrings with permissions set to 755 inside the /etc/apt directory, execute this command:
sudo install -m 0755 -d /etc/apt/keyrings
This command uses ‘sudo’ to ensure superuser privileges, necessary for creating directories in system-wide locations. The install command, coupled with the ‘-m 0755’ option, sets the directory permissions so that the owner has read, write, and execute permissions, while others have read and execute permissions only. The -d option specifies that a directory is to be created. The ‘/etc/apt/keyrings’ directory is commonly used to store trusted keys for package repositories, assisting the APT package manager in verifying the authenticity of installed packages.
Download GPG Key
To securely download and install the GPG key for the Docker repository into the system’s APT keyring, use this command:
curl -fsSL https://download.docker.com/linux/ubuntu/gpg | sudo gpg --dearmor -o /etc/apt/keyrings/docker.gpg
This command ensures that the Docker repository’s GPG key is properly installed in the system’s APT keyring, enabling the secure installation of Docker packages from the official repository. It allows APT to verify the authenticity of packages downloaded from the Docker repository.
Modify GPG Permission
To modify the permissions of the Docker GPG key file and ensure that it is readable by all users, execute this command:
sudo chmod a+r /etc/apt/keyrings/docker.gpg
This command is necessary to allow the APT package manager to access and use the key for verifying the authenticity of packages from the Docker repository. After running this command, the Docker GPG key file will be readable by all users on the system, allowing the APT package manager to verify the signatures of Docker packages.
Add Docker to Package Manager
To enable the APT package manager to access and install packages from the Docker repository, run this command:
echo \
"deb [arch=$(dpkg --print-architecture) signed-by=/etc/apt/keyrings/docker.gpg] https://download.docker.com/linux/ubuntu \
$(. /etc/os-release && echo "$VERSION_CODENAME") stable" | \
sudo tee /etc/apt/sources.list.d/docker.list > /dev/null
After executing this command, the Docker repository will be added to the system’s APT sources list, facilitating the installation of Docker packages from this repository.
Update System Packages Again
Following the addition of the Docker repository to the APT sources list, it is imperative to update the package cache once more. Run this command:
apt-get update -y
When you add a new repository to the APT sources list, the package manager needs to update its local cache of available packages and their versions. This cache is used by APT to determine which packages are available for installation or upgrade. Running ‘apt-get update -y’ ensures that the package manager retrieves the latest information about the packages available in the newly added Docker repository, as well as any other repositories configured on the system.
By updating the package cache, you ensure that when you attempt to install Docker or any other package, the APT package manager can find the latest versions of the packages and their dependencies. Without running ‘apt-get update -y’ after adding a new repository, the package manager might not be aware of the packages available in that repository, leading to errors or the installation of outdated versions.
Install Docker Components
To install the core components of Docker, including Docker Engine, Docker CLI, containerd, Docker Buildx plugin, and Docker Compose plugin, execute this command:
sudo apt-get install docker-ce docker-ce-cli containerd.io docker-buildx-plugin docker-compose-plugin
- docker-ce is the package for Docker Engine – Community Edition, which is the core Docker application responsible for creating and managing Docker containers.
- docker-ce-cli is the package for the Docker command-line interface (CLI), which provides the docker command used to interact with Docker Engine.
- containerd.io is the package for containerd, an industry-standard container runtime used by Docker Engine.
- docker-buildx-plugin is the package for the Docker Buildx plugin, which extends the Docker CLI with features for building multi-architecture images, among other capabilities.
- docker-compose-plugin is the package for the Docker Compose plugin, which integrates Docker Compose functionality directly into the Docker CLI, allowing you to use docker compose commands.

After running this command, Docker Engine and the specified components will be installed on your system, enabling you to create and manage Docker containers and use Docker Compose for defining and running multi-container Docker applications.
Test Docker Installation
To verify the correct installation of Docker and ensure that Docker Engine is functioning properly, run this test command:
sudo docker run hello-world
After executing this command, Docker will start a container that outputs a “Hello, World!” message along with additional information about your Docker installation. The output will be displayed in the terminal.
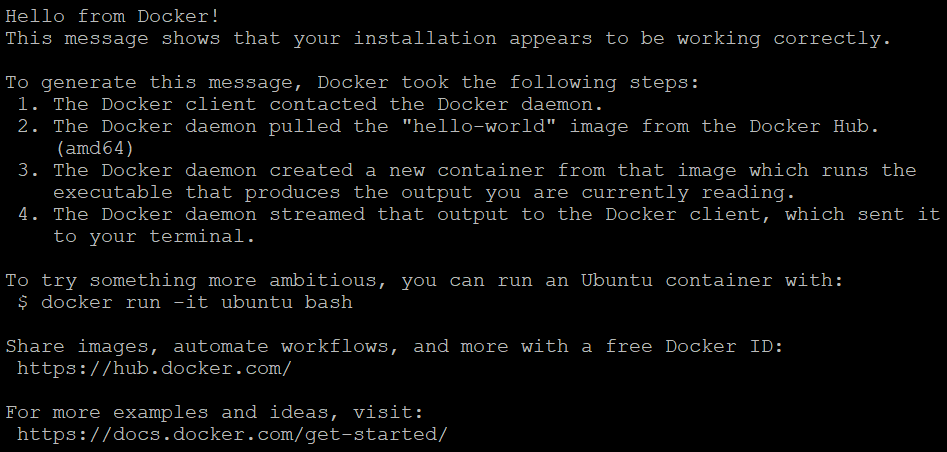
If you see the “Hello, World!” message and the additional information, it indicates that Docker is operating correctly on your system.
Install Docker Compose
To download a specific version of Docker Compose and save it to a designated location on your system, use this command:
curl -SL https://github.com/docker/compose/releases/download/v2.23.3/docker-compose-linux-x86_64 -o /usr/local/bin/docker-compose
After running this command, the Docker Compose binary will be downloaded and saved as /usr/local/bin/docker-compose on your system, allowing you to use the docker-compose command to define and run multi-container Docker applications.
Then, grant execute permissions to the Docker Compose binary file to allow it to be run as an executable program:
sudo chmod +x /usr/local/bin/docker-compose
After executing this command, the Docker Compose binary file will have execute permissions, enabling you to run Docker Compose commands using docker-compose from the command line.
Check Docker Compose
To display the version of Docker Compose currently installed on your system, run this command:
docker-compose --version
After running this command, the terminal will output the version of Docker Compose that is installed.
![]()
This information is useful for confirming the successful installation of Docker Compose, troubleshooting issues, and ensuring compatibility with Docker applications.
Installing Git
To install the Git version control system on your system using the APT package manager, execute this command:
apt-get install git -y
After running this command, the Git version control system will be installed on your system, allowing you to use Git for version control of your projects, including cloning repositories, committing changes, and collaborating with others.
Clone Mailcow Repository
To clone the Mailcow Dockerized repository from GitHub, first, change the current working directory to /opt by running this command:
cd /opt
This command changes the shell’s current working directory to the /opt directory, which is commonly used for installing and storing third-party application software.
Then, execute the following command to clone the Mailcow Dockerized repository:
git clone https://github.com/mailcow/mailcow-dockerized
This command uses Git to clone the Mailcow Dockerized repository from its GitHub URL into a new directory called mailcow-dockerized in the current working directory. This creates a local copy of the Mailcow Dockerized project, which is a mail server suite based on Docker.
After cloning the repository, change the current working directory to the mailcow-dockerized directory:
cd mailcow-dockerized
This command changes the shell’s current working directory to the mailcow-dockerized directory, which was created by the previous git clone command. This allows you to navigate into the project directory to perform further actions.
Generate Config File
To set up Mailcow Dockerized, you need to generate a configuration file that specifies the parameters of your mail server. This is accomplished by running the following command in the terminal:
./generate_config.sh
This command initiates the shell script, which is an integral part of the Mailcow Dockerized project. The script guides you through a series of prompts to configure your mail server.
The first prompt asks for the Fully Qualified Domain Name (FQDN) of your server. You should provide your server’s hostname combined with your domain name in the format yourhostname.yourdomain.extension. For example, in my case, it’s mail.technicalsahil.com.

Next, you will be asked to select the Mailcow branch you wish to use. It is recommended by Mailcow to always choose the stable branch for reliability and stability.

If your server’s IP address is clean (not blacklisted), you will see a confirmation message on your terminal screen indicating that your IP is suitable for use with Mailcow.
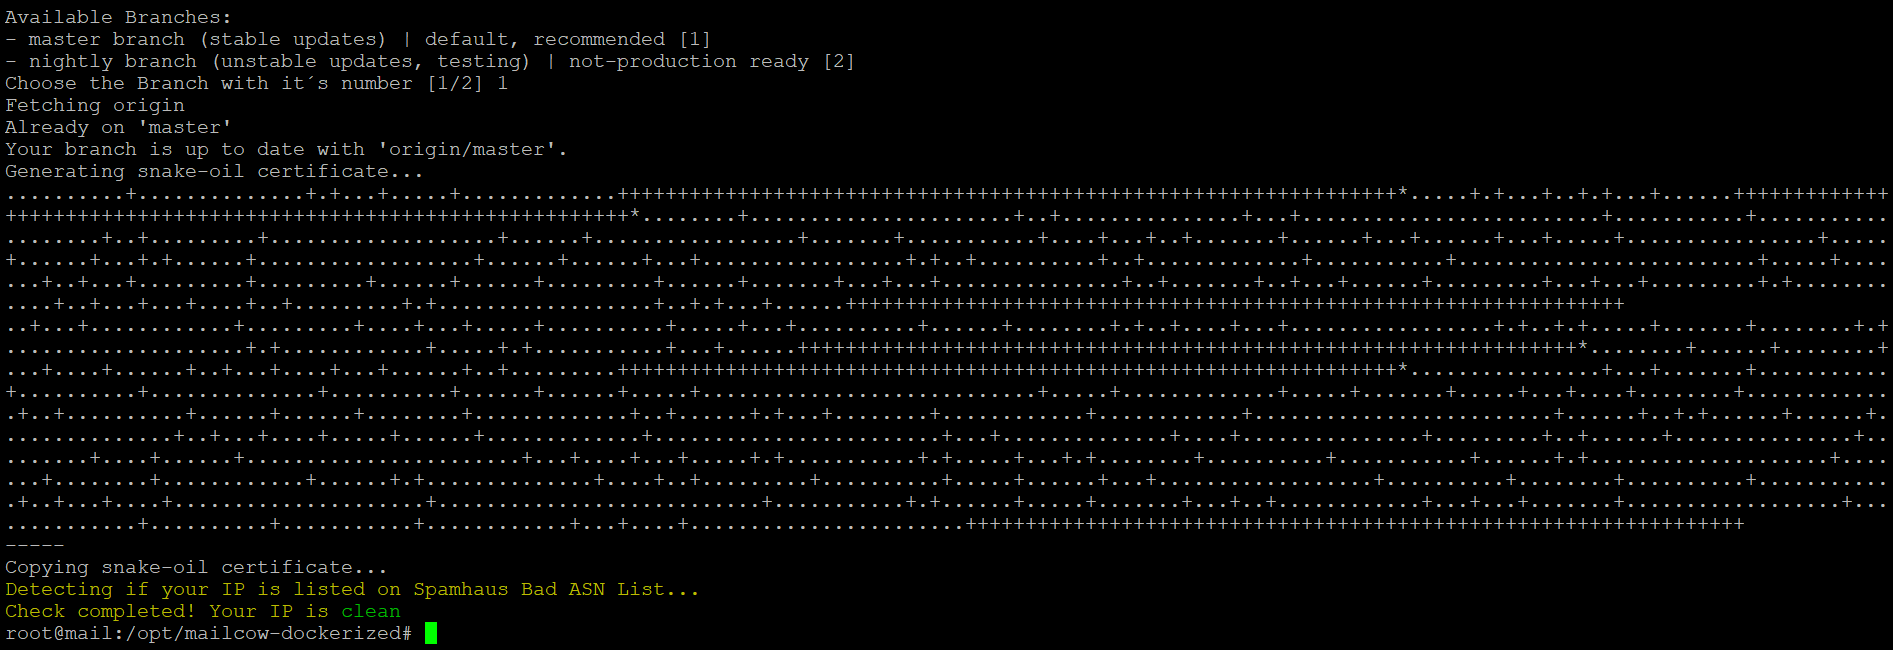
Ensuring your server has a clean IP address is crucial for maintaining a reputable online presence and ensuring uninterrupted services. A clean IP means that the address is not listed on any blacklists and is free from any associations with spam or malicious activities. This is especially important for services such as email hosting, where a blacklisted IP can result in your emails being marked as spam or not delivered at all.
To verify the cleanliness of your server’s IP address, you can use various online tools that check against multiple blacklists. If your server’s IP is clean, you should see a positive output indicating no blacklist entries.
>>Check IP is blacklisted or not
If you are in need of a server with a clean IP, there are several reputable providers to consider. Below is a table of recommended server providers:
| Providers | Offers | |
|---|---|---|
| Contabo | Contabo offers a range of affordable and scalable VPS and dedicated server solutions, known for their reliability and excellent performance. | No Setup Fee |
| OVH | OVH is a global provider known for its extensive range of cloud and dedicated server options, offering robust infrastructure and security features. | Up to 50% off |
| OpenPort25 | Specializing in email server solutions, OpenPort25 provides servers optimized for email marketing and delivery with a focus on high deliverability rates. | Get 40% off |
| Time4VPS | Time4VPS offers a variety of VPS hosting solutions with a focus on affordability and reliability, suitable for both personal and business use. | Avail 75% off |
| Hetzner | Hetzner is known for its high-performance dedicated and cloud servers, offering a range of hosting services with a strong emphasis on data privacy and security. | €20 Free Credits |
Pull Docker Compose Images
After successfully generating the configuration file for Mailcow Dockerized, the next step is to download the latest versions of the Docker images specified in the docker-compose.yml file. This is achieved by executing the following command:
docker-compose pull
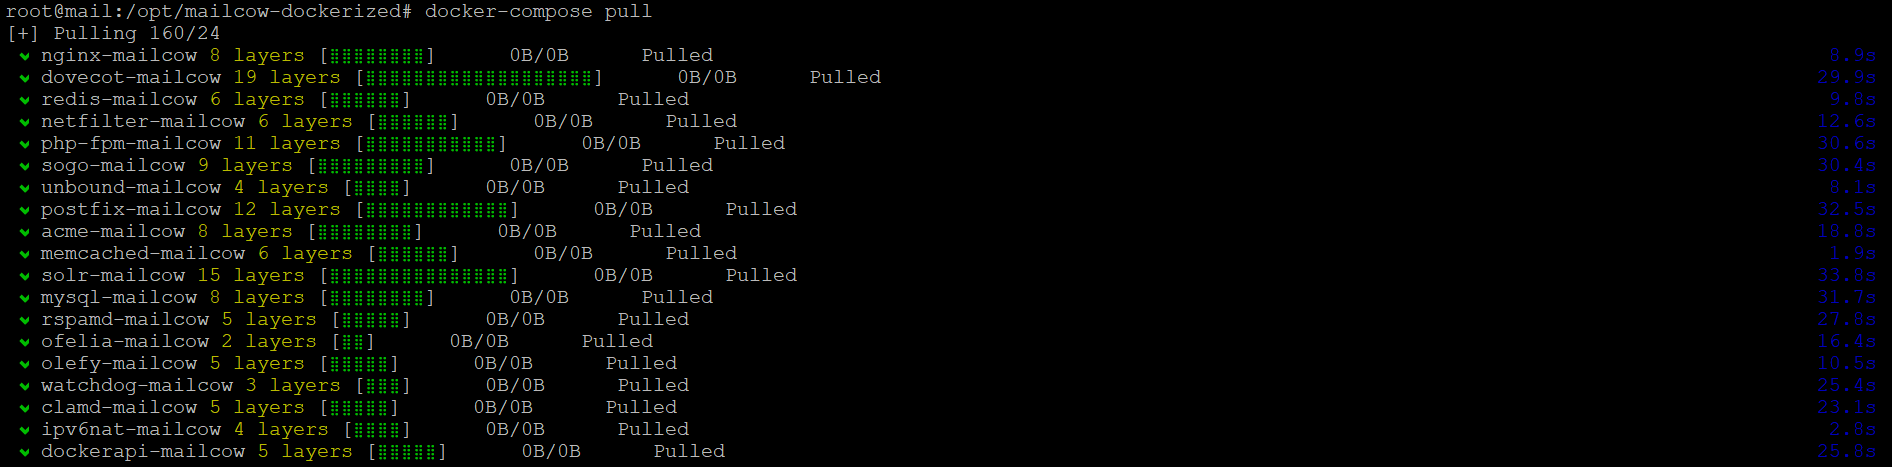
This command instructs Docker Compose to connect to Docker Hub (or another specified Docker registry) and download the most recent versions of all the images required by Mailcow Dockerized. By doing so, you ensure that your mail server is equipped with the latest and most secure versions of the software components.
Start Mailcow Dockerized Services
Once the latest Docker images have been downloaded, you can start the Mailcow Dockerized services in the background using this command:
docker-compose up -d
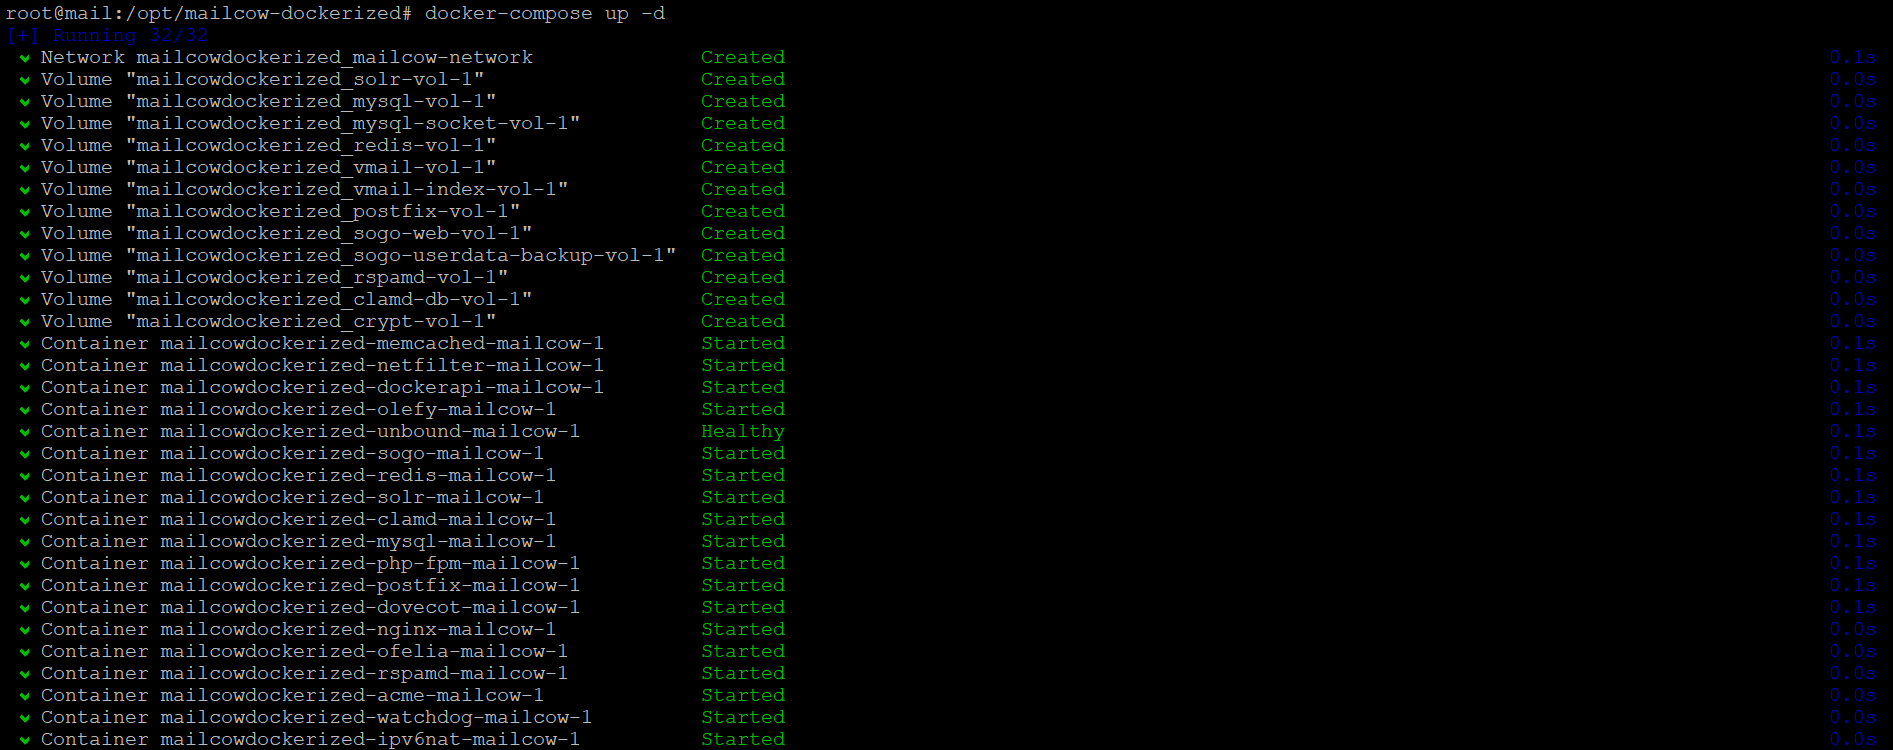
This command brings the Mailcow Dockerized mail server online and makes it operational. The services will run in the background, allowing you to continue using the terminal for other tasks. You can now access the Mailcow administration interface through a web browser by navigating to the server’s hostname or IP address.
Configure Firewall & Allowing Ports
With the Mailcow Dockerized services up and running, it is crucial to check and configure the status of the Uncomplicated Firewall (UFW) on your server:
service ufw status

This command checks the status of the UFW service on your server, indicating whether it is active (enabled) or inactive (disabled). If UFW is active, it will also display the current firewall rules in effect.
To ensure that Mailcow Dockerized and other email-related services can function properly, you need to configure UFW to allow incoming TCP traffic on specific ports. Execute the following command to allow traffic on these ports:
sudo ufw allow 25,80,443,110,143,465,587,993,995/tcp

Here’s a breakdown of what each port is typically used for:
- 25: SMTP (Simple Mail Transfer Protocol) for sending emails.
- 80: HTTP for web traffic (used for the Mailcow UI and webmail).
- 443: HTTPS for secure web traffic (used for the Mailcow UI and webmail).
- 110: POP3 (Post Office Protocol version 3) for receiving emails.
- 143: IMAP (Internet Message Access Protocol) for receiving emails.
- 465: SMTPS (SMTP over SSL/TLS) for sending emails securely.
- 587: Submission port for sending emails (alternative to port 25).
- 993: IMAPS (IMAP over SSL/TLS) for receiving emails securely.
- 995: POP3S (POP3 over SSL/TLS) for receiving emails securely.
By executing this command, you ensure that the necessary ports are open for Mailcow Dockerized to operate effectively and that your server’s firewall is correctly configured to allow traffic for essential email services.
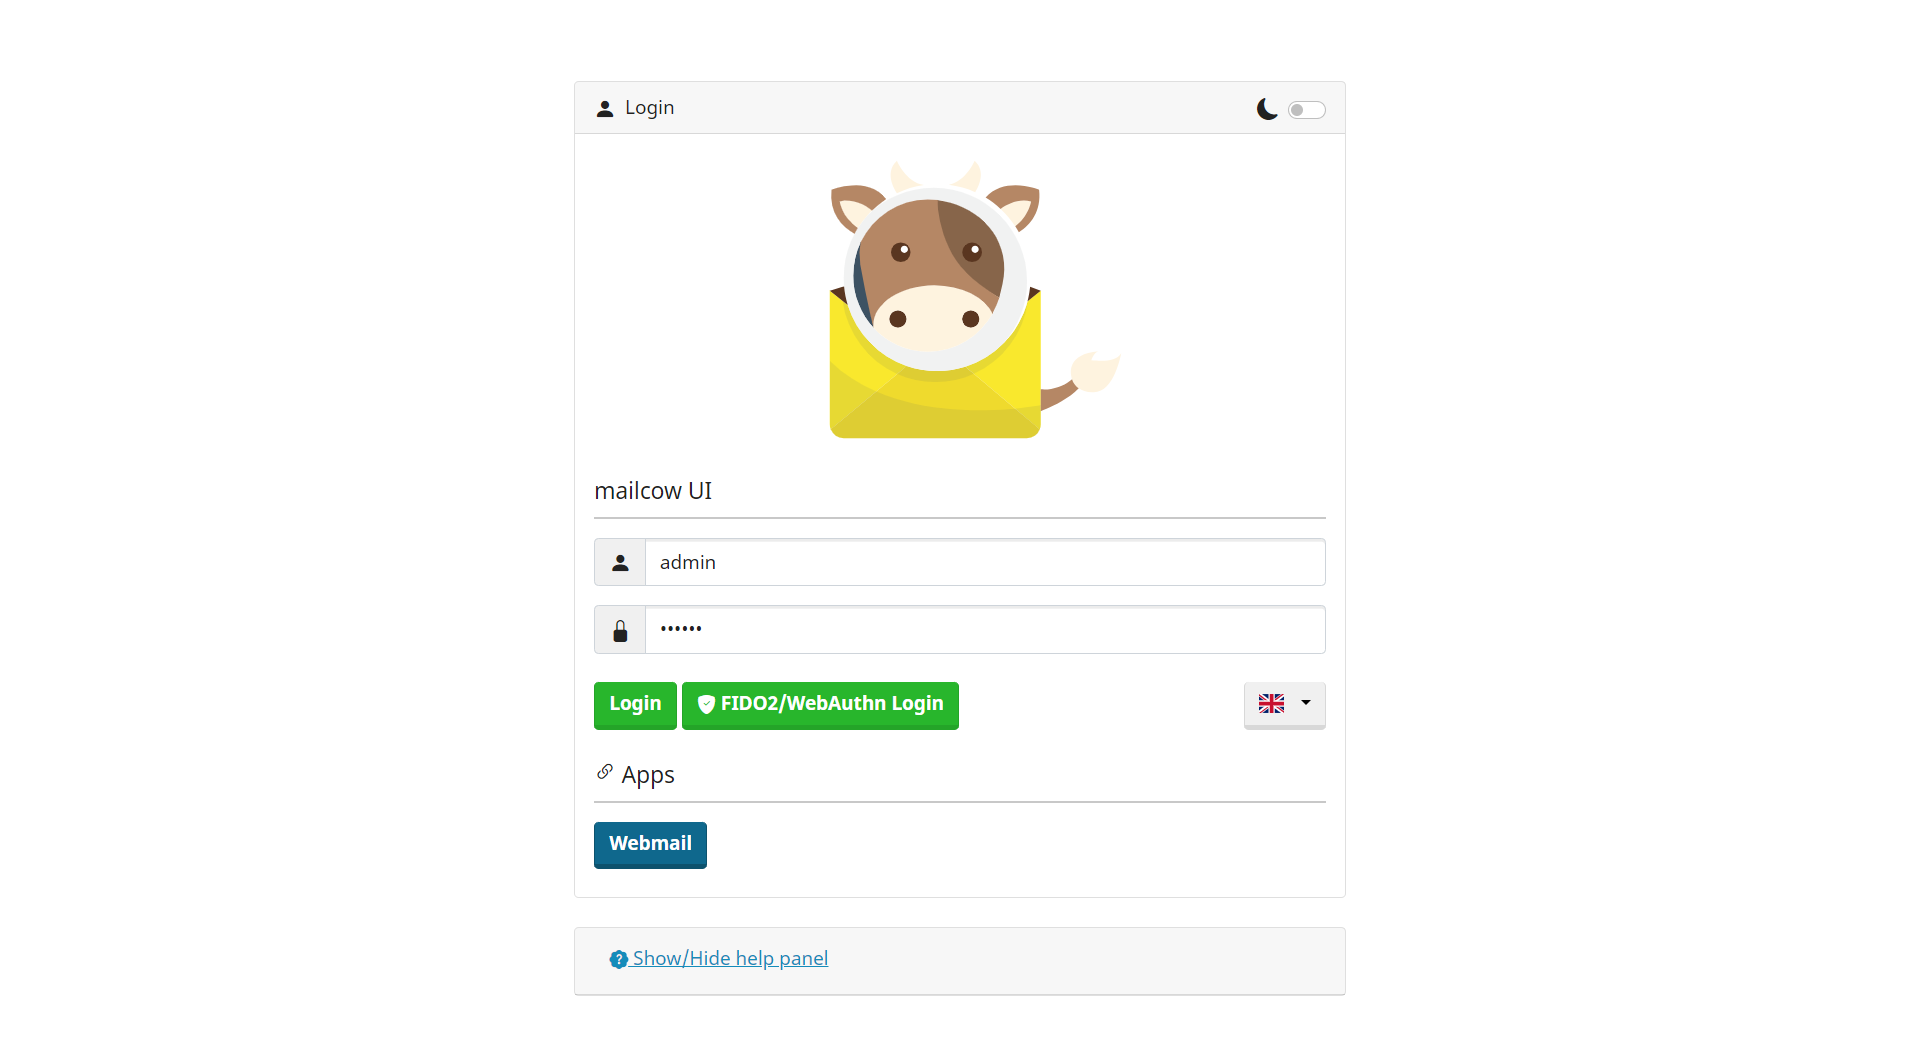
Access Mailcow Administration Interface
After successfully setting up Mailcow Dockerized, you can access the administration interface through your web browser. Navigate to your server’s Fully Qualified Domain Name (FQDN), such as https://yourhostname.yourdomain.extension, where you’ll be greeted with the Mailcow login screen. Initially, you’ll use the default credentials, which are typically ‘admin’ for the username and ‘moohoo’ for the password. For security reasons, it’s imperative to change these credentials immediately after your first login.
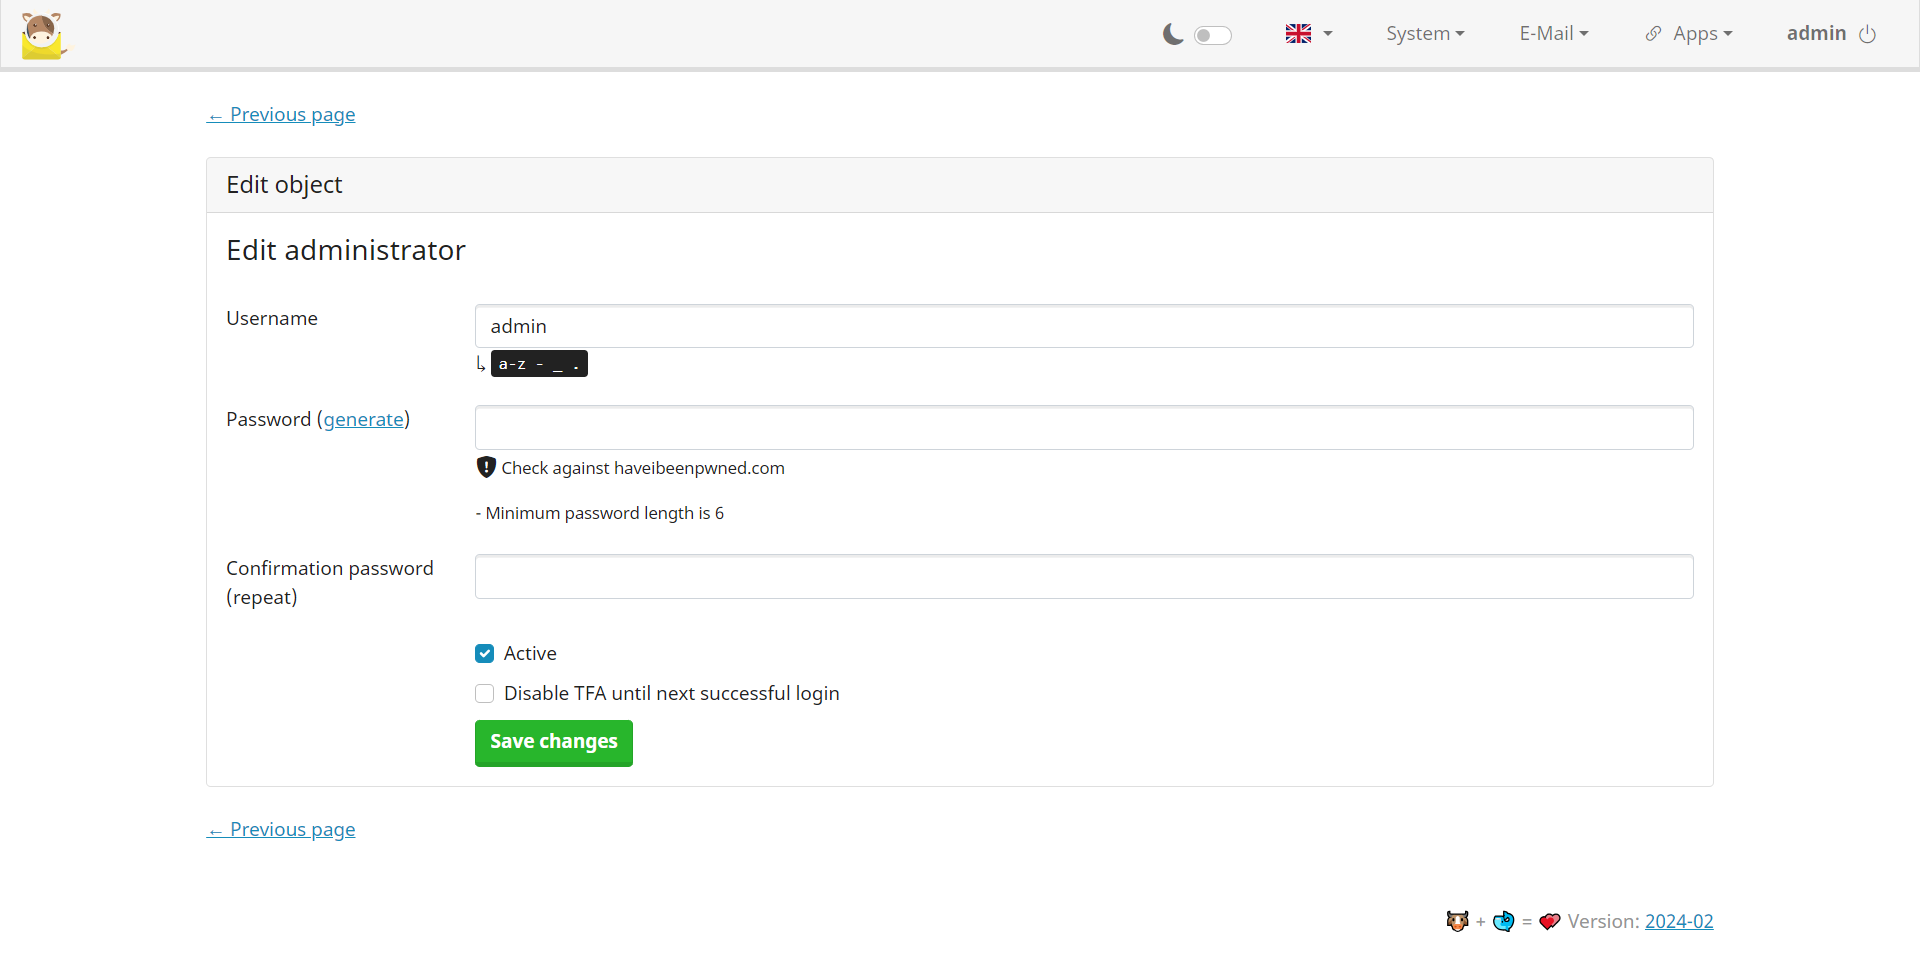
Change Admin Credentials
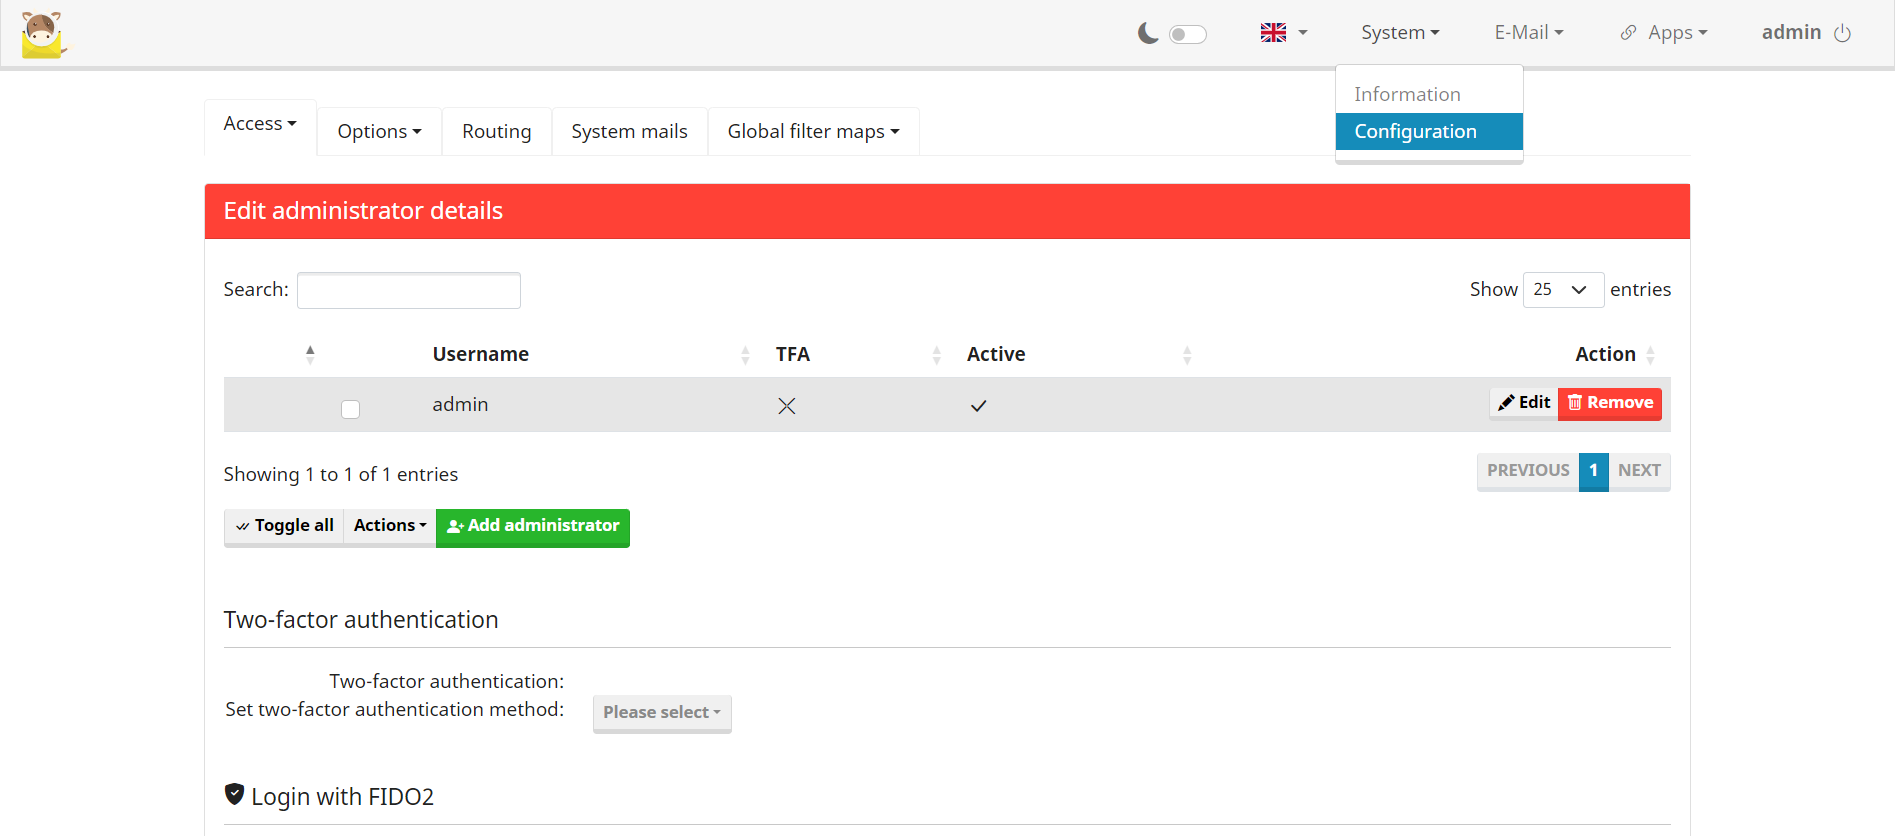
To change the admin credentials, log in to the Mailcow admin interface using the default credentials. Once logged in, navigate to the Configuration tab and select Mail Setup. Under the Mailbox section, find the admin user and click on the edit icon. In the edit user dialog, enter a new password in the Password and Repeat Password fields, then click Save Changes to update the admin password.
Adding Domain
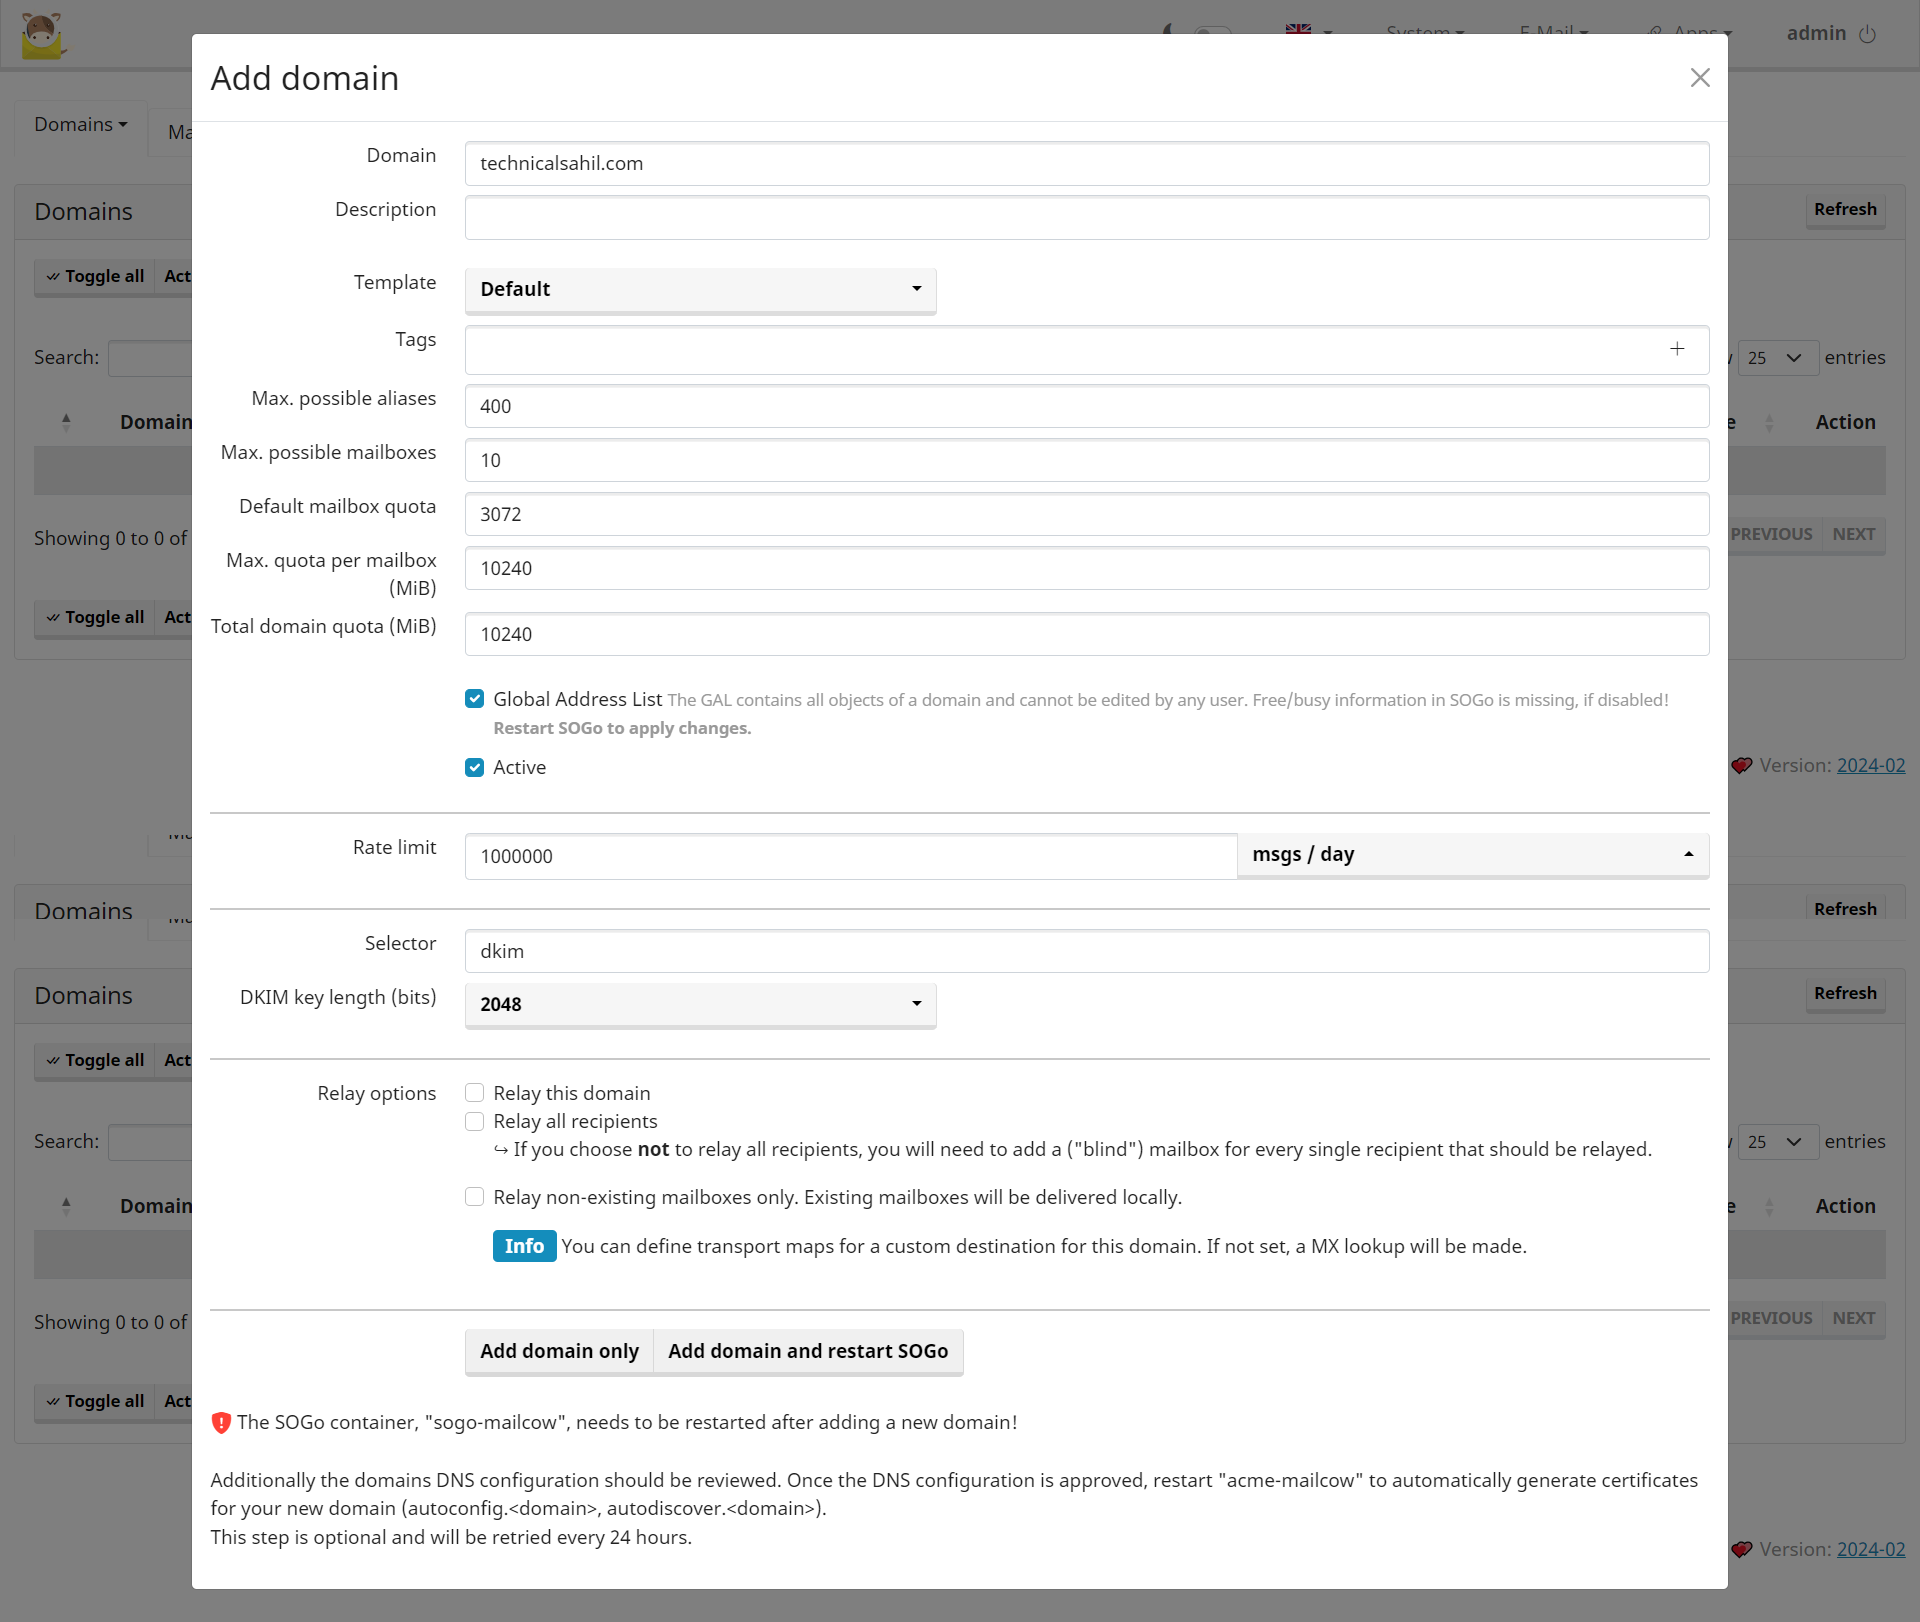
To add your domain, such as yourdomain.extension, to Mailcow, navigate to the Configuration tab and select Mail Setup within the Mailcow admin interface. Under the Domains section, click on the Add domain button. Enter your domain name in the Domain field. You can also configure additional settings such as Description, Backup MX, Relay, and Quota according to your requirements. Click Add domain to save the configuration.

Adding Mailbox
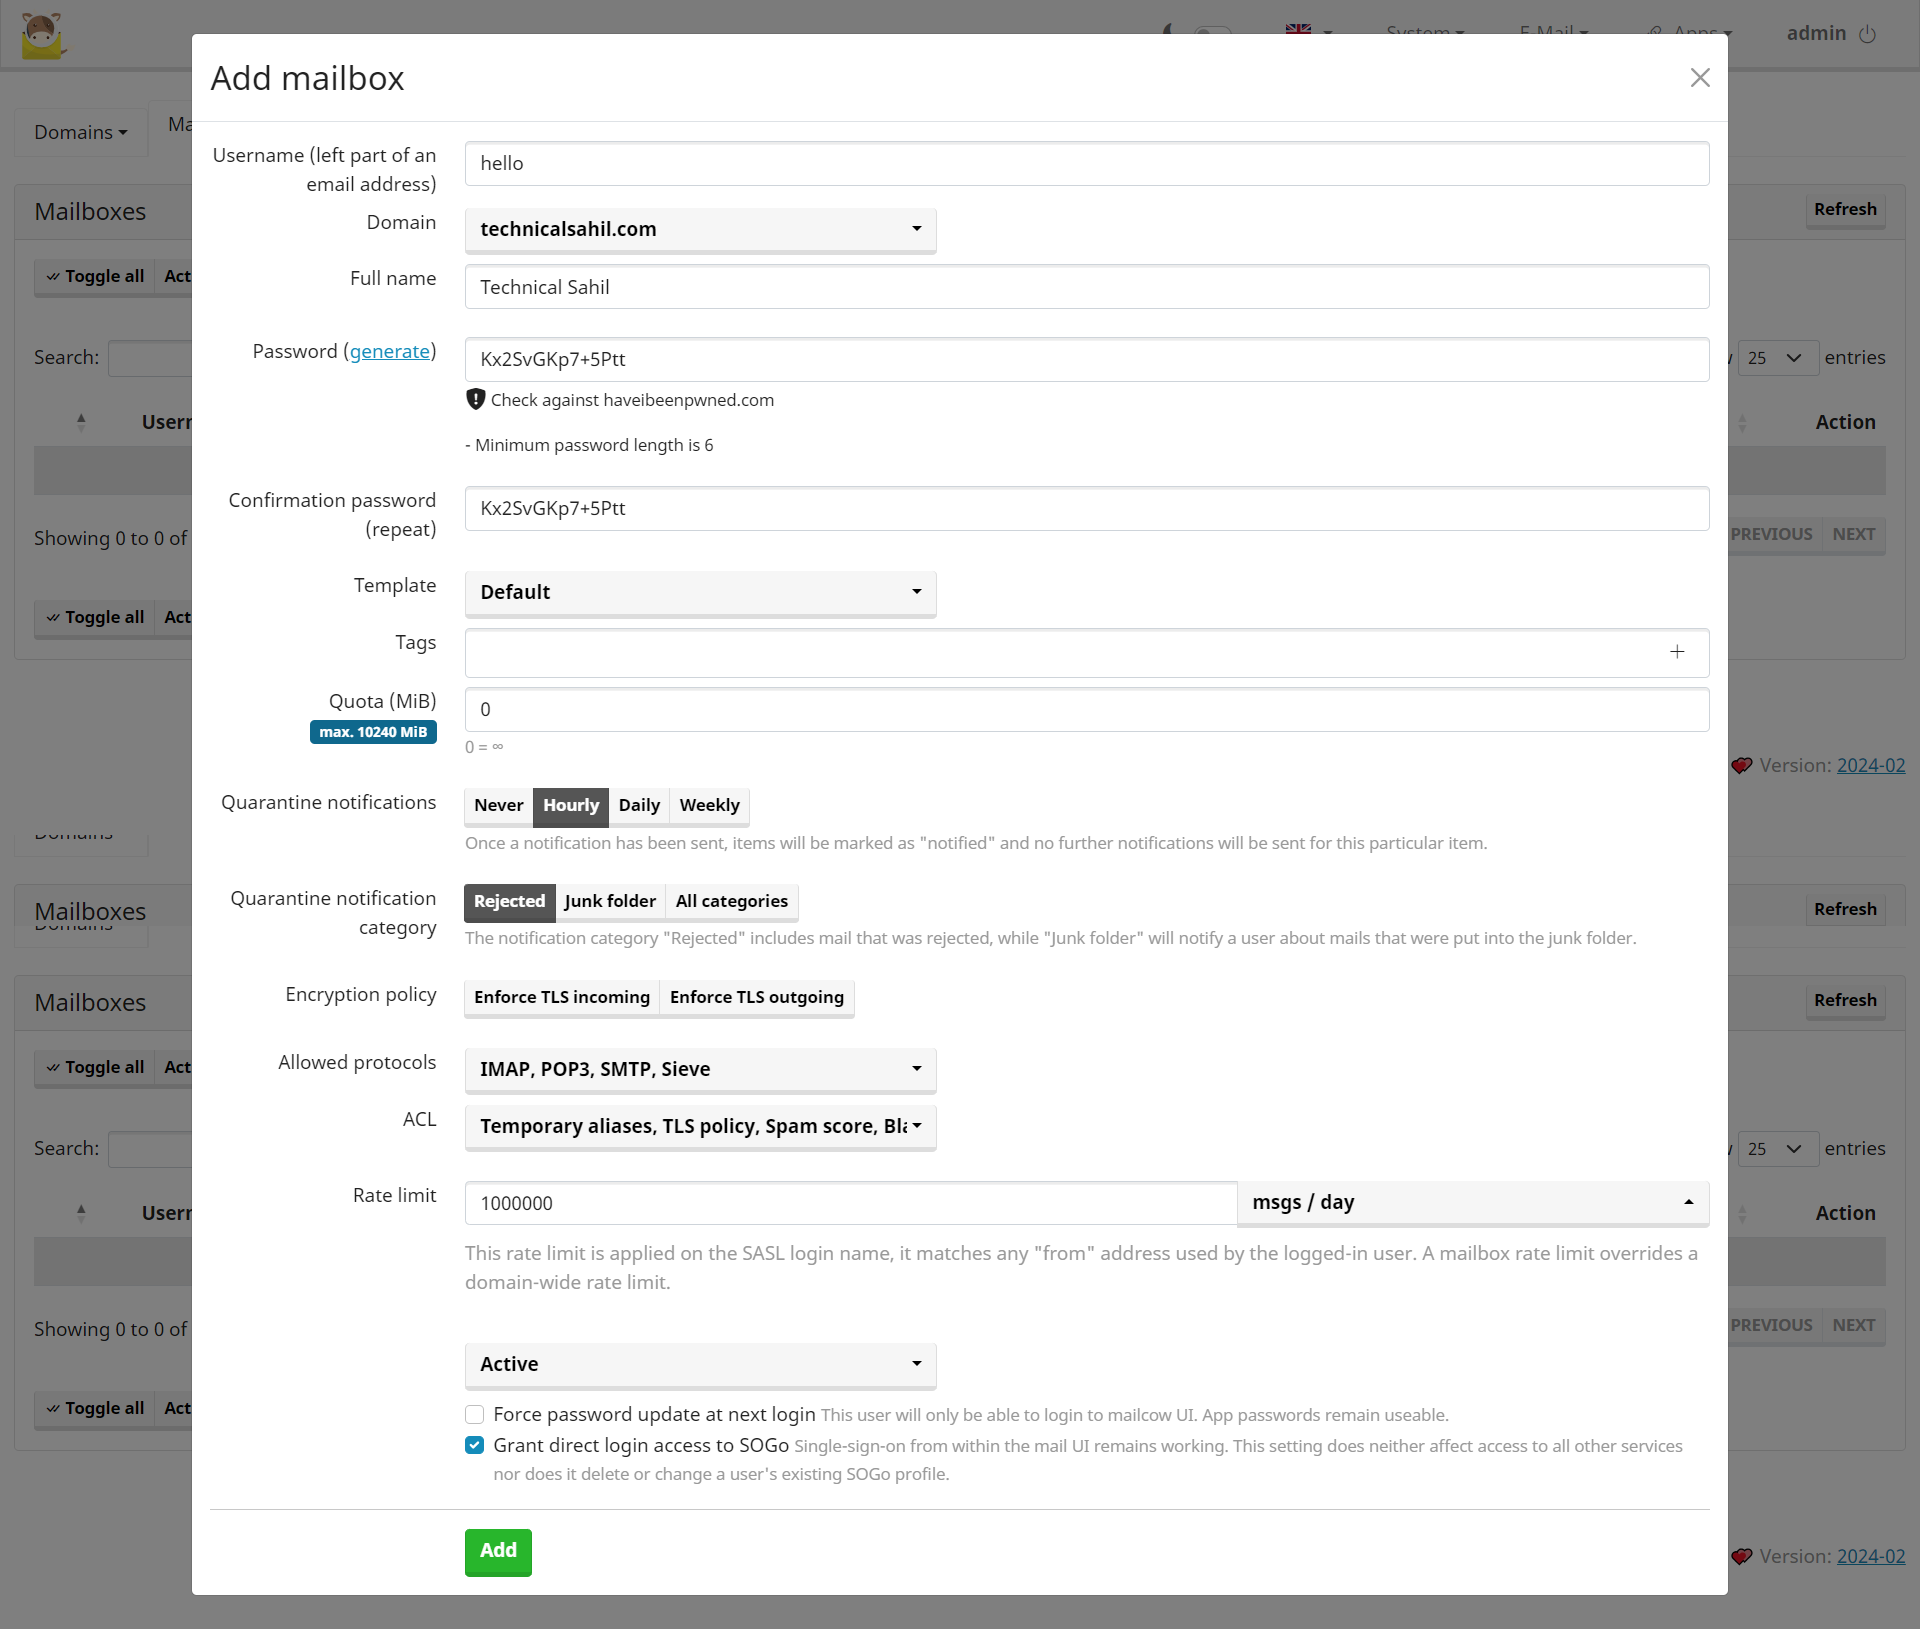
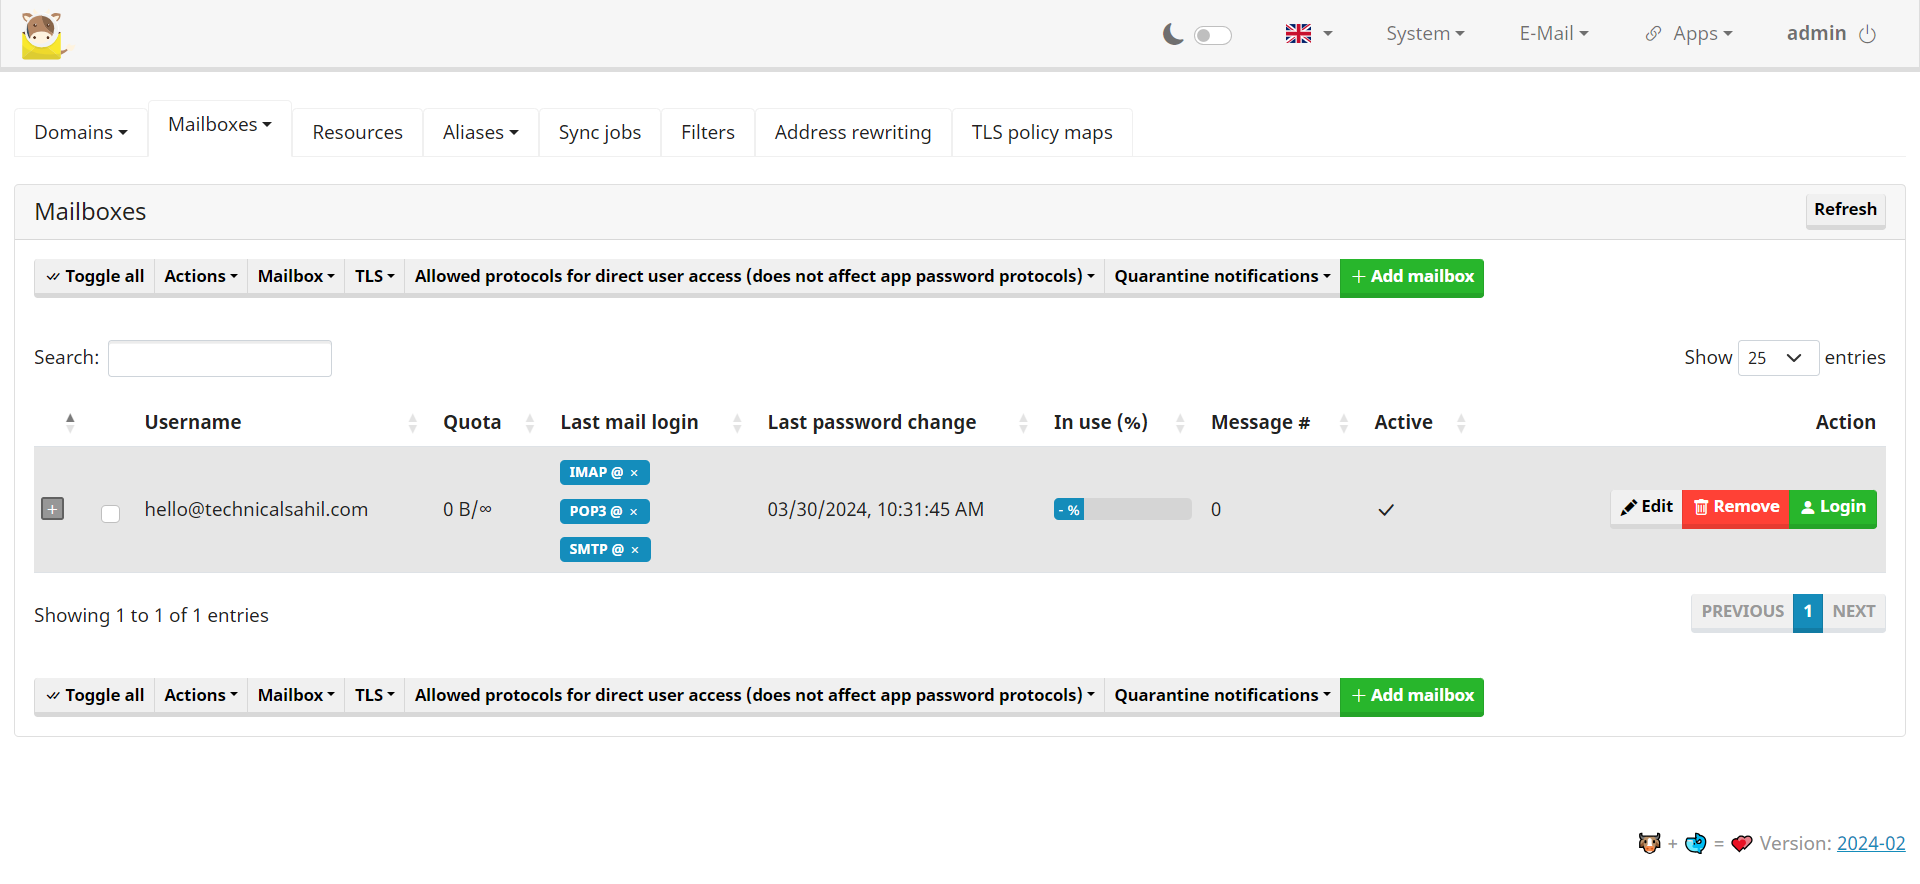
To add a mailbox, for example, username@yourdomain.extension with a sending limit of 1 million emails per day, navigate to the Configuration tab and select Mail Setup. Under the Mailboxes section, click on the Add mailbox button. Fill in the details such as the Local part (email username), select yourdomain.extension from the domain dropdown menu, and set a password for the mailbox. You can also enter a name for the mailbox and specify a quota if desired. Click Add mailbox to create the mailbox.
Adding DKIM, DMARC, and SPF Records
>>What are SPF, DKIM and DMARC?

To enhance the security and deliverability of your emails, it’s important to add DKIM, DMARC, and SPF records to your DNS configuration. Here’s an example of the DNS records in an HTML table format:
| Type | Host | Value |
|---|---|---|
| TXT | @ | “v=spf1 mx a -all” |
| TXT | _dmarc | “v=DMARC1; p=reject; rua=mailto:mailauth-reports@yourdomain.extension” |
| TXT | dkim._domainkey | “v=DKIM1; k=rsa; t=s; s=email; p=YOUR_DKIM_KEY“ |
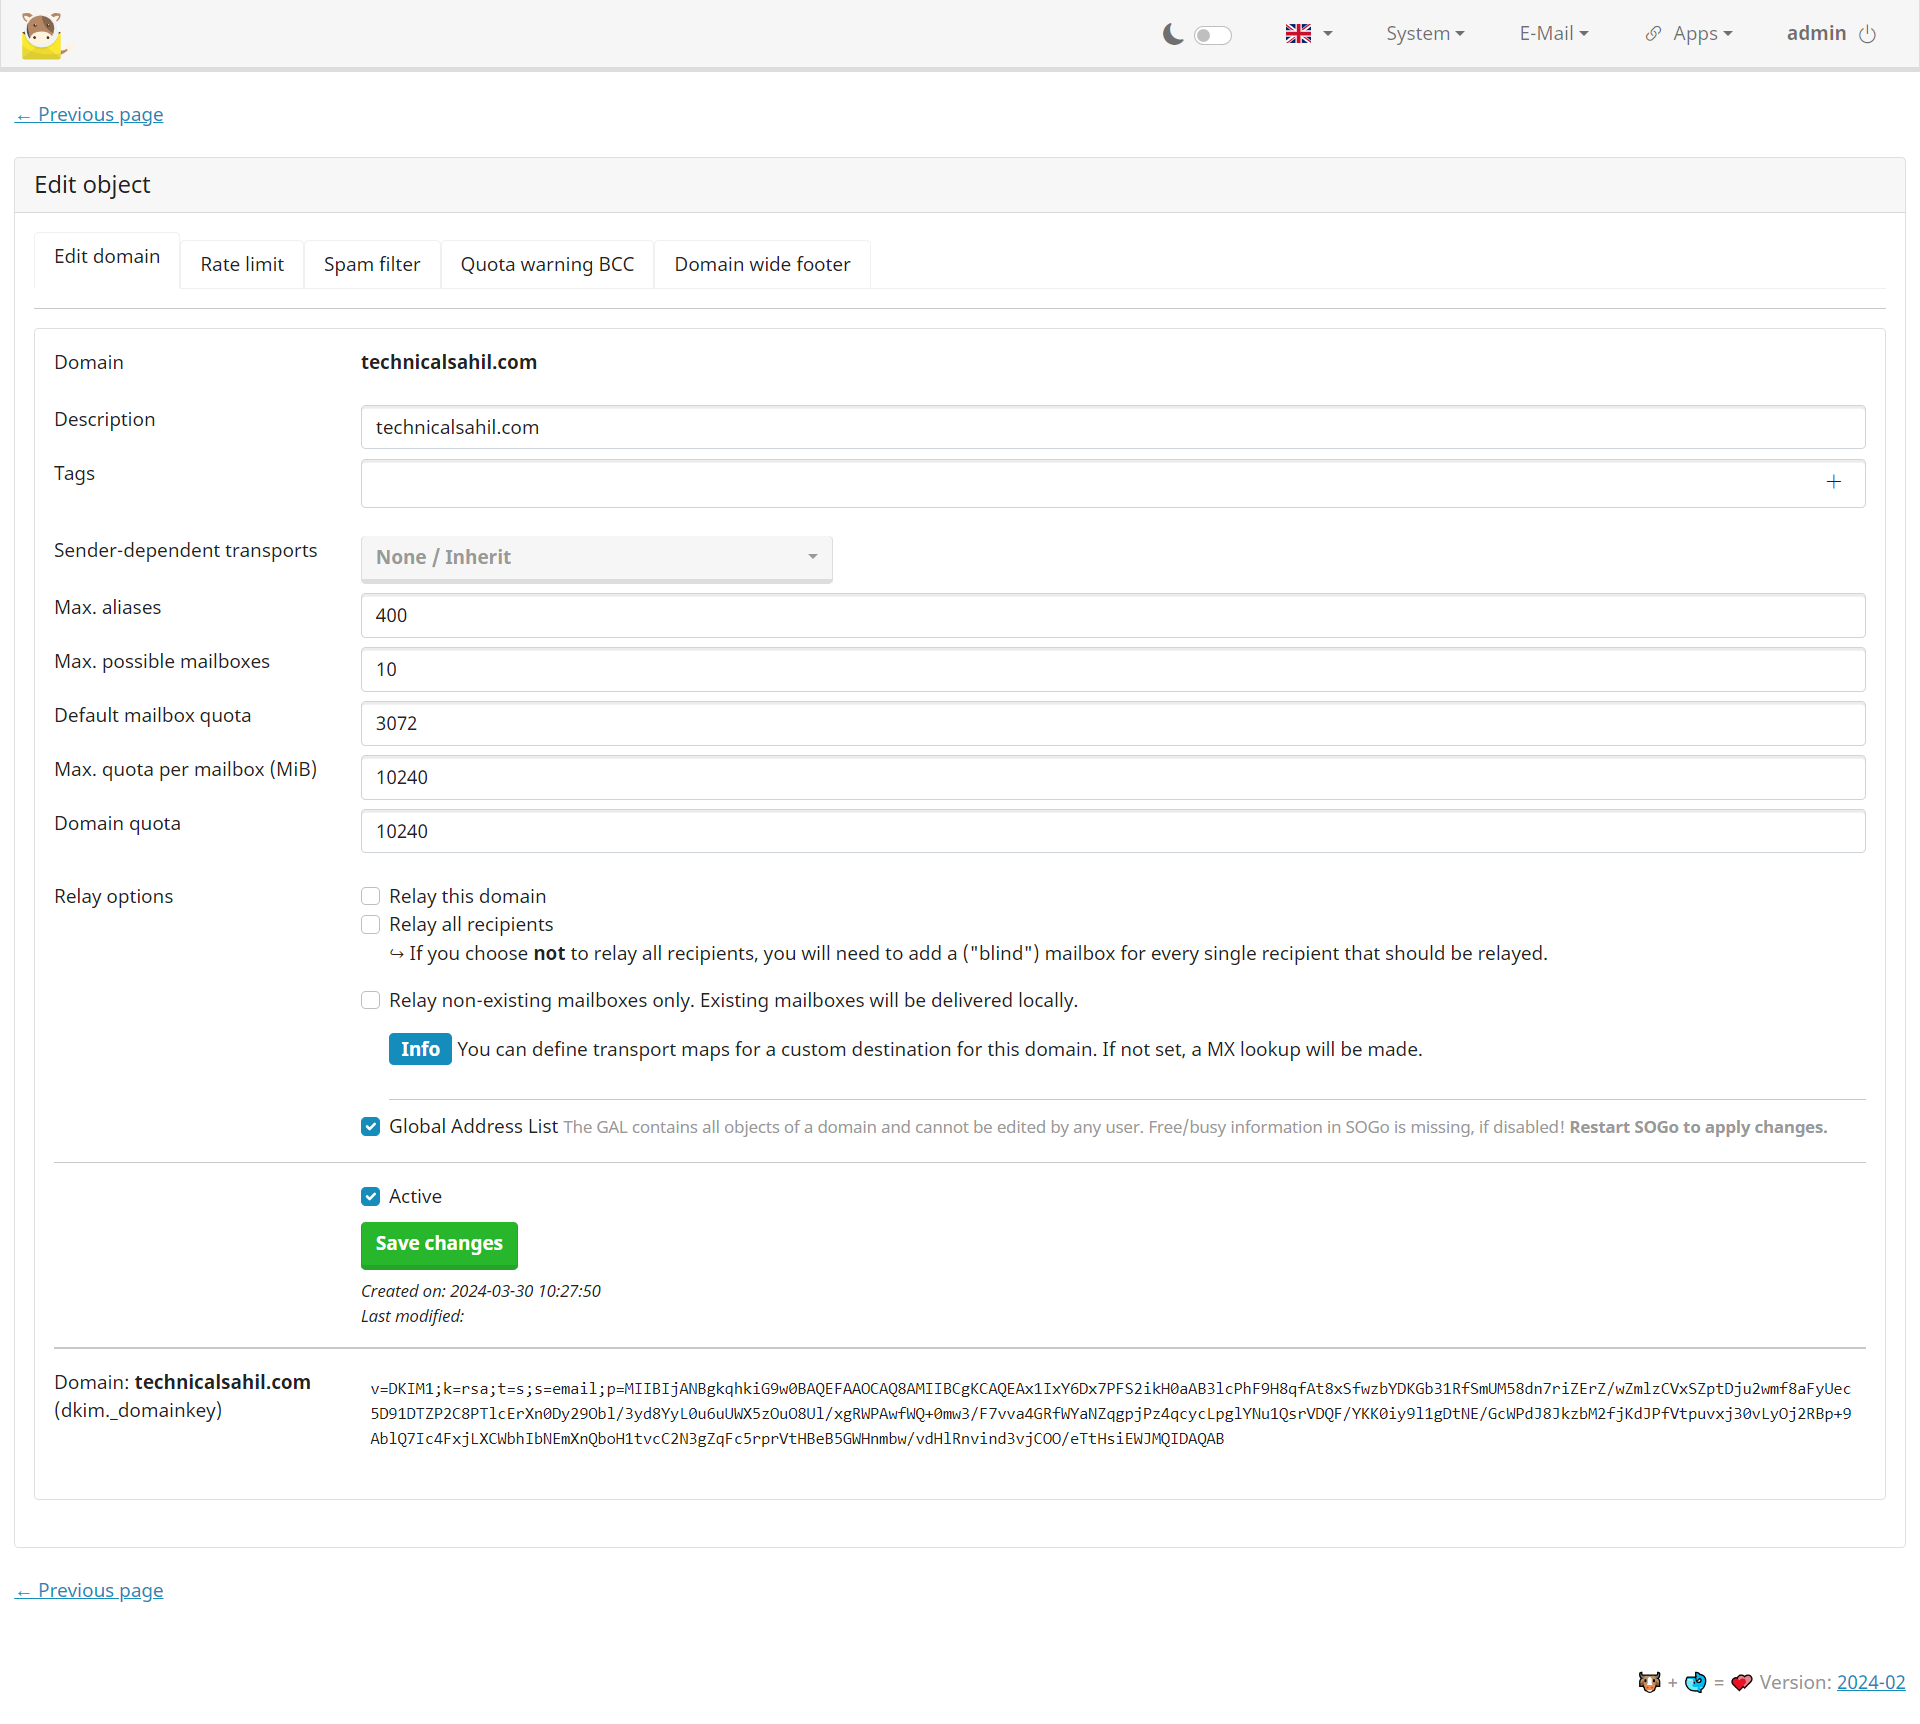
Replace YOUR_DKIM_KEY with the actual DKIM key generated by Mailcow, which can be found in the Mailcow admin interface under Configuration > ARC/DKIM keys.
Logging into Webmail
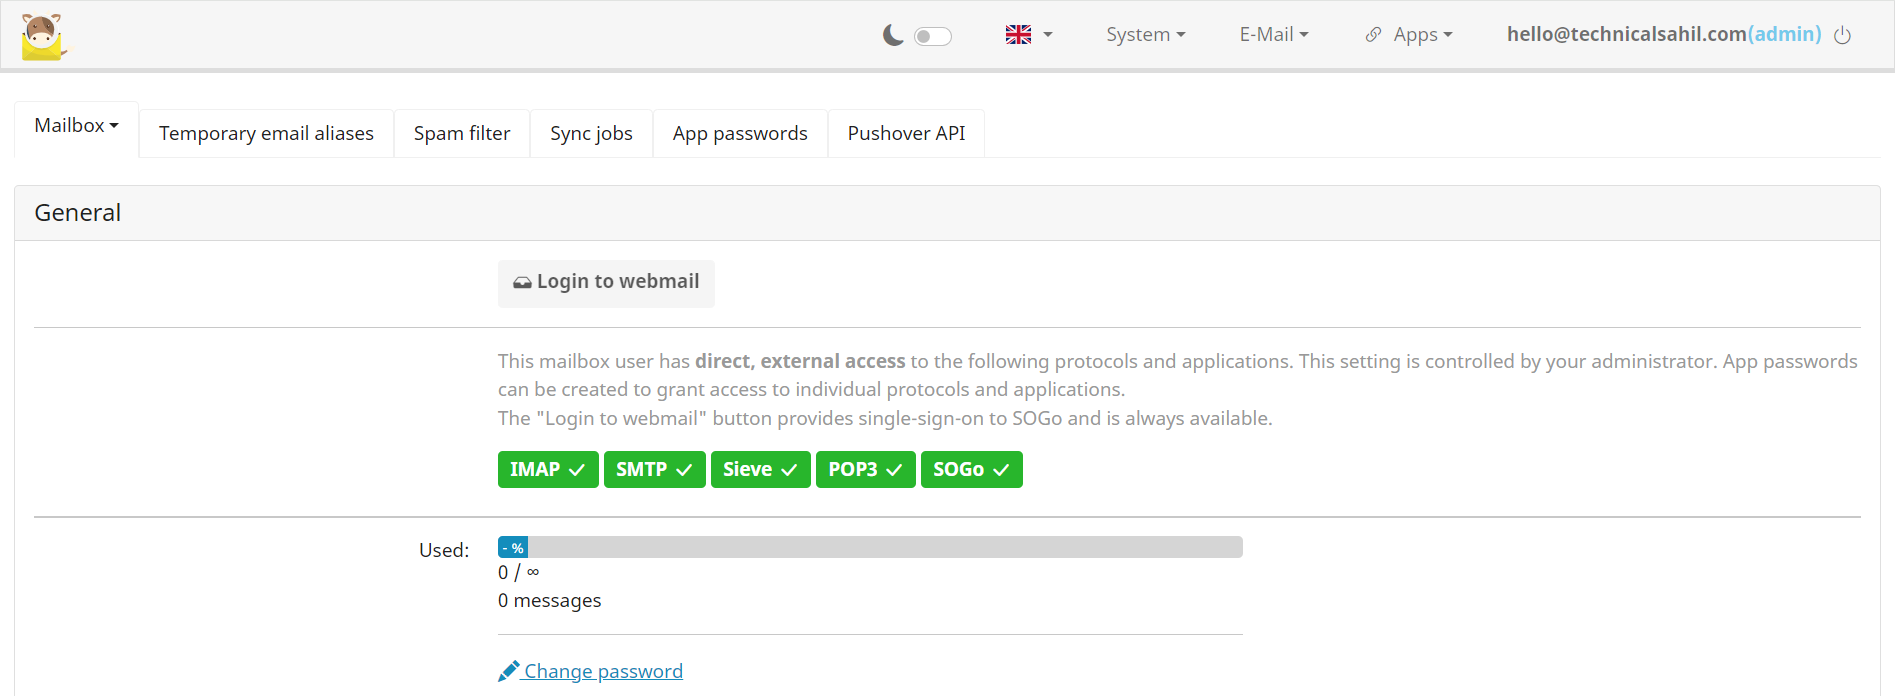
SOGo is the webmail interface used by Mailcow. To log into SOGo, navigate to the Apps tab in the Mailcow admin interface and select Webmail (SOGo). Log in using your mailbox credentials, such as username@yourdomain.extension and the mailbox password.

Sending Test Email
To test the email delivery and score, compose a new email in SOGo and send it to a test email from mail-tester.com.
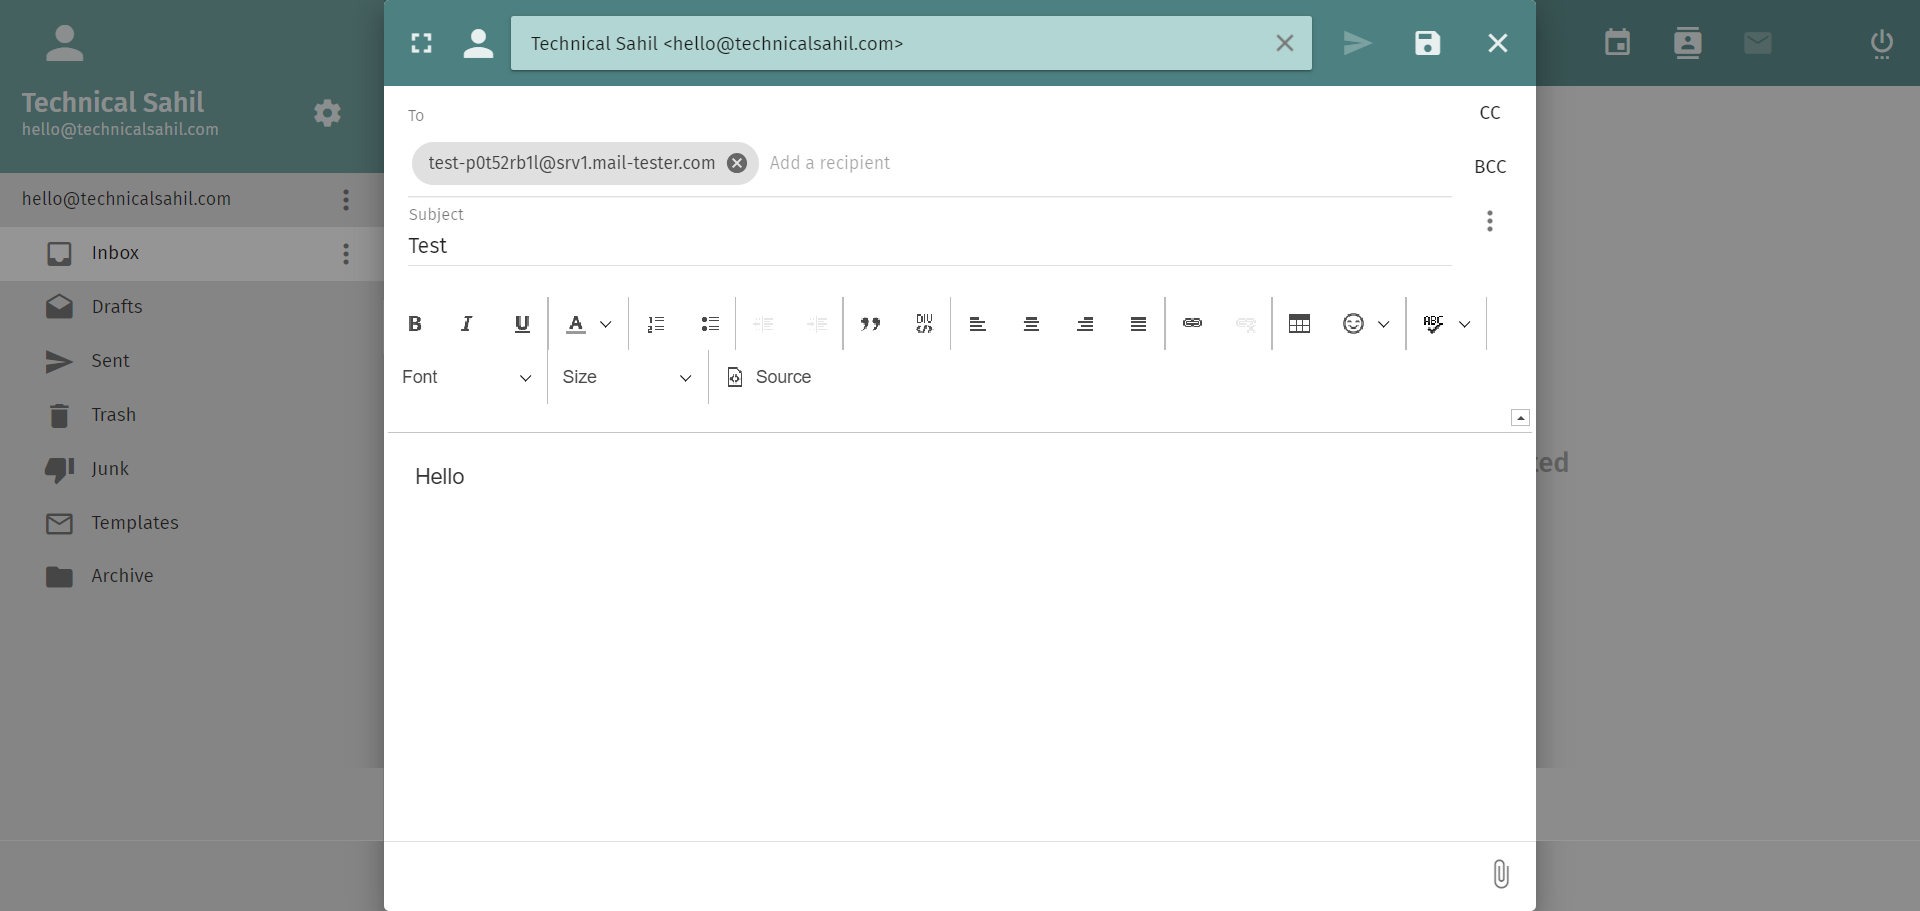
After a few moments, visit the Mail-Tester website and enter the email address from which you sent the test email. Click Check Score to see the results.

To achieve a 10/10 score on Mail-Tester, ensure that your SPF, DKIM, and DMARC records are correctly set up, your IP address is not blacklisted, and your emails are properly formatted without containing spammy content. By following these steps and ensuring your configuration is correct, you should be able to achieve a perfect score on Mail-Tester, indicating that your Mailcow setup is optimized for email deliverability.