
iRedMail is an open-source and full-featured mail server solution that offers the ability to host your own mail server at no cost. Built on reliable open-source technologies like Postfix, Dovecot, and OpenLDAP (or MySQL, MariaDB, PostgreSQL), iRedMail aims to simplify the process of setting up a robust mail server. It supports a variety of features such as SMTP, POP3, IMAP, webmail access, Antispam and Antivirus features with SpamAssassin and ClamAV, a web-based administration panel, account self-reset by users, and CalDAV and CardDAV support. Despite its comprehensive feature set, running your own mail server can be a complex task requiring a solid understanding of server management and email systems.
iRedMail provides an automated installation script that simplifies the process of setting up a mail server. It’s user-friendly, but some may find it complex if they’re not familiar with Linux server administration. Postal, on the other hand, also offers an automated installation script, but it’s more of a mail delivery platform for transactional email, and not exactly a full-featured mail server like iRedMail.
>>How to Install & Configure Postal Mail Server
Benefits of Building an iRedMail Server
Building an iRedMail server comes with several benefits. Firstly, iRedMail is free and open-source, eliminating licensing fees. You only need to consider the cost of the infrastructure where you’ll install it. It’s also feature-rich, offering a full suite of email server capabilities. The automated installation script that iRedMail provides simplifies the setup process, although it still requires some level of technical knowledge.
Hosting your own mail server with iRedMail gives you complete control over your data, which can be crucial if you have strict data privacy requirements. The open-source nature of iRedMail allows you to customize the server to your specific needs, and its active community can provide invaluable support and guidance. However, it’s important to remember that running your own mail server also comes with its own set of responsibilities, including managing and maintaining the server, ensuring security, handling backups, and dealing with potential deliverability issues.
Requirements for Installing and Building an iRedMail Server
Setting up an iRedMail server requires the following:
- A domain name for setting up DNS records for your mail server.
- A dedicated server or VPS running a fresh, minimal installation of a Linux distribution supported by iRedMail with minimum 2GB of RAM and an adequate storage based on your email usage, accounting for the volume of emails and their attachments, and the duration of email retention plus must have open port 25 and a good reputation IP to ensure the email deliverability straight to primary box.
Choosing the right server for your iRedMail installation is a critical step to ensure optimal email deliverability and server performance. I have some recommendations that not only meet the necessary requirements but also come with exciting offers that can make your journey more budget-friendly:
- Contabo: Known for their excellent VPS and dedicated server offerings, Contabo is a great choice for hosting your iRedMail server. With their current offer, you can save on the setup fee, making it an economical choice for getting started. Their servers are well-reputed for good IP reputation, which can enhance your email deliverability. Sign up for Contabo and save on the setup fee.
- OVH: A global, hyper-scale cloud provider, OVH offers a wide range of robust and secure server options. Their current deal lets you get up to 50% off on selected services, making it a cost-effective choice for small to medium-sized businesses. OVH’s servers are known for their reliability and solid IP reputation. Get started with OVH and enjoy up to 50% off.
- Time4VPS: If you’re looking for a budget-friendly VPS solution with high performance, Time4VPS is a great option. They’re currently offering up to 75% off on selected plans. With a strong emphasis on customer service and server performance, Time4VPS ensures your email deliverability stays high. Take advantage of Time4VPS’s offer and get up to 75% off.
- Hetzner: Hetzner is another great choice for dedicated and cloud server options. They’re currently offering €20 in free credits for new customers, which can help offset your initial costs. Hetzner is known for their robust server infrastructure and reliable IP reputation. Sign up for Hetzner and get €20 in free credits.
Each of these providers offers a solid foundation for your iRedMail server. Remember, a good server provider with a reputable IP is key to ensuring your emails land straight in the primary inbox. So, take advantage of these offers and set up your iRedMail server today!
(Note: The above are affiliate links. If you click through and make a purchase, I may receive a commission at no additional cost to you. I only recommend products I trust and would use myself.)
Update Reverse DNS
To update your Reverse DNS (rDNS), start by logging into your server provider’s panel using your credentials. Once inside, navigate to the relevant server for which you want to set the Reverse DNS. Look for a section or menu related to ‘Network’ or ‘DNS’ settings. Within this section, you should find an option to set or update your Reverse DNS. Input the hostname you’d like to associate with the IP address of your server, and ensure that the hostname resolves back to the server’s IP address in your DNS records. Once you’ve entered the hostname, save your changes. Note that it may take some time for the changes to propagate across the internet.

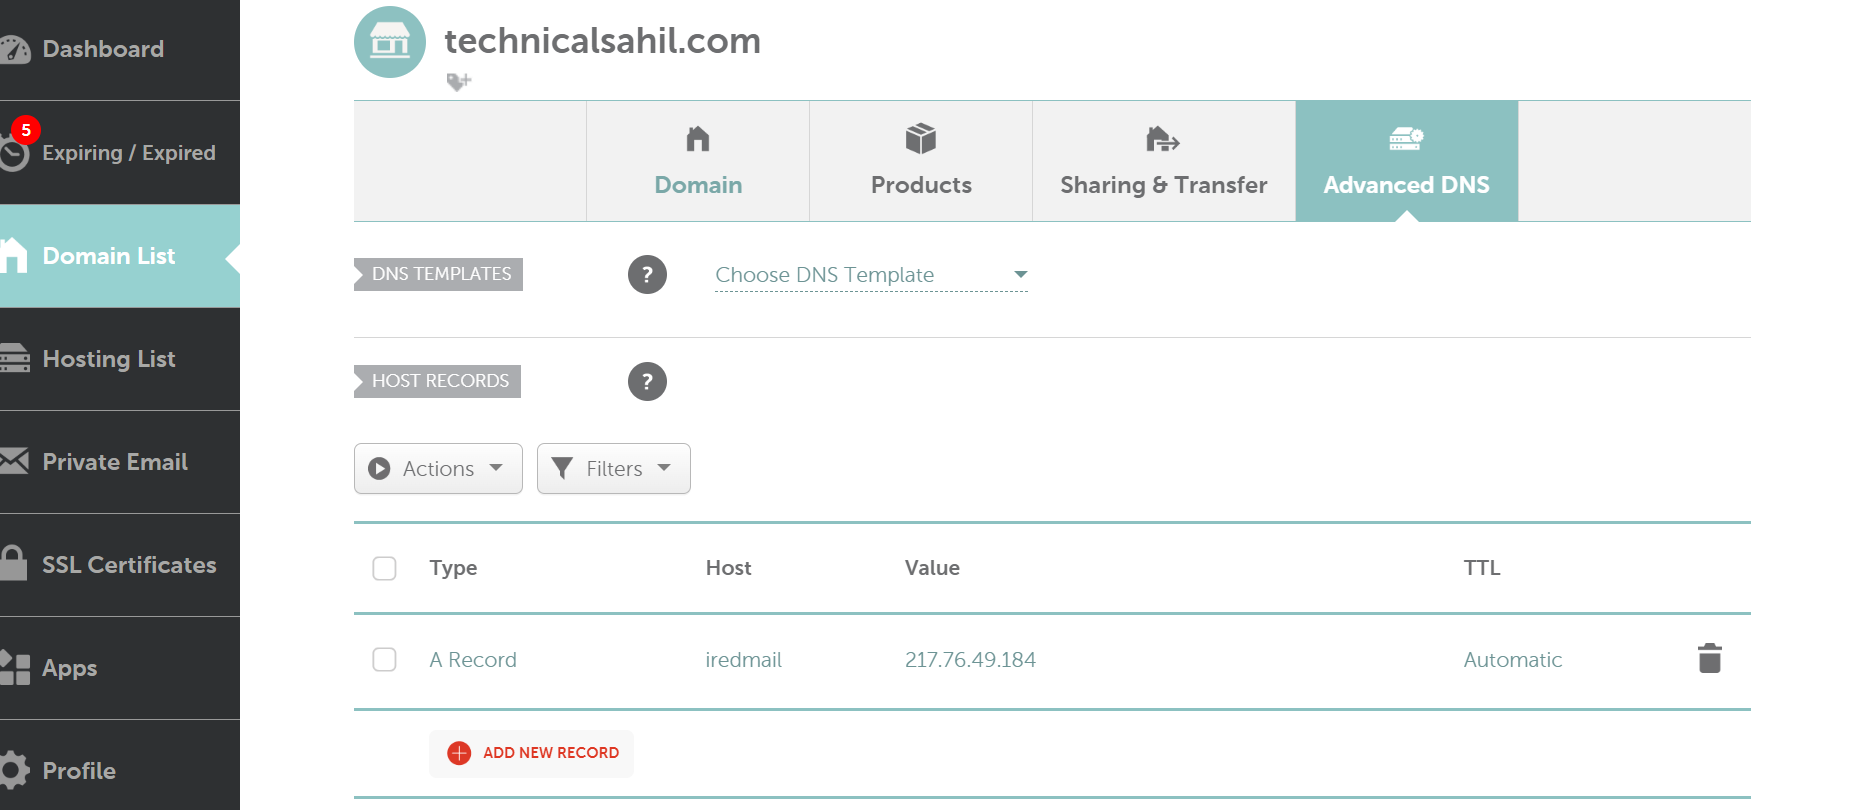
Add A Record
After logging into your domain registrar’s account, navigate to the ‘Domain List’ from the sidebar and click on the ‘Manage’ button next to your domain name. Then, go to the ‘Advanced DNS’ tab where you’ll see a section for managing DNS records. To add a new A record, click on the ‘Add New Record’ button, select ‘A Record’ from the dropdown list, and then input your hostname in the ‘Host’ field and your server’s IP address in the ‘Value’ field. Once you’ve done this, click on the green checkmark to save your changes. Remember, DNS changes might take some time to propagate worldwide.
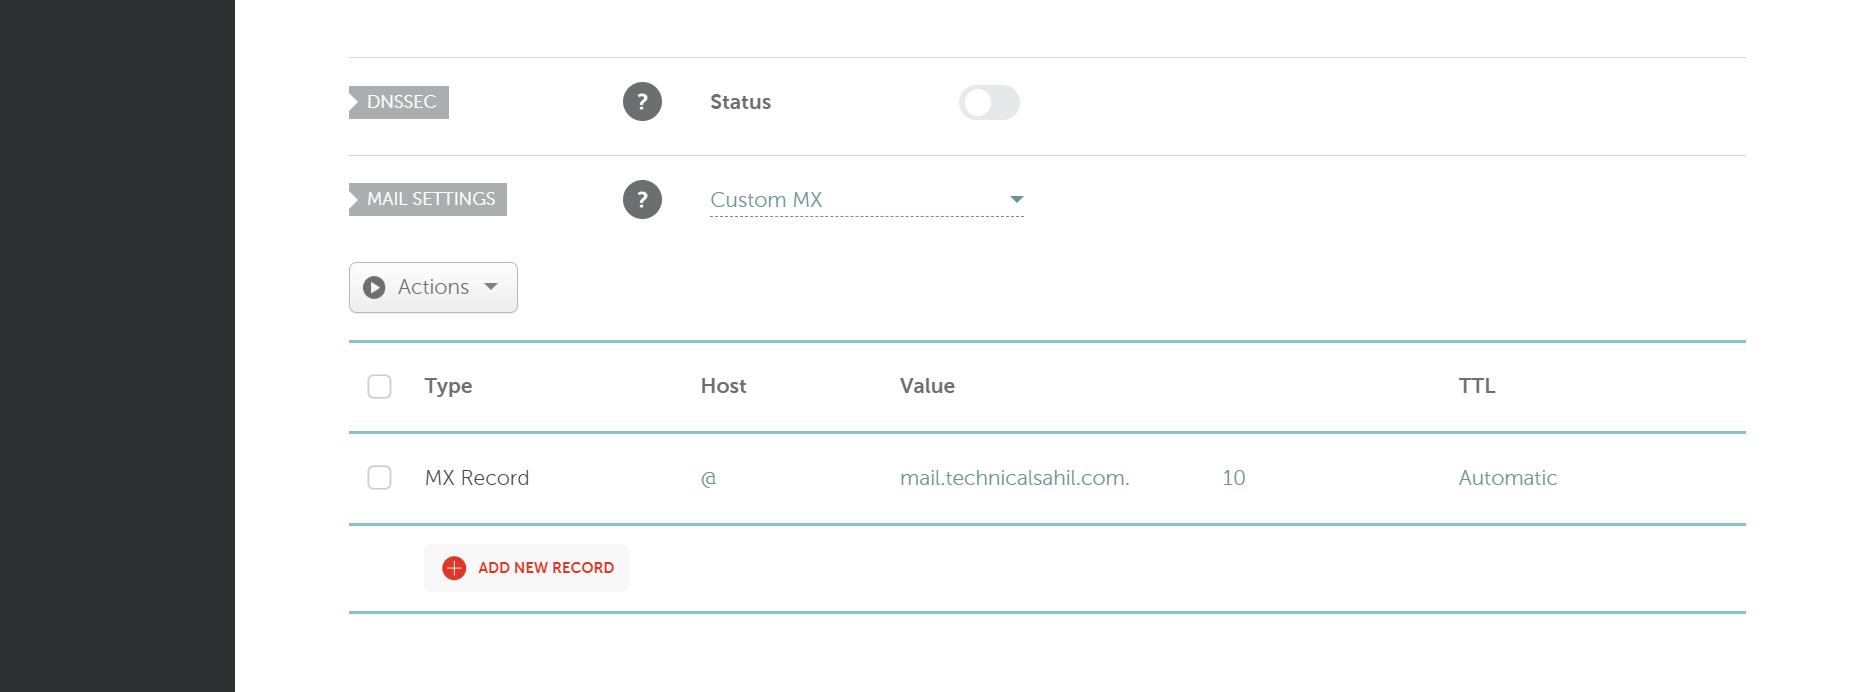
Change MX Record
In this section, you’ll also find the settings for managing MX records. To change the MX record, find the existing MX record and click on the edit icon, or add a new one if necessary. For the ‘Host’ field, input ‘@’ to represent your domain, and for the ‘Value’ field, enter ‘mail.yourdomain.com.’ Set the ‘Priority’ to 10. Once you’ve made these changes, save them by clicking on the green checkmark.
Generate and Update SPF Record
The Sender Policy Framework (SPF) is a vital part of your email setup, as it helps to prevent unauthorized persons from using your domain to send email, also known as email spoofing.
To generate an SPF record, you can use the SPF Generator tool available at ‘https://technicalsahil.com/spf-generator‘. Input the necessary details about your mail server, including your domain and IP addresses for the server or servers authorized to send mail on your domain’s behalf. Once you’ve filled out the necessary fields, click ‘Generate SPF’ to create your SPF record.
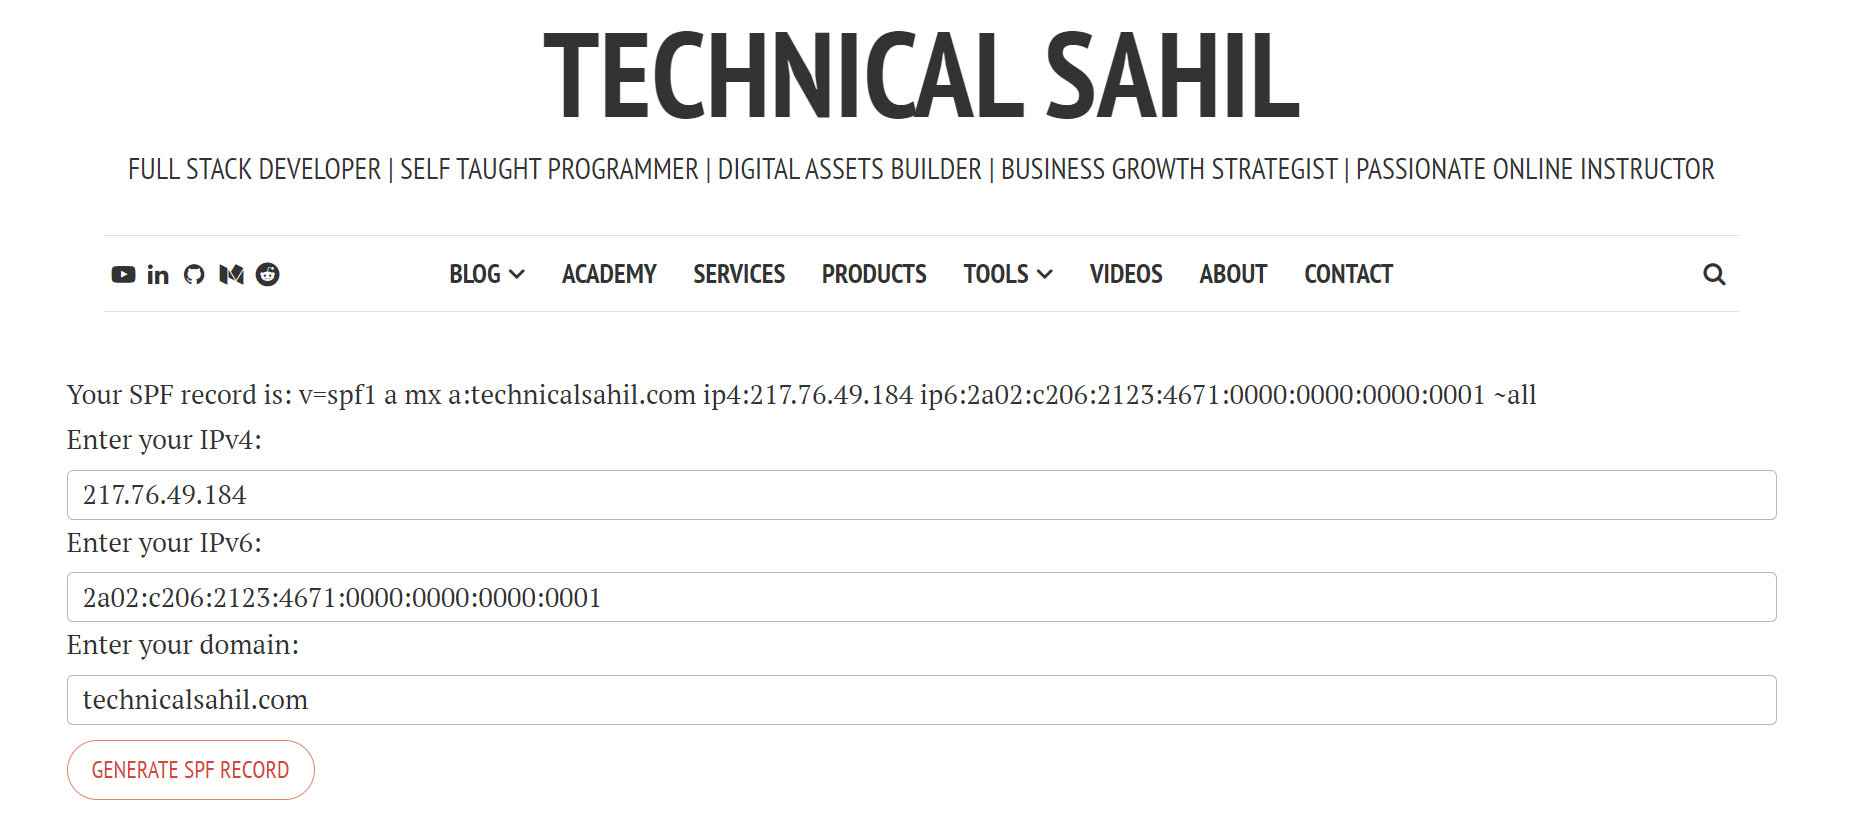
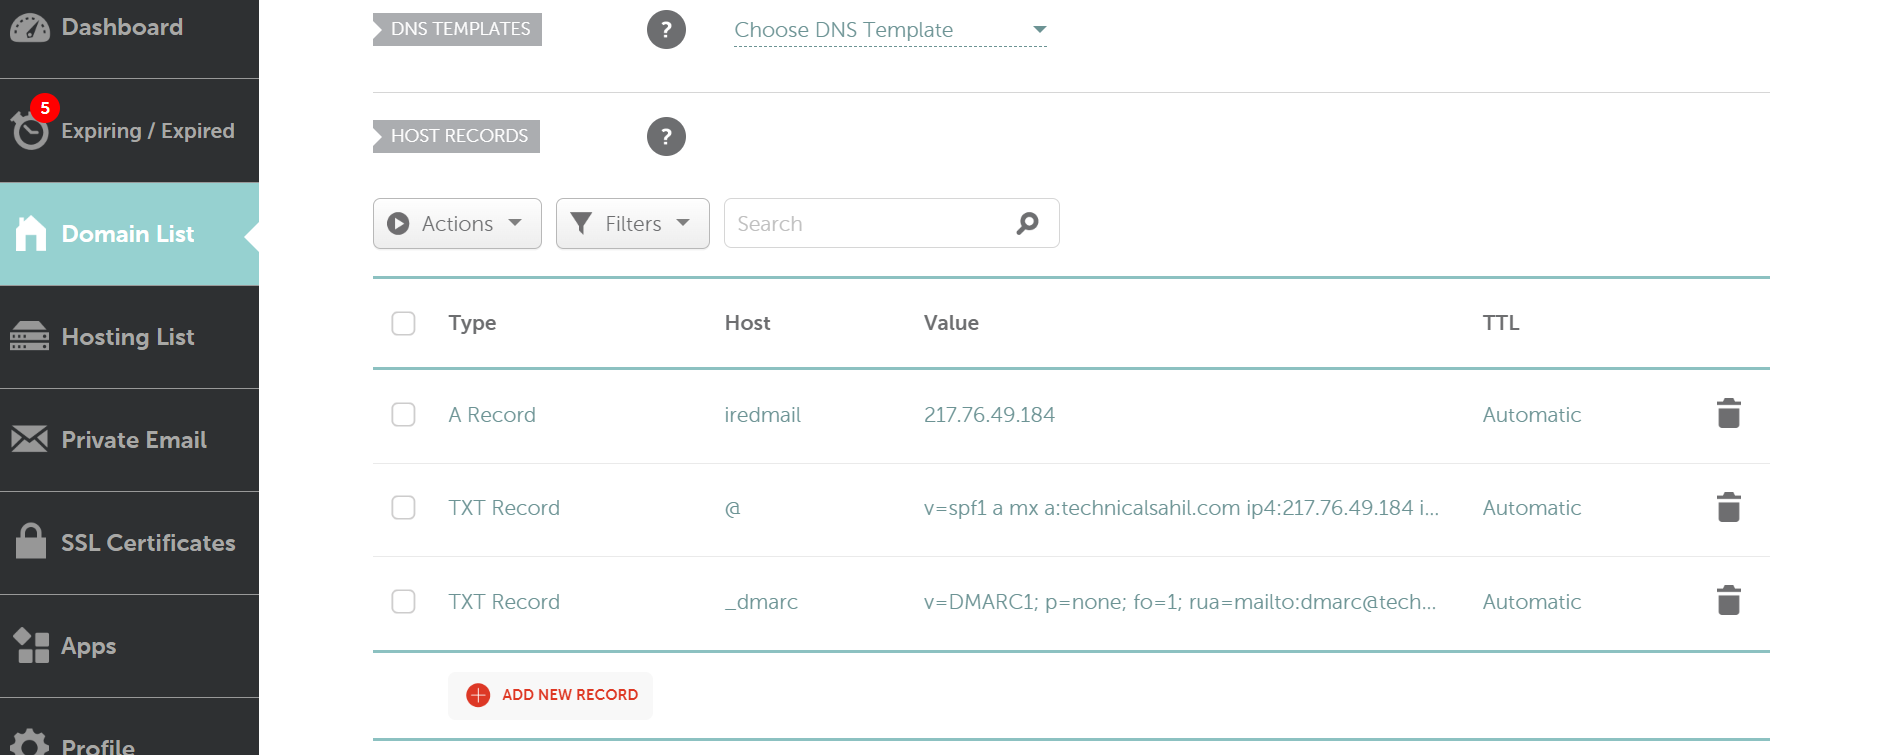
Once you have your SPF record, the next step is to update this in your DNS records. To update your SPF record here, lick on ‘Add New Record’. Choose ‘TXT Record’ from the dropdown menu. In the ‘Host’ field, enter ‘@’ to represent your domain. In the ‘Value’ field, paste the generated SPF record. After you’ve entered the SPF record, save your changes by clicking on the green checkmark.

Generate and Update DMARC Record
Domain-based Message Authentication, Reporting & Conformance (DMARC) is an email authentication protocol that uses SPF and DKIM to detect email spoofing. It provides reporting on these policies, helping improve and monitor your domain’s protection against phishing and spam.
You can generate a DMARC record using the DMARC Generator tool available at ‘https://technicalsahil.com/dmarc-generator‘. Fill in the necessary information about your email and reporting preferences, then click ‘Generate DMARC’ to create your DMARC record.

Once you have the DMARC record, the next step is to add this to your DNS records. Click on ‘Add New Record’ and select ‘TXT Record’ from the dropdown menu. For the ‘Host’ field, enter ‘_dmarc’ to specify the DMARC TXT record. In the ‘Value’ field, paste the generated DMARC record. After entering the DMARC record, save your changes by clicking on the green checkmark.
>>What is SPF, DKIM and DMARC?
Change Hostname
Checking the current hostname of your server, by executing the command:
hostname -f
This command will return the fully qualified domain name (FQDN) of your server. If it’s not pointed to your domain name, you need to change the hostname. The syntax for this command is:
hostnamectl set-hostname yourhostname.yourdomain.com
Replace “yourhostname.domain.com” with the FQDN that you want to set for your server.
Like in my case, it’s hostnamectl set-hostname iredmail.technicalsahil.com to set the hostname of the server to “iredmail.technicalsahil.com“.
*Note: You’ll need to have administrative rights (typically root access) to make these changes. If you have a server without root access by default(for example: if you have server from OVHcloud, AWS etc) then first you have to enable root access on your server.
>>How to Enable Root Access on OVHcloud
After updating the hostname, you can run hostname -f again to confirm that your changes were successful.
Modify Hosts File
To modify your hosts file, you’ll need to open it in a text editor. You can do this by running the command:
nano /etc/hosts
In the hosts file, you may see a line that includes the default hostname and FQDN provided by your server provider. Replace this with the new hostname and FQDN you set using the hostnamectl command earlier.
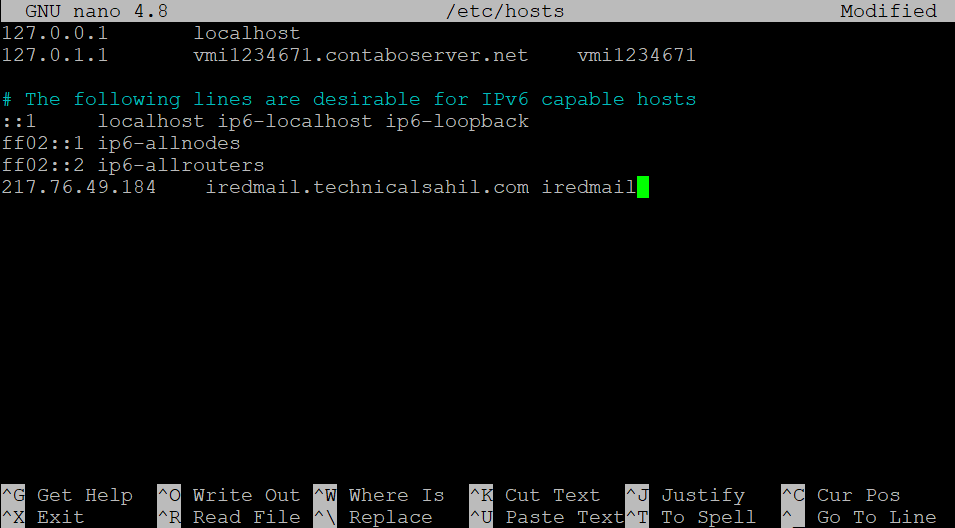
For example, if you’ve set your hostname to iredmail and your FQDN to iredmail.technicalsahil.com, you would replace the existing line with: 217.76.49.184 iredmail.technicalsahil.com iredmail
After making the necessary changes, save and close the file. In nano editor, you can do this by pressing Ctrl+X to exit, then Y to confirm saving changes, and Enter to confirm the file name.
Update System Packages
To update your system packages, you’ll need to run the following command in your terminal:
apt update && apt upgrade -y
The apt update command refreshes your local package index to make sure it’s in sync with the packages available from the remote repositories. The && is a logical AND operator that causes the second command (apt upgrade) to run only if the first command (apt update) completes successfully. The apt upgrade command then updates all currently installed packages to their latest versions. The -y option automatically answers ‘yes’ to any prompts, allowing the upgrade to proceed without further input.
Install GZIP
Gzip is a popular data compression program used widely in Unix and Linux systems. It allows you to compress files, making them easier to store and transfer, which can save valuable disk space and network bandwidth.
To install gzip on your server, you need to run this command:
apt install gzip
Running this command in your terminal will fetch the gzip package from your configured repositories, resolve any dependencies needed, and install the program on your system. Once the installation is complete, you can use the gzip command to compress files, and the corresponding gunzip command to decompress them.
Download iRedmail
To obtain the most recent stable release of iRedMail, navigate to their official download page: https://www.iredmail.org/download.html. This page typically provides a direct download link for the latest version.
Once on the page, look for the latest stable release, right click and copy the corresponding download link.
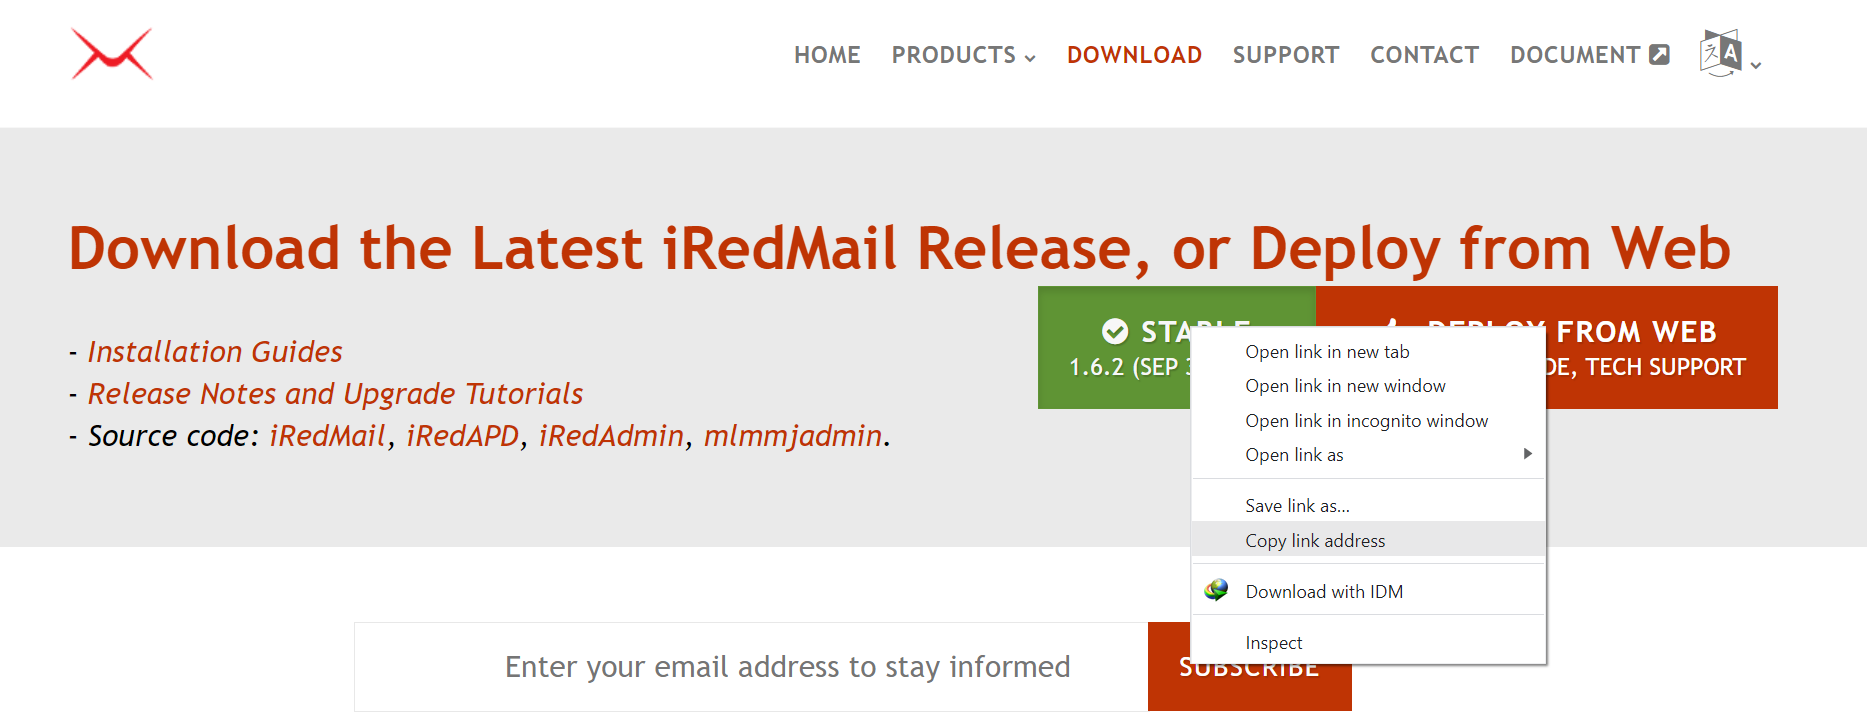
Downloading iRedMail from the official source ensures you’re getting a legitimate, secure copy of the software. It’s always recommended to use the official channels when downloading software, especially for critical systems like a mail server, to avoid potential security risks.
Install iRedmail
After downloading the latest version of iRedMail, the subsequent step involves its installation. To achieve this, you will first need to run this command:
wget https://github.com/iredmail/iRedMail/archive/refs/tags/1.6.2.tar.gz
This command uses the wget utility to download the iRedMail software from the provided URL, which points to the 1.6.2 version of iRedMail on GitHub. Make sure to replace the version number with the latest one if a newer version has been released.
Next, you’ll need to extract the downloaded file. iRedMail is downloaded as a .tar.gz file, a compressed file format that needs to be unpacked before you can use the contained software. To accomplish this, run the following command:
tar zxvf 1.6.2.tar.gz
The tar command is used to manipulate tar archives, with the z, x, v, and f options telling it to uncompress (z), extract (x), list the files as they’re extracted (v), and operate on the provided file (f).
Once the file is extracted, you’ll change your working directory to the newly created iRedMail directory by following this command:
cd iRedMail-1.6.2
Replace “1.6.2” with the version number you’ve downloaded.
To initiate the iRedMail installation script, run this command:
bash iRedMail.sh
This script will guide you through the rest of the installation process. It’s designed to be user-friendly, and it will prompt you for necessary information as it configures your new mail server like:
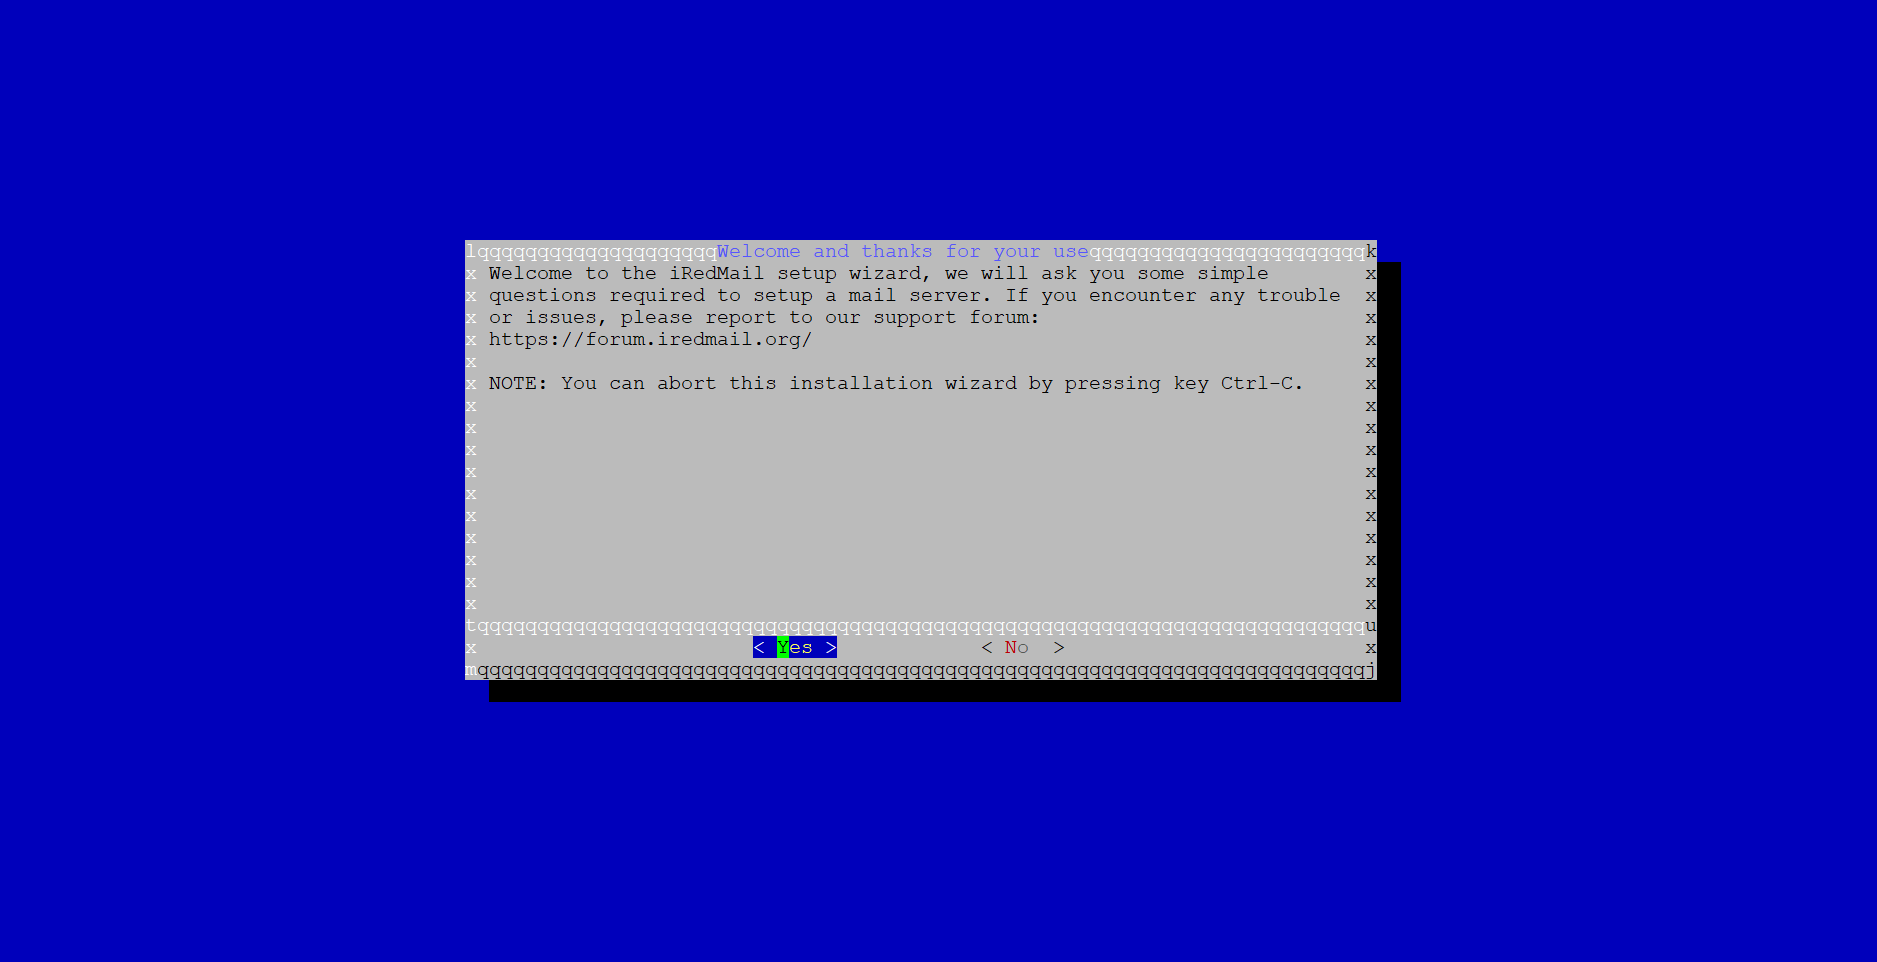
Press Enter on Yes to proceed further.

Again, press Enter to proceed to the next prompt
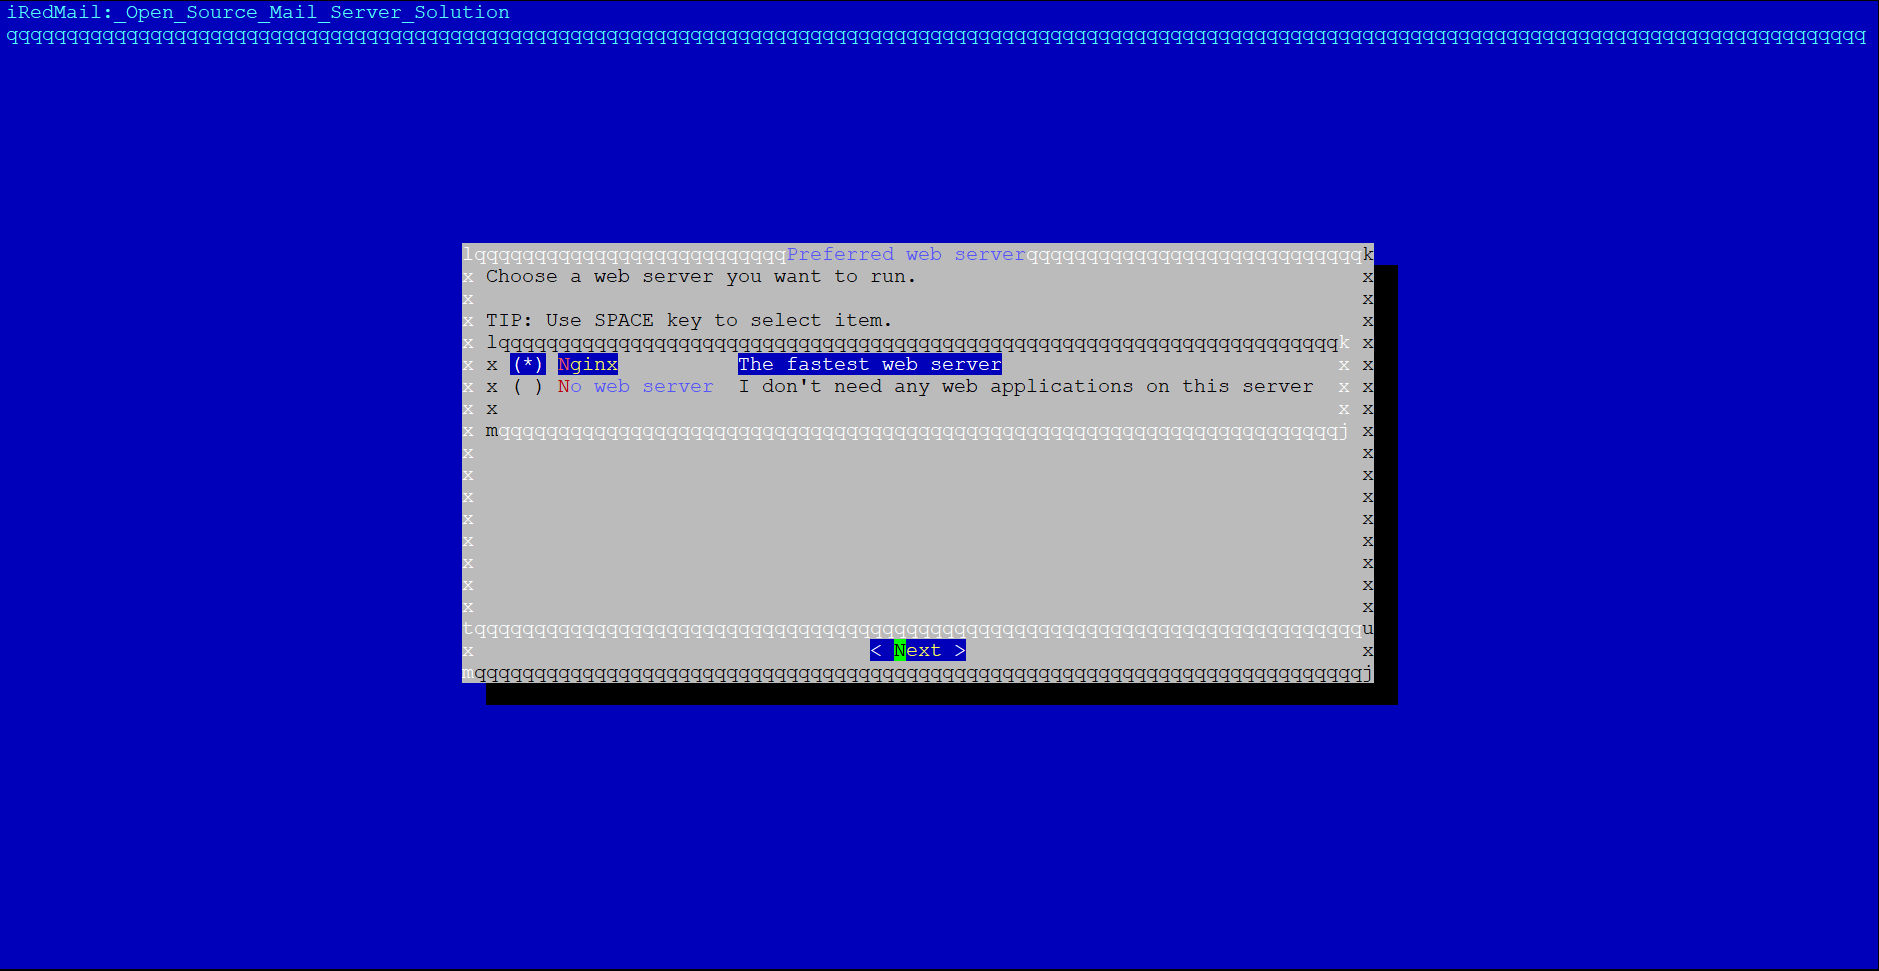
If you want to install iRedmail standalone, without any web application. Then you can go with only Nginx to select(Using SPACE key) and Press Enter to install.
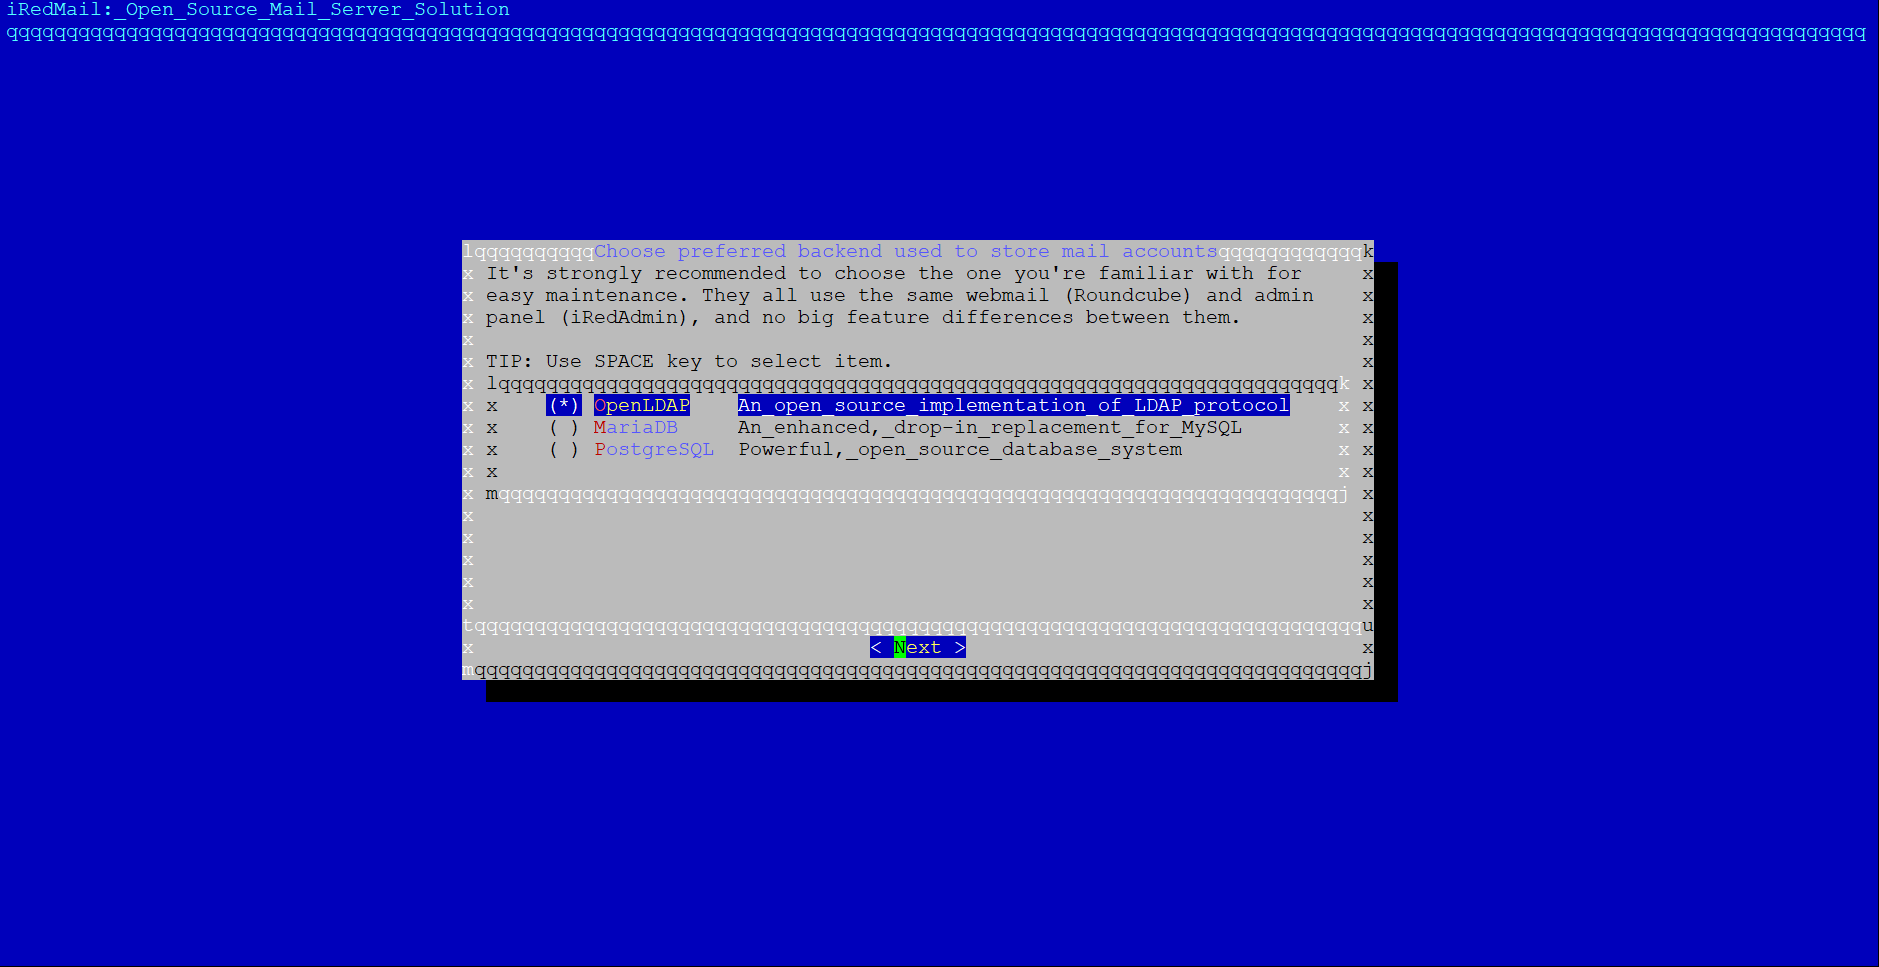
If you want to go with iRedMail server only, as you saw in my previous prompt I’ve gone with only Nginx, then here I only need to go with OpenLDAP but in case of yours, if you’re planning to host another application on the same server then you can select MariaDB(recommended) or PostgreSQL.
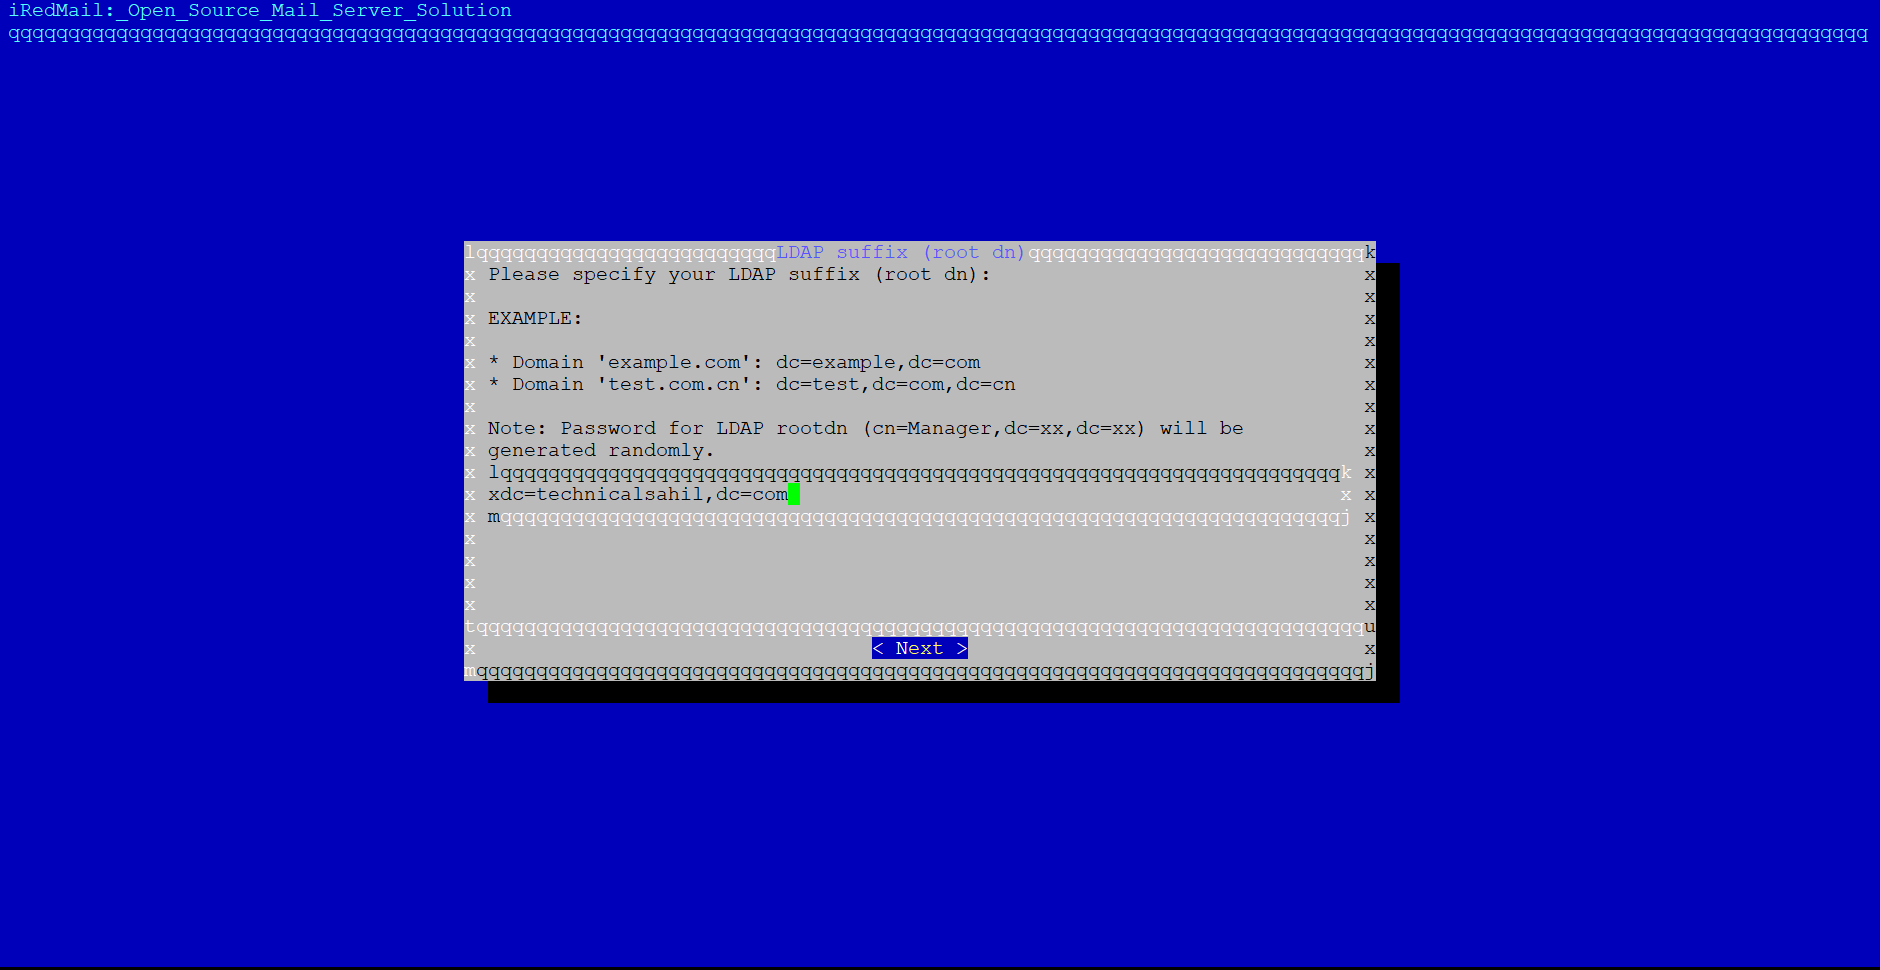
Type your domain in this format here:
dc=yourdomain, dc=yourdomainextension
like in my case it’s dc=technicalsahil, dc=com
*Note: Don’t type (.) anywhere either after `yourdomain` or before `yourdomainextension`.
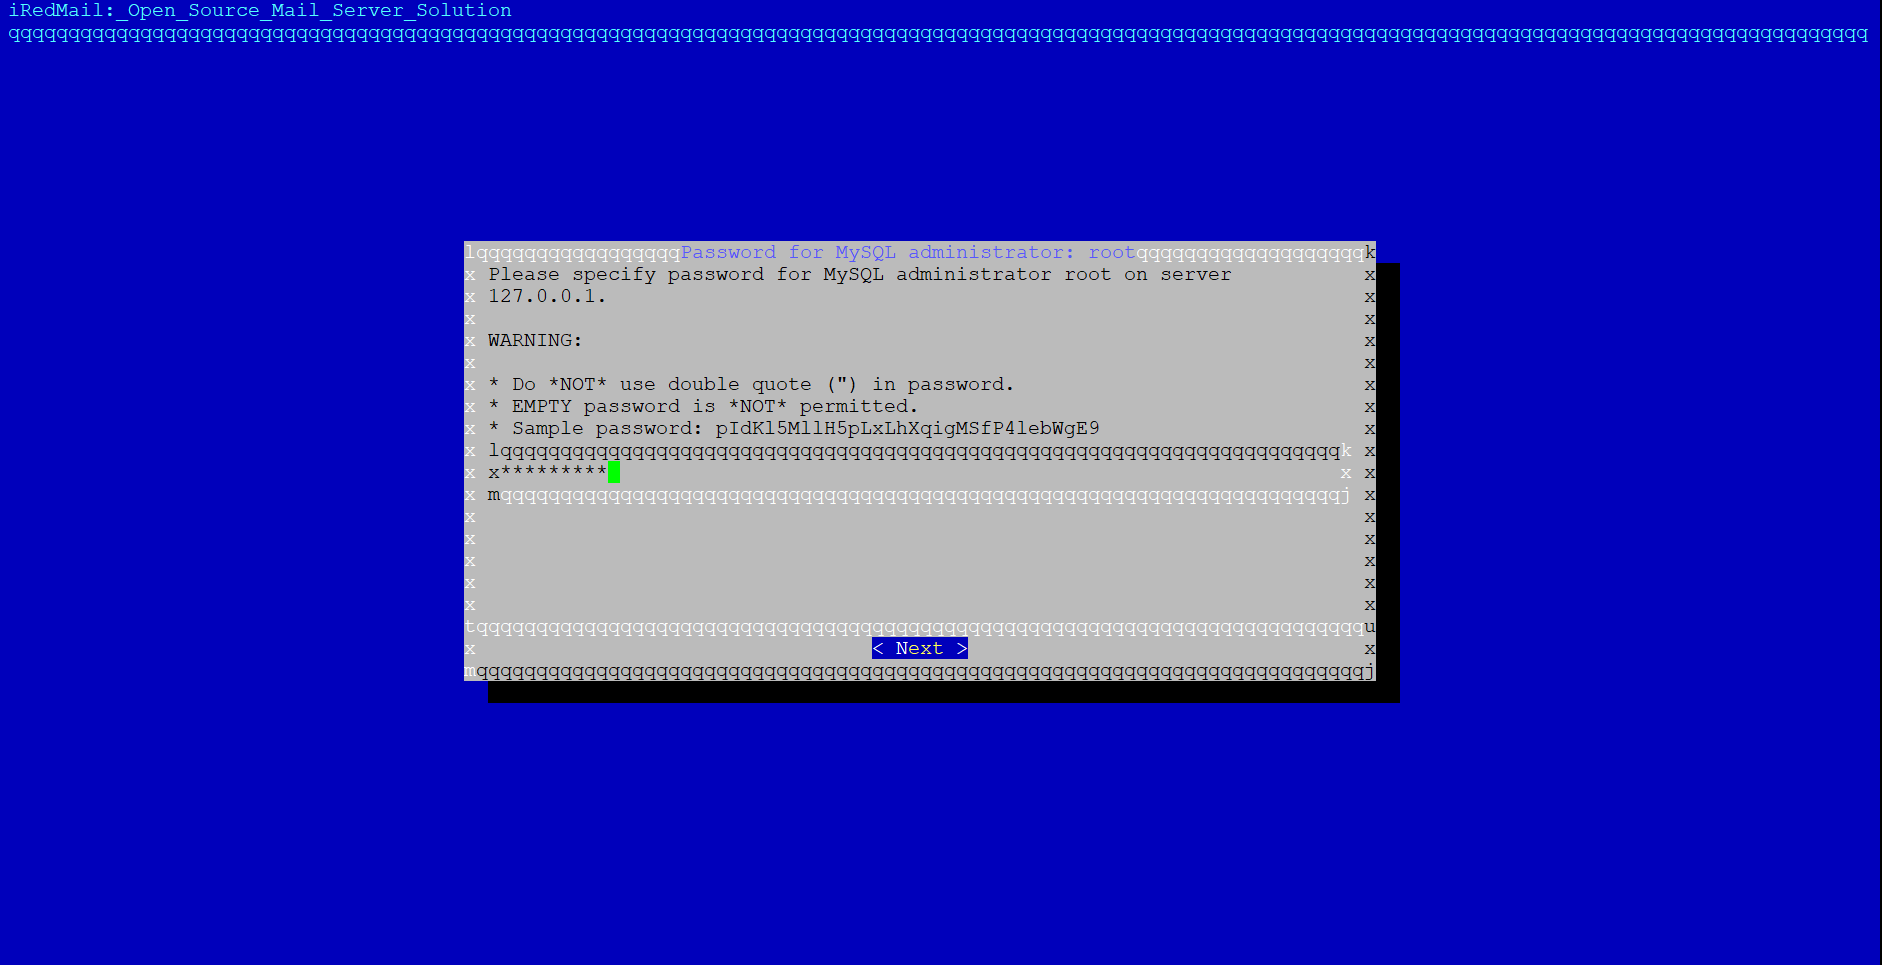
Create your new MySQL administrator password on this prompt(make sure to set strong and remember this password).
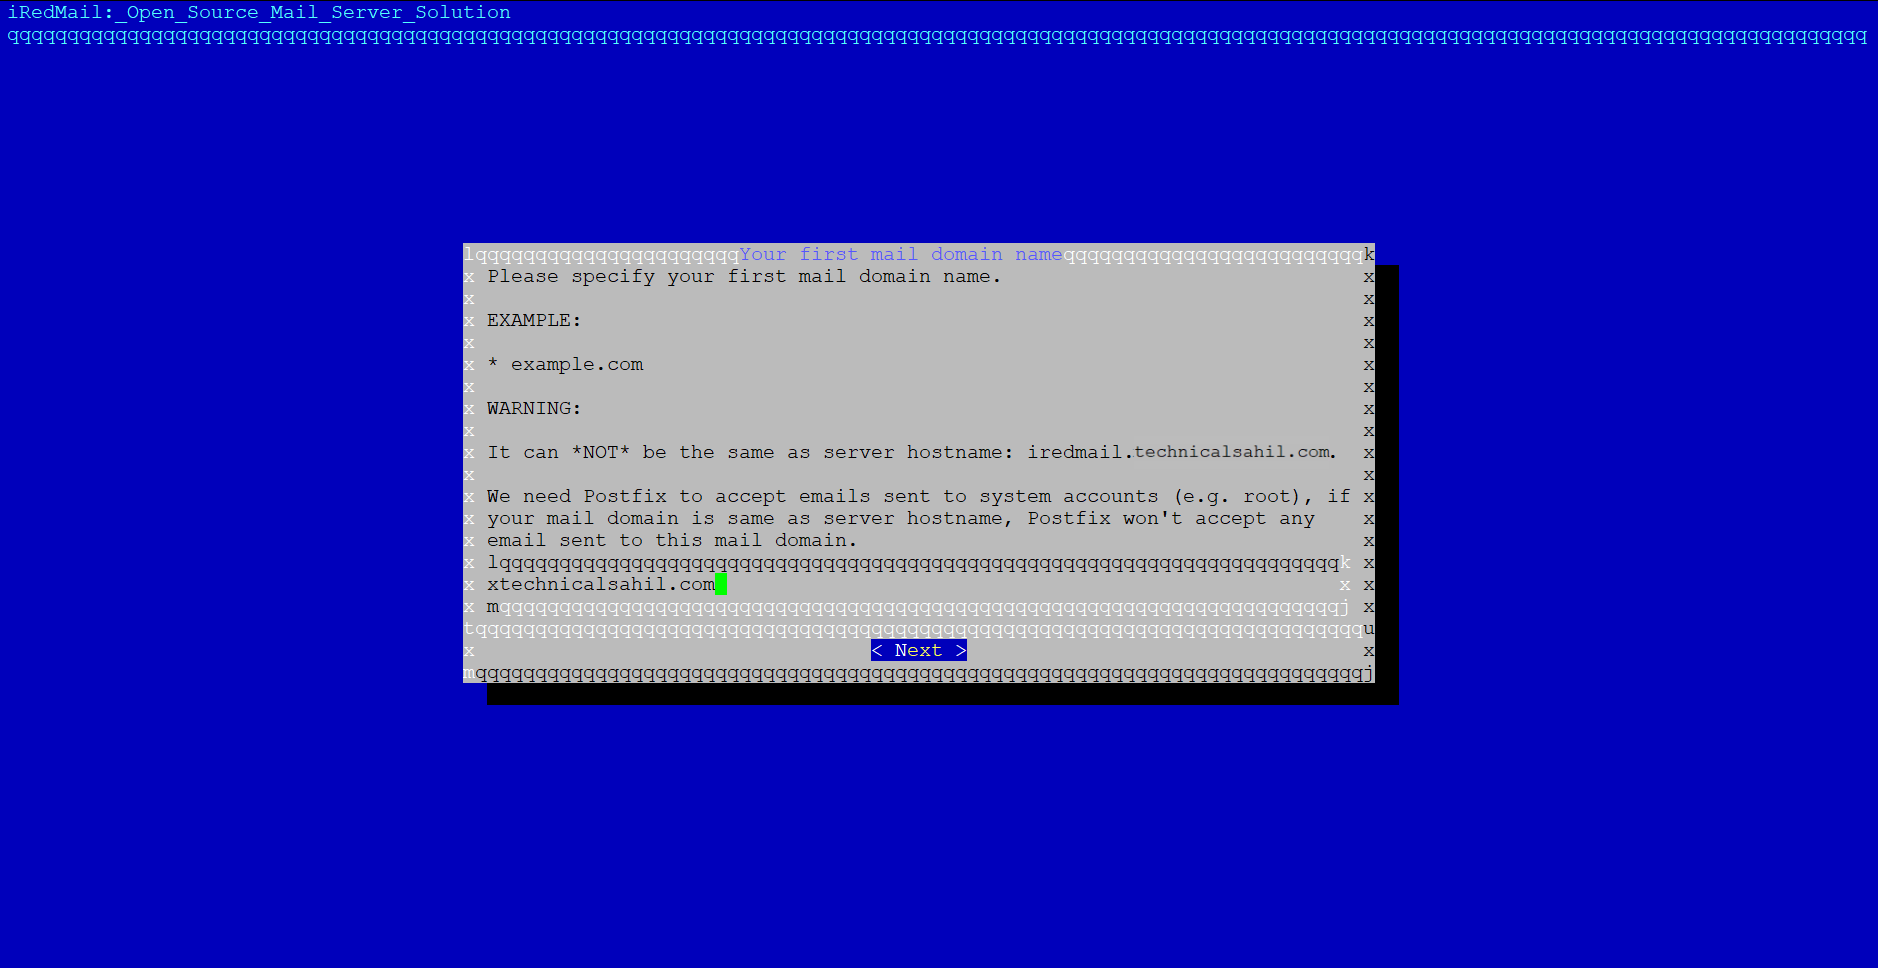
Enter your email domain, only domain.com not host.domain.com. Like in my case, my FQDN is iredmail.technicalsahil.com but here I only need to mention technicalsahil.com
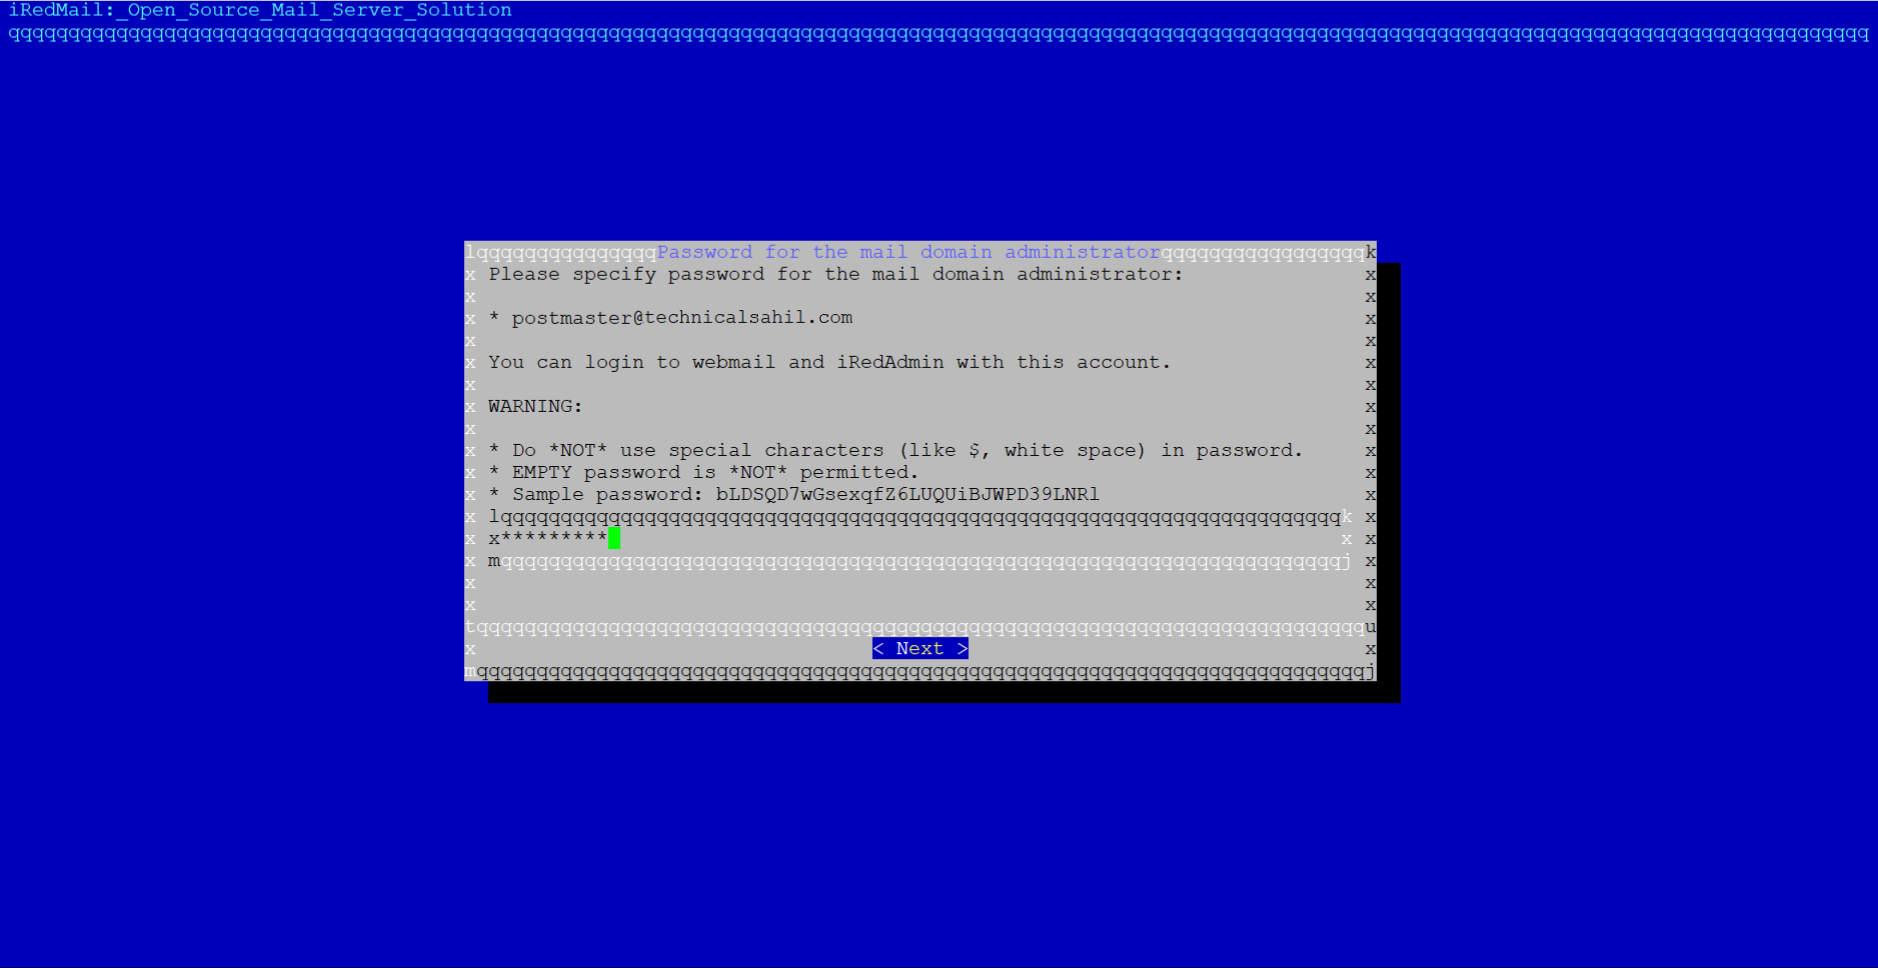
Create your new password(this will be your iredadmin as well as your email login password)

- Roundcube is a web-based IMAP email client. It’s user-friendly and includes features like full-text search, shared folders and identities, and more. With Roundcube, users can access their email through a web interface instead of having to set up a separate mail client.
- Netdata is a monitoring and troubleshooting tool for servers. It provides real-time performance and health insights for your server. With Netdata, you can monitor CPU usage, RAM consumption, network status, and other key metrics. This can help you spot issues early and keep your server running smoothly.
- iRedAdmin is the official web-based admin panel for iRedMail. It allows you to manage mail accounts, aliases, and domains. It simplifies the management of your mail server, allowing you to easily add or remove users, set up forwarding, and more.
- Fail2Ban is a security tool that helps protect your server against brute-force attacks. It works by monitoring system logs for signs of malicious activity and then updating firewall rules to block suspicious IP addresses. This can help protect your server from unauthorized access attempts.
So make sure to select all these four(by Spacebar Key) although SOGo is also an important component for a mail server setup, especially if you require additional features beyond basic email functionality. But it requires lot of server resources and this is the thing, like if your server has limited resources, you can skip this functionality.
Type Y to confirm changes, and it will start installing all the configurations you have instructed to do through prompts.
As you approach the conclusion of the installation process, the system will prompt you to modify the default SSH port (port 22) or to proceed with the existing configuration.
Press Y multiple times to proceed.
Show and Update DKIM Record
DKIM is an email authentication method that is used to detect email spoofing. It allows the receiving mail server to check if the email that claims to have come from a specific domain was indeed authorized by the owner of that domain.
When you run:
amavisd-new showkeys

It displays your DKIM keys in a format that you can directly insert into your DNS records. This is important because for DKIM to work, you need to have a specific DNS record that holds the public part of your DKIM key. The receiving mail server will use this to verify that the email was actually sent by you and hasn’t been modified during transit.

Once it shows the DKIM record, the next step is to add this to your DNS records. Click on ‘Add New Record’ and select ‘TXT Record’ from the dropdown menu. For the ‘Host’ field, enter ‘dkim._domainkey‘ to specify the DMARC TXT record. In the ‘Value’ field, paste the generated DKIM record. After entering the DKIM record, save your changes by clicking on the green checkmark.
Install SSL
Securing your iRedMail server with an SSL certificate is an essential process that helps protect your users’ data during transmission. One of the commonly used providers for SSL certificates is Let’s Encrypt, which is lauded for its cost-effectiveness (it’s free), automation, and openness.
Before we start, it’s necessary to navigate back to the root directory from the iRedMail directory (for instance, iRedmail-1.6.2). To do this, use the following command:
cd /
Next, we need to install two essential packages on your system, certbot and python3-certbot-nginx. Certbot is a free and open-source software tool that automates the process of using Let’s Encrypt to set up an SSL certificate, thereby securing your server. You can install these packages with the following command:
apt install certbot python3-certbot-nginx -y
Certbot is a free, open-source software tool that automatically uses Let’s Encrypt to set up an HTTPS (SSL) certificate to enable secure HTTP on a web server. It also can automate certificate issuance and installation with no downtime. It simplifies the process of enabling HTTPS on a server, thereby increasing the number of websites that are secured with SSL/TLS encryption.
To generate the SSL certificate, we will utilize Certbot. Running the following command initiates the process:
certbot certonly --webroot -d hostname.domain.com -w /var/www/html
Certbot will verify the domain, issue the certificate, and store it on your server. The issued certificate will then be ready for manual installation in your desired service, such as a mail or web server.
- certbot certonly: This instruction tells Certbot to acquire the certificate but not install it. This is particularly useful if you want to manually handle the installation process.
- –webroot: This option informs Certbot to use the webroot plugin for authentication. This plugin works by creating a temporary file for the requested domain in ${webroot-path}/.well-known/acme-challenge then the Let’s Encrypt validation server makes HTTP requests to validate that the DNS for your domain resolves to the server where this command is running.
- -d hostname.domain.com: Here, replace “hostname.domain.com” with the fully qualified domain name for which you’re acquiring the certificate. This could be something like “iredmail.technicalsahil.com“.
- -w /var/www/html: The -w flag specifies the webroot path, which is the root directory of your website. In this case, /var/www/html is the default webroot for many Linux distributions.
Once you have successfully obtained the SSL certificate, the next step involves configuring your server applications to use this certificate.
After obtaining the SSL certificate, we need to configure our server applications to use it. Certbot stores your SSL certificate files in a specific directory. Use the following command to list the contents of that directory:
ll /etc/letsencrypt/live/hostname.domain.com
You should see files like fullchain.pem and privkey.pem, which are the ones you’ll need to point your applications to. These are your SSL certificate files.
Open the Nginx SSL template file using a text editor (we’ll use nano in this example):
nano /etc/nginx/templates/ssl.tmpl
Find the following lines and comment them out by adding a ‘#‘ at the start of each line:
#ssl_certificate /etc/ssl/certs/iRedMail.crt;
#ssl_certificate_key /etc/ssl/private/iRedMail.key;
Below these lines, add the following:
ssl_certificate /etc/letsencrypt/live/hostname.domain.com/fullchain.pem;
ssl_certificate_key /etc/letsencrypt/live/hostname.domain.com/privkey.pem;
Save and exit the file.
Similarly, open the Postfix configuration file:
nano /etc/postfix/main.cf
Find and comment out these lines:
#smtpd_tls_key_file = /etc/ssl/private/iRedMail.key
#smtpd_tls_cert_file = /etc/ssl/certs/iRedMail.crt
#smtpd_tls_CAfile = /etc/ssl/certs/iRedMail.crt
After commenting the lines, add the following:
smtpd_tls_key_file = /etc/letsencrypt/live/hostname.domain.com/privkey.pem
smtpd_tls_cert_file = /etc/letsencrypt/live/hostname.domain.com/cert.pem
smtpd_tls_CAfile = /etc/letsencrypt/live/hostname.domain.com/chain.pem
Then save and close the file.
Next, open the Dovecot configuration file:
nano /etc/dovecot/dovecot.conf
Find and comment these lines:
#ssl_cert = </etc/ssl/certs/iRedMail.crt
#ssl_key = </etc/ssl/private/iRedMail.key
Below these, add the following lines:
ssl_cert = </etc/letsencrypt/live/hostname.domain.com/fullchain.pem
ssl_key = </etc/letsencrypt/live/hostname.domain.com/privkey.pem
Save and close the file.
With the changes made to the configuration files, you’ll need to restart the respective services for the changes to take effect.
Restart Nginx with the command:
systemctl restart nginx
Then restart Postfix:
systemctl restart postfix
Lastly, restart Dovecot:
systemctl restart dovecot
After restarting all services, it’s always a good practice to reboot your server to ensure all changes are applied properly. To do so, run:
reboot
By following these steps, you’ve secured your iRedMail server with a Let’s Encrypt SSL certificate, effectively protecting your users’ data with encrypted communication.
Access iRedMail
Once you have successfully installed iRedMail, you can access the iRedMail admin panel and Roundcube webmail interface via your web browser.
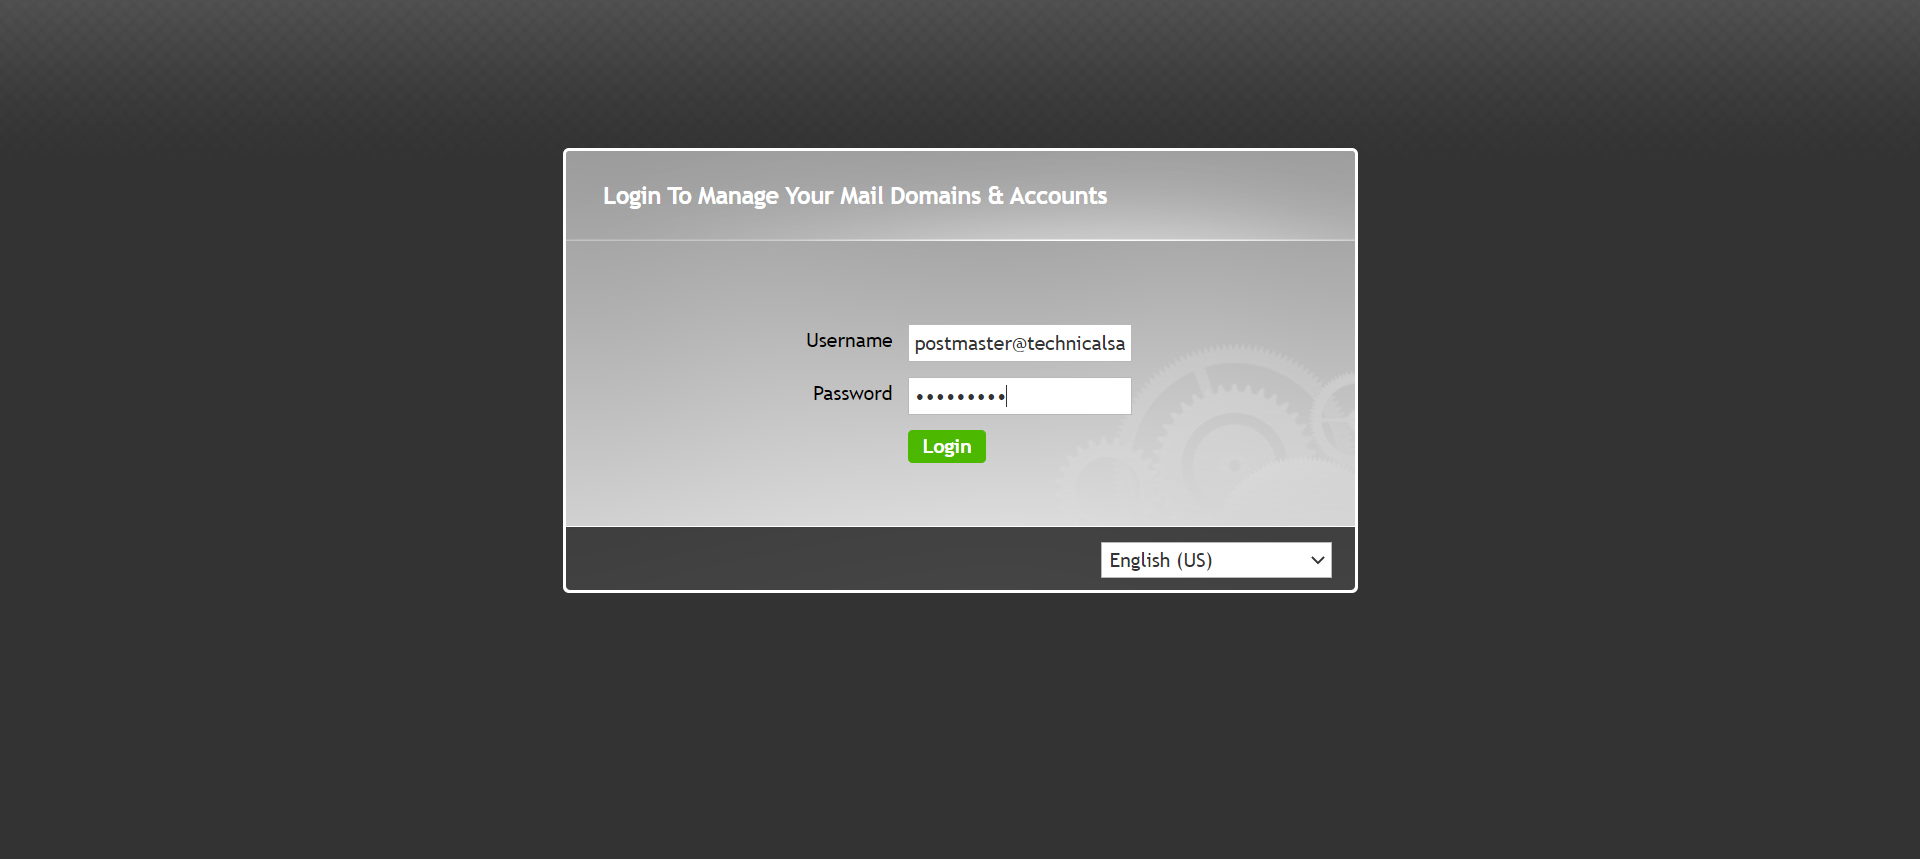
You can access the iRedMail admin panel via the following URL: https://your.fully.qualified.domain/iredadmin
Replace “your.fully.qualified.domain” with your actual FQDN of your mail server like in my case i.e, https://iredmail.technicalsahil.com/iredadmin. You will need to log in with the admin account credentials that you created during the iRedMail installation process.

Access Roundcube
Remember we have also installed Roundcube web mail client which was bundled with iRedMail? You can access it via the following URL: https://your.fully.qualified.domain/mail
Again, replace “your.fully.qualified.domain” with your actual FQDN of your mail server like in my case i.e, https://iredmail.technicalsahil.com/mail. You will need to log in with the same account credentials which we have used to login into iRedAdmin because for now we have just one email and mail domain.


Hello guys! Good article TECHNICAL SAHIL – FULL STACK DEVELOPER | SELF TAUGHT PROGRAMMER | DIGITAL ASSETS BUILDER | BUSINESS GROWTH STRATEGIST | PASSIONATE ONLINE INSTRUCTOR
мега магазин ссылка на мега тор – инновационный анонимный рынок, работающий посредством закладок моментальных магазинов, доступных в любом городе РФ и СНГ. Площадка MEGA с развитой инфраструкторой торговли и отличными продавцами и услугами. Каждому пользователю стоит посетить данный сайт mega магазин и найти для себя, что-нибудь новое и полезное. Быстрое пополнение баланса, встроенный обмен, различные способы оплаты, а также анонимность переводов. Самая надежная площадка. Обеспечивает максимальный уровень безопасности. Устройте себе феерию удовольствия и прекрасного настроения.
mega магазин
мега даркнет ссылки
зеркала мега
[url=https://xn--meg-sb-yoc.com]мега дарк нет [/url]
TECHNICAL SAHIL – FULL STACK DEVELOPER | SELF TAUGHT PROGRAMMER | DIGITAL ASSETS BUILDER | BUSINESS GROWTH STRATEGIST | PASSIONATE ONLINE INSTRUCTOR
–
Что есть на Мега? 5 000+ дилеров с разными позициями. Вы точно найдете нужный. Обменник – возможность приобрести биток на Mega, обменяв киви. Анонимные записки между клиентами Privnote. Нет необходимости использовать Telegram. Решение спорных ситуаций с модератором через «диспут». И это далеко не все. На сайте даже есть отдельная страница со всеми функциями и особенностями данного ресурса мега даркнет ссылка .
[url=https://xn--meg-sb-yc8b.com ]зеркала мега [/url]
Купить стоматологическое оборудование – только в нашем магазине вы найдете широкий ассортимент. по самым низким ценам!
[url=https://stomatologicheskoe-oborudovanie-msk.com/]стоматологический интернет магазин[/url]
стоматологическое оборудование москва – [url=http://www.stomatologicheskoe-oborudovanie-msk.com]https://www.stomatologicheskoe-oborudovanie-msk.com/[/url]
[url=http://kassirs.ru/sweb.asp?url=stomatologicheskoe-oborudovanie-msk.com]http://jump.5ch.net/?stomatologicheskoe-oborudovanie-msk.com[/url]
[url=https://www.thestreetpromo.com/klim-d3o-lp1-knee-elbow-pads-orange-open-box-2/#comment-309]Стоматологический магазин – каталог оборудования включает в себя стоматологические установки, рентгеновские аппараты, стерилизаторы, инструменты для хирургических и ортодонтических процедур, оборудование для гигиены полости рта, материалы для протезирования и многое другое.[/url] d745bf9