
If you are looking for a reliable and powerful email server that you can install and configure on your own server for sending bulk emails, Postal is a great choice, it’s an open-source email server that is designed to be easy to use and manage, and it comes with a web-based interface that allows you to easily manage your email accounts and domains.
Requirements
1. Registered Domain Name: It’s good if you already have but it’s it would be great if you yet to purchase because Namecheap is providing up to 84% off on all domain extensions, click here to avail the offer.
2. VPS w/ Open Port No 25: Because of some VPS providers don’t want their server to be used for email marketing or bulk mailing, those providers by default set port number 25 disable because they don’t want their IPs to get blacklisted. So whatever provider you choose, make sure port number 25 has enabled in your server.
Some of recommended VPS Providers for SMTP(because of their IP reputation):
- Contabo(Click here to save setup fee)
- OVH Cloud(Click here to get up to 50% off)
- Time4VPS(Click here to get up to 75% off)
- Hetzner(Click here to avail €20 free credits)
Change Hostname
First, check your hostname:
hostname -f
If you didn’t see a FQDN like subdomain.domain.com, then you need to change the hostname using the following command:
sudo hostname host.domain.extension
Where the host is anything you want. so in my case, my domain for this tutorial is technicalsahil.com, the command will look like this:
sudo hostname postal.technicalsahil.com
Update PTR Records
A PTR (Pointer) record is a type of DNS (Domain Name System) record that maps an IP address to a domain name. PTR records are used primarily for reverse DNS lookups, which allow you to resolve an IP address to a domain name.
To update PTR records, you first need to login to your server provider’s account and select that server which you want to update ptr records for. Once you have selected the server, go to Reverse DNS Management Section or IP Management section and you can edit the existing PTR record or add a new one.

Update DNS Record
To update a DNS record, you first need to login to your domain registrar panel’s account and select that domain which you want to use from your registered domain names list and go to advanced DNS.

After you have made the necessary changes to the DNS record, save the changes. The changes may take some time to propagate throughout the DNS system, so you may need to wait for sometime to see the effect.
Update Package Manager
apt-get update
Running “apt-get update” ensures that the local package index is up-to-date with the latest information from the configured repositories.
Upgrade Installed Packages
apt-get upgrade -y
Running “apt-get upgrade” ensures that the installed packages on the system are up-to-date with the latest versions available in the configured repositories. This is an important step in keeping a Debian-based system secure and up-to-date with the latest software. It is typically recommended to run “apt-get update” before running “apt-get upgrade” to ensure that the package index is up-to-date with the latest information from the repositories.
The “-y” flag stands for “yes” and it allows the upgrade process to automatically answer “yes” to any prompts that may require user intervention during the upgrade. This means that the upgrade process will run without requiring any manual intervention or confirmation from the user.
Install Docker
Related: Docker Tutorial – A Guide for Beninners
sudo apt-get install ca-certificates curl gnupg lsb-release
By installing these packages, you will be able to securely download and install software packages from the Ubuntu repositories and other third-party sources, and ensure that the software you install is authentic and has not been tampered with.
Add Docker GPG Key
sudo mkdir -m 0755 -p /etc/apt/keyrings
First we need to create a new directory named “keyrings” inside the “/etc/apt” directory by running the above command that can be used to store GPG keys used by the apt package manager. The “-p” option tells the command to create any missing parent directories, so if “/etc/apt” doesn’t already exist, it will be created as well.
The “-m 0755” option sets the directory permissions to “rwxr-xr-x”, which means that the directory owner has read, write, and execute permissions, while members of the group and other users only have read and execute permissions. This is a common permission setting for system directories.
curl -fsSL https://download.docker.com/linux/ubuntu/gpg | sudo gpg --dearmor -o /etc/apt/keyrings/docker.gpg
Then run this command to download and install the Docker GPG key, which is needed to verify the authenticity of Docker packages that are downloaded from the Docker repository. This key is added to the apt keyring, which is used by apt to verify package signatures when installing Docker packages.
Add Docker Repository
echo \
"deb [arch=$(dpkg --print-architecture) signed-by=/etc/apt/keyrings/docker.gpg] https://download.docker.com/linux/ubuntu \
$(lsb_release -cs) stable" | sudo tee /etc/apt/sources.list.d/docker.list > /dev/null
This command will set up a new repository for Docker packages in the apt package manager, which allows the system to easily download and install Docker packages using the standard apt commands.
Again Update
apt-get update
When a new package is added to a repository or an existing package is updated, the package index for that repository is updated to reflect the change. The package index is essentially a database of all available packages in the repository, along with their dependencies, versions, and other metadata.
Install Docker Engine and Container
sudo apt-get install docker-ce docker-ce-cli containerd.io docker-buildx-plugin docker-compose-plugin
This command installs the necessary packages to run Docker on a Debian-based system, along with some additional plugins that can be used to build and manage Docker images and containers more effectively.
Install Docker Compose
curl -SL https://github.com/docker/compose/releases/download/v2.16.0/docker-compose-linux-x86_64 -o /usr/local/bin/docker-compose
This command downloads the Docker Compose binary for Linux and saves it to a location where it can be accessed by users on the system. Docker Compose is a tool used to define and run multi-container Docker applications, and is typically used in conjunction with Docker Compose YAML files that describe the containers and their dependencies.
Change Permission
sudo chmod +x /usr/local/bin/docker-compose
This command sets the execute permission for the Docker Compose binary file, allowing users on the system to run it as a command in the terminal. This is necessary to use Docker Compose to manage multi-container applications on the local system.
Create Symbolic Link
sudo ln -s /usr/local/bin/docker-compose /usr/bin/docker-compose
This command creates a symbolic link from the /usr/local/bin/docker-compose file to /usr/bin/docker-compose, allowing the user to run the “docker-compose” command from any directory in the terminal. This makes it more convenient to use Docker Compose to manage multi-container applications on the local system.
Check Installation
docker compose version
When you run this command, it displays the version of Docker Compose that is currently installed on the local system. If you are not seeing the Docker Compose version in the output or encountering any error message, it means that Docker has not been installed properly. In this case, please try going through the above commands again or troubleshoot it on your level. Do not proceed without installing it properly.
Install Git
apt install git -y
This command will install the Git software package on the local system, allowing the user to use Git for version control tasks such as cloning, branching, committing, and pushing code changes to a repository.
Install Git cURL
apt install git curl jq
This command installs Git, cURL, and JQ software packages on the local system, allowing the user to perform a wide range of development and data processing tasks on the command line.
Clone Postal Helper
git clone https://postalserver.io/start/install /opt/postal/install
This command will download the Postal installation files from the Postal server and saves them in the specified directory on the local system, allowing the user to proceed with installing and configuring the Postal mail server.
sudo ln -s /opt/postal/install/bin/postal /usr/bin/postal
And this command will create a symbolic link to the Postal binary file in the “/usr/bin” directory, allowing the user to run the “postal” command from anywhere on the command line without specifying the full path to the binary file.
Install MariaDB
This command is used to create and run MariaDB inside Docker container.
docker run -d \
--name postal-mariadb \
-p 127.0.0.1:3306:3306 \
--restart always \
-e MARIADB_DATABASE=postal \
-e MARIADB_ROOT_PASSWORD=your_strong_password \
mariadb
“-d”: This is the option used to run the container in “detached” mode, which means that it runs in the background and does not attach to the current shell session.
“–name postal-mariadb”: This option specifies the name of the container that will be created, which in this case is “postal-mariadb”.
“-p 127.0.0.1:3306:3306”: This option maps the host machine’s port 3306 to the container’s port 3306, allowing external programs to connect to the database server running inside the container.
“–restart always”: This option specifies that the container should be automatically restarted if it exits or if the Docker daemon is restarted.
“-e MARIADB_DATABASE=postal”: This option sets an environment variable inside the container named “MARIADB_DATABASE” to the value “postal”. This creates a new database with the name “postal” inside the MariaDB container.
“-e MARIADB_ROOT_PASSWORD=your_strong_password”: This option sets the root password for the MariaDB container to the value “your_strong_password”. This ensures that the database server is secure and can only be accessed with the correct password.
“mariadb”: This is the name of the Docker image that will be used to create the container.
In short, the “docker run” command creates and runs a Docker container with the name “postal-mariadb”, using the “mariadb” Docker image. The container runs in the background, maps the host machine’s port 3306 to the container’s port 3306, and sets the root password and database name for the MariaDB container. This allows the user to connect to the database server running inside the container and use it for the Postal mail server.
Install RabbitMQ
It’s important to install RabbitMQ in order to process messages and distribute the loads.
docker run -d \
--name postal-rabbitmq \
-p 127.0.0.1:5672:5672 \
--restart always \
-e RABBITMQ_DEFAULT_USER=postal \
-e RABBITMQ_DEFAULT_PASS=your_strong_password \
-e RABBITMQ_DEFAULT_VHOST=postalvhost \
rabbitmq:3.8
This command will create a Docker container named “postal-rabbitmq” running the RabbitMQ image version 3.8. It maps port 5672 in the container to port 5672 on the host machine’s loopback interface (127.0.0.1), allowing external connections to the RabbitMQ service. It sets the RabbitMQ default username to “postal”, the default password to “your_strong_password”, and the default virtual host to “postalvhost”. The container is set to restart automatically always, even after system reboots.
Install Postal
postal bootstrap subdomain.domain.com
This command is used to set up the Postal SMTP server with the given subdomain and domain. The “bootstrap” command initializes the Postal server and creates the necessary databases and tables. “subdomain.domain.com” is the domain that will be used by the Postal server for sending and receiving emails(like in our case it’s postal.technicalsahil.com). This command should be run after the RabbitMQ and MariaDB containers have been started and are running.
Configure Postal
Now open the Postal server’s main configuration file in the nano text editor.
nano /opt/postal/config/postal.yml
The configuration file contains various settings for the Postal server, including database configuration, RabbitMQ configuration, SMTP settings, and more. You need to modify the settings in the file as according to your server details using the nano editor.
general:
# This can be changed to allow messages to be sent from multiple IP addresses
use_ip_pools: false

web:
# The host that the management interface will be available on
host: your.host.name
# The protocol that requests to the management interface should happen on
protocol: https

web_server:
# Specify configuration for the Postal web server
bind_address: your_server_ip
port: 5000

smtp_server:
# Specify configuration to the Postal SMTP server
port: 25

logging:
# Specify options for the logging
stdout: true

main_db:
# Specify the connection details for your MySQL database
host: 127.0.0.1
username: root
password: your_strong_password
database: postal

message_db:
# Specify the connection details for your MySQL server that will be house the
# message databases for mail servers.
host: 127.0.0.1
username: root
password: your_strong_password
prefix: postal

rabbitmq:
# Specify connection details for your RabbitMQ server
host: 127.0.0.1
username: postal
password: your_strong_password
vhost: postalvhost

dns:
# Specify the DNS records that you have configured. Refer to the documentation at
# https://github.com/atech/postal/wiki/Domains-&-DNS-Configuration for further
# information about these.
mx_records:
- mail.your_domain.com
smtp_server_hostname: postal.your_domain.com
spf_include: spf.postal.your_domain.com
return_path: rp.postal.your_domain.com
route_domain: routes.postal.your_domain.com
track_domain: track.postal.your_domain.com

smtp:
# Specify an SMTP server that can be used to send messages from the Postal management
# system to users. You can configure this to use a Postal mail server once the
# your installation has been set up.
host: 127.0.0.1
port: 2525
username: # Complete when Postal is running and you can
password: # generate the credentials within the interface.
from_name: Postal
from_address: postal@your_domain.com

rails:
# This is generated automatically by the config initialization. It should be a random
# string unique to your installation.
secret_key: 082f3b5e7e858bc2de2887e964cb137ada525dcfd337e978236be759e278367fb7c6773be625265d3d235ee98b4f8405957e4bbd1c4001f367442bf531843f690a1918626179bf297e31d5cd268c2f33339afd19b17ce901a3832bb9a8107f04bf1b702a4da16096141ed564cb13764a376b8a4c7e5550db84292dc43c9f97c
After making all the changes, Press Ctrl + X then type Y and Press Enter to save the configuration file.
Initialize Database
postal initialize
This command initializes the Postal server after the configuration file has been modified. It runs some checks and sets up the necessary database tables and indexes and also creates some default records in the database, including the Postal user account, organization, and domain.
Build Postal
postal make-user

The command prompts the user to enter the user’s full name, email address, and password. After entering these details, the command creates a new user account and assigns a randomly generated API key to the user. This API key is required to interact with the Postal API and perform various tasks, such as sending emails, managing domains, and more.
Start Postal
postal start
When you install the Postal mail server on your machine, it runs as a daemon or background service. The “postal start” command starts this daemon process, allowing the mail server to begin accepting incoming email messages and processing outgoing ones.
Check Status
postal status

You can use the “postal status” command to check the status of the Postal mail server and see whether it is running or stopped.
Install Caddy
Caddy is a lightweight and easy-to-use web server that can be used to serve static and dynamic content over HTTP/HTTPS protocols. It is designed to be simple, efficient, and secure, with automatic HTTPS support, easy configuration, and built-in features such as virtual hosting, reverse proxy, and automatic TLS certificate management.
docker run -d \
--name postal-caddy \
--restart always \
--network host \
-v /opt/postal/config/Caddyfile:/etc/caddy/Caddyfile \
-v /opt/postal/caddy-data:/data \
caddy
This command starts a new Docker container named “postal-caddy” that runs the Caddy web server, with its configuration file and data stored on the host machine and automatically restarted if it exits. The container is also connected to the host network for communication purposes.
Launch Postal
Open your web browser and visit http://subdomain.domain.com:5000 (in my case http://postal.technicalsahil.com:5000), use the admin credentials to log in. This will take you to the admin page, which will look something like this:

Setup Postal
Log in to your Postal dashboard using your web browser.

Click on “Create the first organization” and enter the name of your new organization in the “Name” field.

Then Click on “Build your first mail server” and enter a name of your mail server.
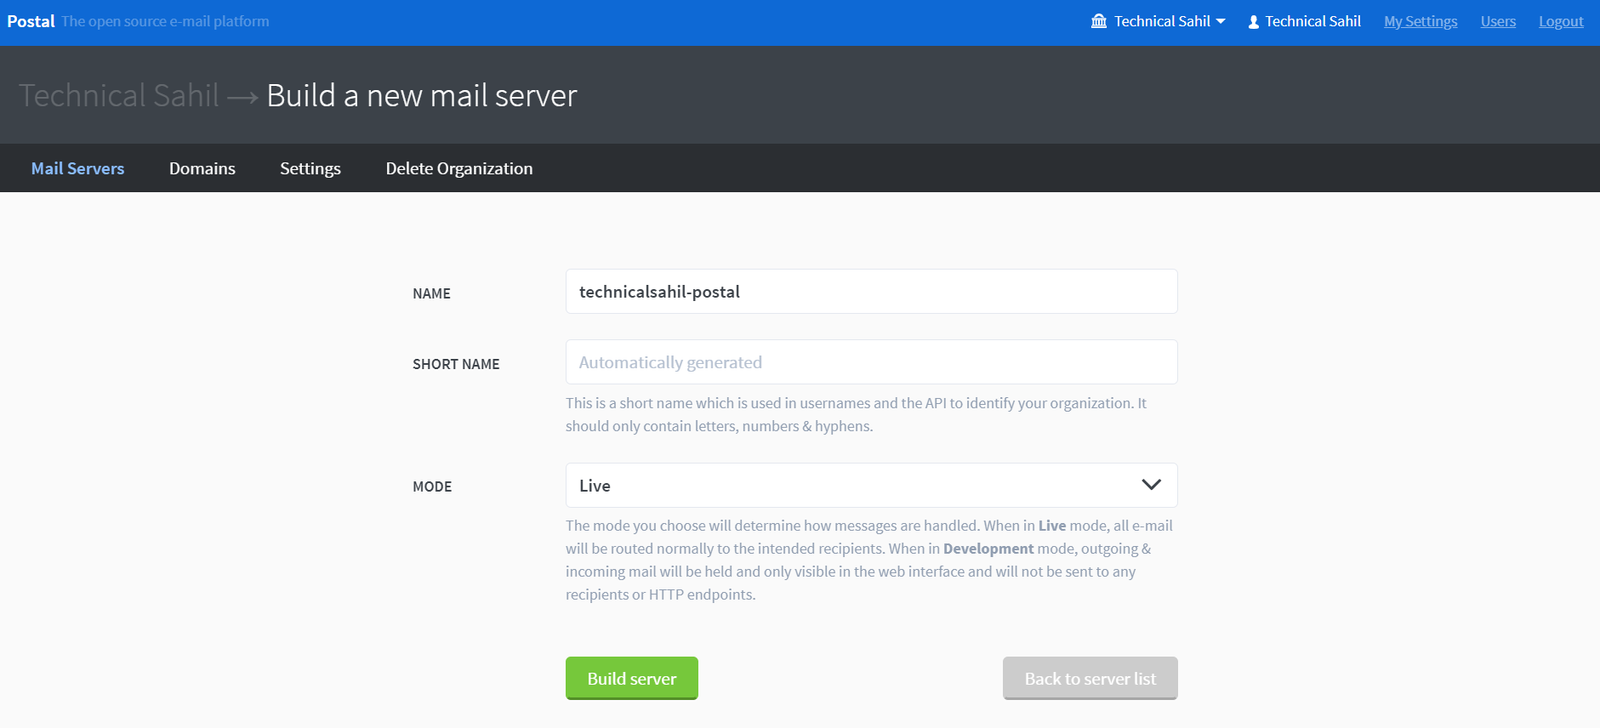
Click “Build server”.
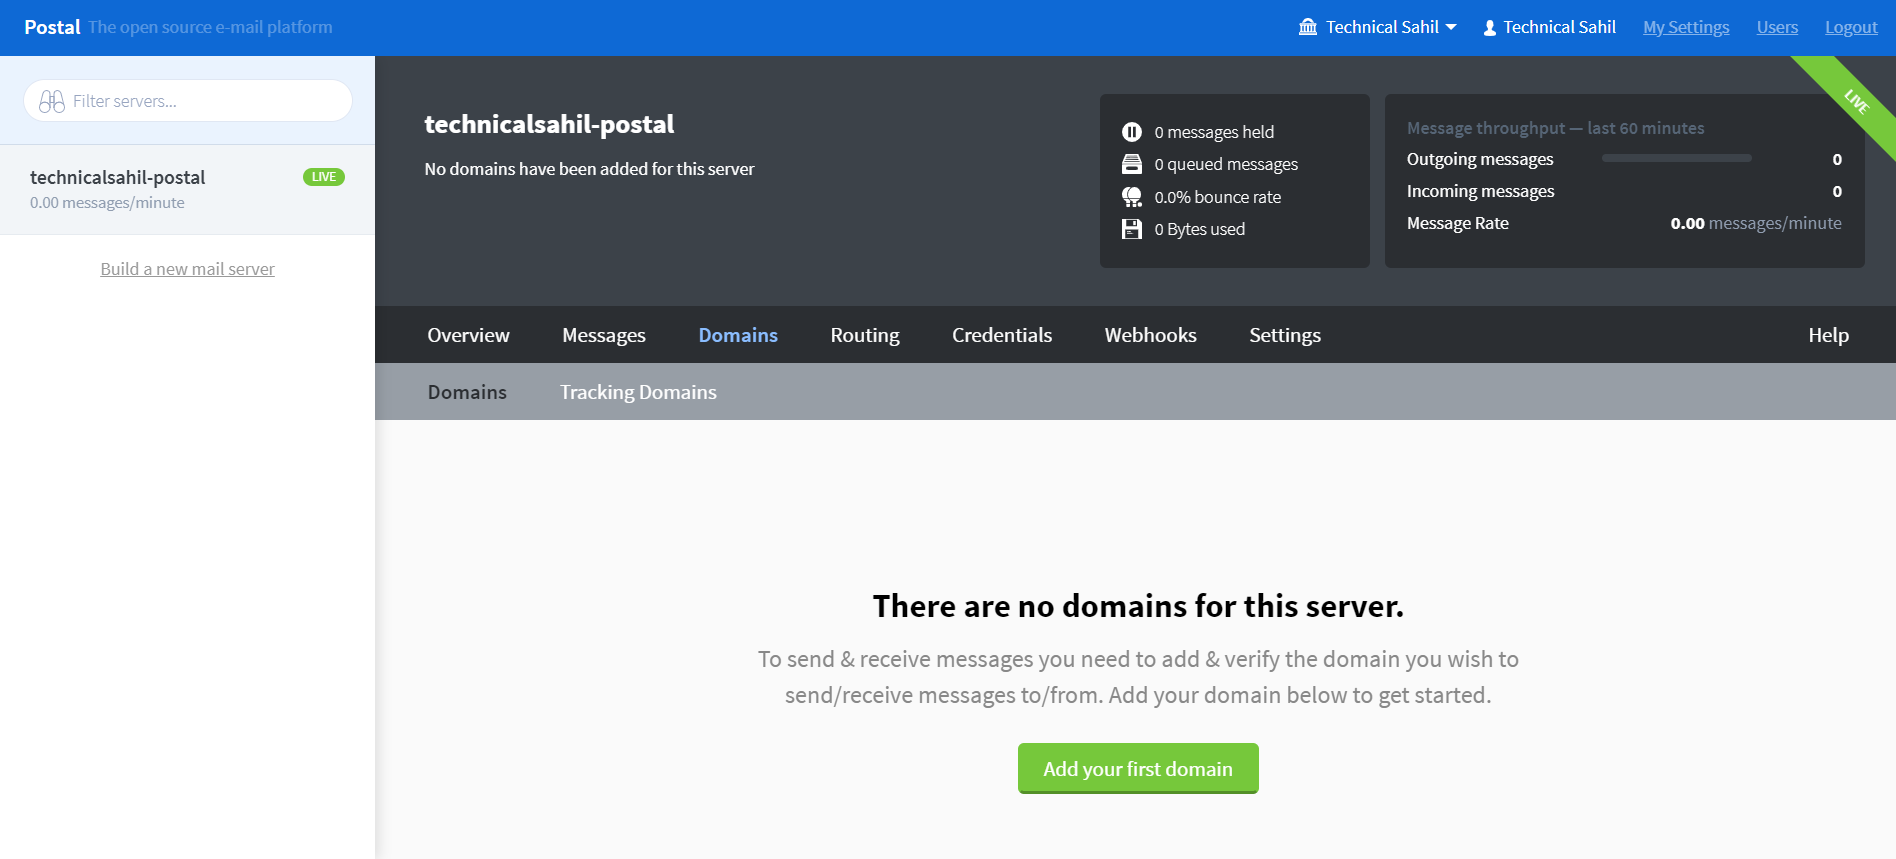
Now Click on “Domains” tab and add your first domain.
After adding domain name, you need to add SPF, DKIM MX & rDNS records. But if you want to achieve 100% inbox delivery, you need to configure DNS records in this way:
| Name | Type | Value |
|---|---|---|
| rp.your_hostname_subdomain | A | your_ipv4 |
| track.your_hostname_subdomain | A | your_ipv4 |
| psrp | CNAME | rp.your.hostname.com |
| @ | MX | 10; mail.your_domain.com |
| routes.your_hostname_subdomain | MX | 10; your_hostname_subdomain.your_domain.com |
| rp.your_hostname_subdomain | MX | 10; your_hostname_subdomain.your_domain.com |
| @ | TXT | v=spf1 a mx include:spf.your_hostname_subdomain.example.com ~all |
| rp.your_hostname_subdomain | TXT | v=spf1 a mx include:spf.mail.your_domain.com ~all |
| spf.your_hostname_subdomain | TXT | v=spf1 ip4:your_ipv4 ~all |
| postal-fcuQkc._domainkey | TXT | v=DKIM1; t=s; h=sha256; p=MIGfMA0GCSqGSIb3…; |
| _dmarc | TXT | v=DMARC1; p=reject; sp=reject; rua=mailto:postmaster@your_domain.com |

Then click “Check DNS” Button inside Postal.

If you get a message like this, this means you have successfully configured your DNS.
Now click “Credentials” tab, and create your SMTP credentials.

- SMTP Host = Your_Server_IP or Your_Hostname
- Port = 25
- Username = The name we type inside this name field i.e,(technicalsahil-postalsmtp)
- Password = Automatically generated key


hi sahim thank you very much for your effort to provide such a valuable information.
after install the smtp on your server, where to know your imap info?
how many smtps i can install on same server? note: i buy a private ip for every smtp